怎么使用Python+OpenCV实现图像识别替换功能
导读:本文共4015.5字符,通常情况下阅读需要13分钟。同时您也可以点击右侧朗读,来听本文内容。按键盘←(左) →(右) 方向键可以翻页。
摘要: OpenCV-Python是一个Python库,旨在解决计算机视觉问题。OpenCV是一个开源的计算机视觉库,1999年由英特尔的Gary Bradski启动。Bradski在访学过程中注意到,在很多优秀大学的实验室中,都有非常完备的内部公开的计算机视觉接口。这些接口从一届学生传到另一届学生,对于刚入门的新人来说,使用这些接口比重复造轮子方便多了。这些接口可以让... ...
音频解说
目录
(为您整理了一些要点),点击可以直达。OpenCV-Python是一个Python库,旨在解决计算机视觉问题。
OpenCV是一个开源的计算机视觉库,1999年由英特尔的Gary Bradski启动。Bradski在访学过程中注意到,在很多优秀大学的实验室中,都有非常完备的内部公开的计算机视觉接口。这些接口从一届学生传到另一届学生,对于刚入门的新人来说,使用这些接口比重复造轮子方便多了。这些接口可以让他们在之前的基础上更有效地开展工作。OpenCV正是基于为计算机视觉提供通用接口这一目标而被策划的。
安装opencv
pip3install-ihttps://pypi.doubanio.com/simple/opencv-python
思路:
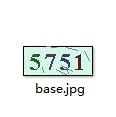
1、首先区分三张图片:
base图片代表初始化图片;
template图片代表需要在大图中匹配的图片;
white图片为需要替换的图片。
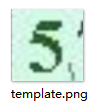

2、然后template图片逐像素缩小匹配,设定阈值,匹配度到达阈值的图片,判定为在初始图片中;否则忽略掉。
3、匹配到最大阈值的地方,返回该区域的位置(x,y)
4、然后用white图片resize到相应的大小,填补到目标区域。
match函数:
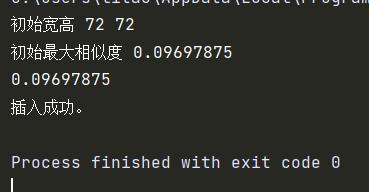
"""检查模板图片中是否包含目标图片"""defmake_cv2(photo1,photo2):globalx,y,w,h,num_1,flagstarttime=datetime.datetime.now()#读取base图片img_rgb=cv2.imread(f'{photo1}')#读取template图片template=cv2.imread(f'{photo2}')h,w=template.shape[:-1]print('初始宽高',h,w)res=cv2.matchTemplate(img_rgb,template,cv2.TM_CCOEFF_NORMED)print('初始最大相似度',res.max())threshold=res.max()""",相似度小于0.2的,不予考虑;相似度在[0.2-0.75]之间的,逐渐缩小图片"""print(threshold)whilethreshold>=0.1andthreshold<=0.83:ifw>=20andh>=20:w=w-1h=h-1template=cv2.resize(template,(w,h),interpolation=cv2.INTER_CUBIC)res=cv2.matchTemplate(img_rgb,template,cv2.TM_CCOEFF_NORMED)threshold=res.max()print('宽度:',w,'高度:',h,'相似度:',threshold)else:break"""达到0.75覆盖之前的图片"""ifthreshold>0.8:loc=np.where(res>=threshold)x=int(loc[1])y=int(loc[0])print('覆盖图片左上角坐标:',x,y)forptinzip(*loc[::-1]):cv2.rectangle(img_rgb,pt,(pt[0]+w,pt[1]+h),(255,144,51),1)num_1+=1endtime=datetime.datetime.now()print("耗时:",endtime-starttime)overlay_transparent(x,y,photo1,photo3)else:flag=Falsereplace函数:
"""将目标图片镶嵌到指定坐标位置"""defoverlay_transparent(x,y,photo1,photo3):#覆盖图片的时候上下移动的像素空间y+=4globalw,h,num_2background=cv2.imread(f'{photo1}')overlay=cv2.imread(f'{photo3}')"""缩放图片大小"""overlay=cv2.resize(overlay,(w,h),interpolation=cv2.INTER_CUBIC)background_width=background.shape[1]background_height=background.shape[0]ifx>=background_widthory>=background_height:returnbackgroundh,w=overlay.shape[0],overlay.shape[1]ifx+w>background_width:w=background_width-xoverlay=overlay[:,:w]ify+h>background_height:h=background_height-yoverlay=overlay[:h]ifoverlay.shape[2]<4:overlay=np.concatenate([overlay,np.ones((overlay.shape[0],overlay.shape[1],1),dtype=overlay.dtype)*255],axis=2,)overlay_image=overlay[...,:3]mask=overlay[...,3:]/255.0background[y:y+h,x:x+w]=(1.0-mask)*background[y:y+h,x:x+w]+mask*overlay_image#path='result'path=''cv2.imwrite(os.path.join(path,f'1.png'),background)num_2+=1print('插入成功。')init()每次执行需要初始化x,y(图片匹配初始位置参数),w,h(图片缩放初始宽高)
x=0y=0w=0h=0flag=Truethreshold=0template=''num_1=0num_2=0photo3=''"""参数初始化"""definit():globalx,y,w,h,threshold,template,flagx=0y=0w=0h=0threshold=0template=''
完整代码
importcv2importdatetimeimportosimportnumpyasnpx=0y=0w=0h=0flag=Truethreshold=0template=''num_1=0num_2=0photo3=''"""参数初始化"""definit():globalx,y,w,h,threshold,template,flagx=0y=0w=0h=0threshold=0template=''"""检查模板图片中是否包含目标图片"""defmake_cv2(photo1,photo2):globalx,y,w,h,num_1,flagstarttime=datetime.datetime.now()img_rgb=cv2.imread(f'{photo1}')template=cv2.imread(f'{photo2}')h,w=template.shape[:-1]print('初始宽高',h,w)res=cv2.matchTemplate(img_rgb,template,cv2.TM_CCOEFF_NORMED)print('初始最大相似度',res.max())threshold=res.max()""",相似度小于0.2的,不予考虑;相似度在[0.2-0.75]之间的,逐渐缩小图片"""print(threshold)whilethreshold>=0.1andthreshold<=0.83:ifw>=20andh>=20:w=w-1h=h-1template=cv2.resize(template,(w,h),interpolation=cv2.INTER_CUBIC)res=cv2.matchTemplate(img_rgb,template,cv2.TM_CCOEFF_NORMED)threshold=res.max()print('宽度:',w,'高度:',h,'相似度:',threshold)else:break"""达到0.75覆盖之前的图片"""ifthreshold>0.8:loc=np.where(res>=threshold)x=int(loc[1])y=int(loc[0])print('覆盖图片左上角坐标:',x,y)forptinzip(*loc[::-1]):cv2.rectangle(img_rgb,pt,(pt[0]+w,pt[1]+h),(255,144,51),1)num_1+=1endtime=datetime.datetime.now()print("耗时:",endtime-starttime)overlay_transparent(x,y,photo1,photo3)else:flag=False"""将目标图片镶嵌到指定坐标位置"""defoverlay_transparent(x,y,photo1,photo3):y+=0globalw,h,num_2background=cv2.imread(f'{photo1}')overlay=cv2.imread(f'{photo3}')"""缩放图片大小"""overlay=cv2.resize(overlay,(w,h),interpolation=cv2.INTER_CUBIC)background_width=background.shape[1]background_height=background.shape[0]ifx>=background_widthory>=background_height:returnbackgroundh,w=overlay.shape[0],overlay.shape[1]ifx+w>background_width:w=background_width-xoverlay=overlay[:,:w]ify+h>background_height:h=background_height-yoverlay=overlay[:h]ifoverlay.shape[2]<4:overlay=np.concatenate([overlay,np.ones((overlay.shape[0],overlay.shape[1],1),dtype=overlay.dtype)*255],axis=2,)overlay_image=overlay[...,:3]mask=overlay[...,3:]/255.0background[y:y+h,x:x+w]=(1.0-mask)*background[y:y+h,x:x+w]+mask*overlay_image#path='result'path=''cv2.imwrite(os.path.join(path,f'1.png'),background)num_2+=1print('插入成功。')init()if__name__=="__main__":photo1="1.png"photo2="3.png"photo3="white.png"whileflag==True:make_cv2(photo1,photo2)overlay_transparent(x,y,photo1,photo3)执行结果:
</div> <div class="zixun-tj-product adv-bottom"></div> </div> </div> <div class="prve-next-news">本文:
怎么使用Python+OpenCV实现图像识别替换功能的详细内容,希望对您有所帮助,信息来源于网络。