怎么在IDEA中使用SpringBoot+MyBatis+MySql实现一个动态登录与注册功能
导读:本文共7347字符,通常情况下阅读需要24分钟。同时您也可以点击右侧朗读,来听本文内容。按键盘←(左) →(右) 方向键可以翻页。
摘要: 一、搭建SpringBoot项目1.1、file ——> new ——> project——> Spring Initializr——> next——> next——> next——> finish注意选择包依赖关系二、springboot整合mybatis.mysql2.1、整体结构2.2、设置所需要的依赖即pom.x... ...
目录
(为您整理了一些要点),点击可以直达。一、搭建SpringBoot项目
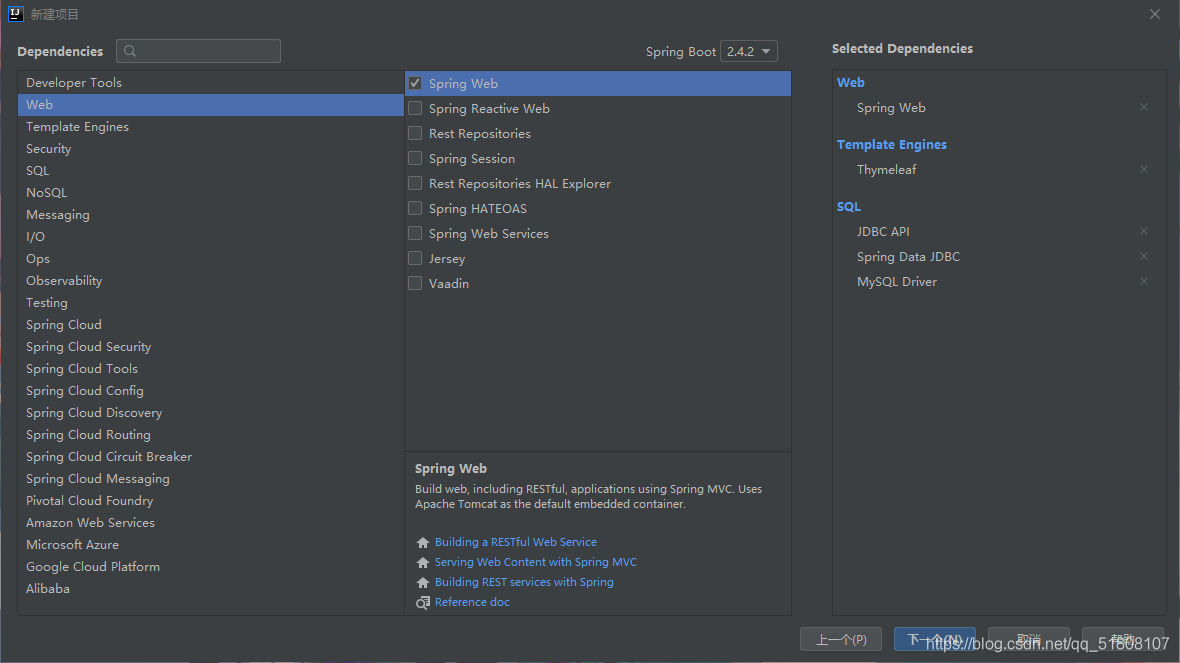
1.1、file ——> new ——> project——> Spring Initializr——> next——> next——> next——> finish
注意选择包依赖关系
二、springboot整合mybatis.mysql
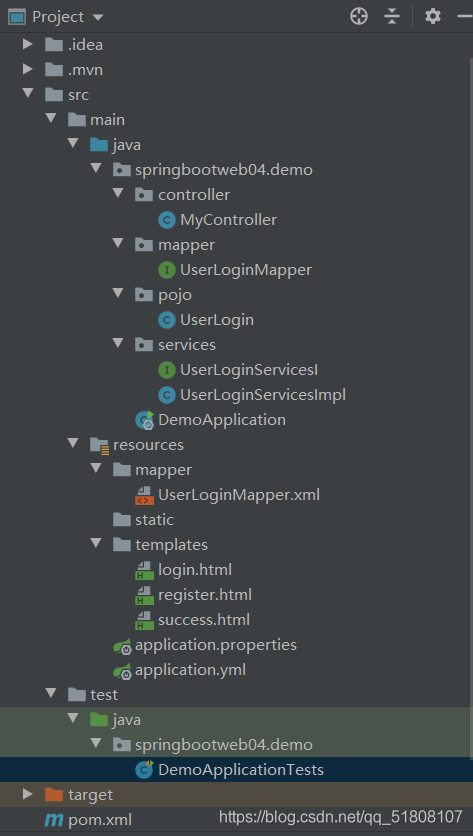
2.1、整体结构
2.2、设置所需要的依赖
即pom.xml文件
<?xmlversion="1.0"encoding="UTF-8"?><projectxmlns="http://maven.apache.org/POM/4.0.0"xmlns:xsi="http://www.w3.org/2001/XMLSchema-instance"xsi:schemaLocation="http://maven.apache.org/POM/4.0.0https://maven.apache.org/xsd/maven-4.0.0.xsd"><modelVersion>4.0.0</modelVersion><parent><groupId>org.springframework.boot</groupId><artifactId>spring-boot-starter-parent</artifactId><version>2.4.2</version><relativePath/><!--lookupparentfromrepository--></parent><groupId>springboot-web04</groupId><artifactId>demo</artifactId><version>0.0.1-SNAPSHOT</version><name>demo</name><description>DemoprojectforSpringBoot</description><properties><java.version>1.8</java.version></properties><dependencies><dependency><groupId>org.springframework.boot</groupId><artifactId>spring-boot-starter-data-jdbc</artifactId></dependency><dependency><groupId>org.springframework.boot</groupId><artifactId>spring-boot-starter-jdbc</artifactId></dependency><dependency><groupId>org.springframework.boot</groupId><artifactId>spring-boot-starter-thymeleaf</artifactId></dependency><dependency><groupId>org.springframework.boot</groupId><artifactId>spring-boot-starter-web</artifactId></dependency><dependency><groupId>mysql</groupId><artifactId>mysql-connector-java</artifactId><scope>runtime</scope></dependency><dependency><groupId>org.springframework.boot</groupId><artifactId>spring-boot-starter-test</artifactId><scope>test</scope></dependency><!--下面的都是我加的--><dependency><groupId>org.springframework.boot</groupId><artifactId>spring-boot-starter-jdbc</artifactId></dependency><dependency><groupId>org.springframework.boot</groupId><artifactId>spring-boot-starter-thymeleaf</artifactId></dependency><dependency><groupId>org.springframework.boot</groupId><artifactId>spring-boot-starter-web</artifactId></dependency><dependency><groupId>org.mybatis.spring.boot</groupId><artifactId>mybatis-spring-boot-starter</artifactId><version>2.1.3</version></dependency><dependency><groupId>mysql</groupId><artifactId>mysql-connector-java</artifactId></dependency><dependency><groupId>org.projectlombok</groupId><artifactId>lombok</artifactId><version>1.18.12</version><scope>provided</scope></dependency><dependency><groupId>com.alibaba</groupId><artifactId>druid</artifactId><version>1.2.1</version></dependency><dependency><groupId>org.springframework.boot</groupId><artifactId>spring-boot-starter-test</artifactId><scope>test</scope><exclusions><exclusion><groupId>org.junit.vintage</groupId><artifactId>junit-vintage-engine</artifactId></exclusion></exclusions></dependency><dependency><groupId>org.xmlunit</groupId><artifactId>xmlunit-core</artifactId></dependency><dependency><groupId>org.mybatis</groupId><artifactId>mybatis</artifactId><version>3.4.6</version></dependency></dependencies><build><plugins><plugin><groupId>org.springframework.boot</groupId><artifactId>spring-boot-maven-plugin</artifactId></plugin></plugins></build></project>
2.3、设置application.yml文件与pplication.properties文件
在resources目录下新建yml文件,用于存放数据库连接需要的一些数据
spring:datasource:driver-class-name:com.mysql.cj.jdbc.Driverurl:jdbc:mysql://localhost:3306/mybatis?serverTimezone=GMT%2B8&useSSL=trueusername:root//数据库password:sm1208//密码
在application.properties文件中加入
#端口号server.port=8080#druid数据库连接池type=com.alibaba.druid.pool.DruidDataSource#清除缓存spring.thymeleaf.cache=false#配置mappermybatis.mapper-locations=classpath:mapper/*.xml
2.4、在pojo下的新建类UserLogin
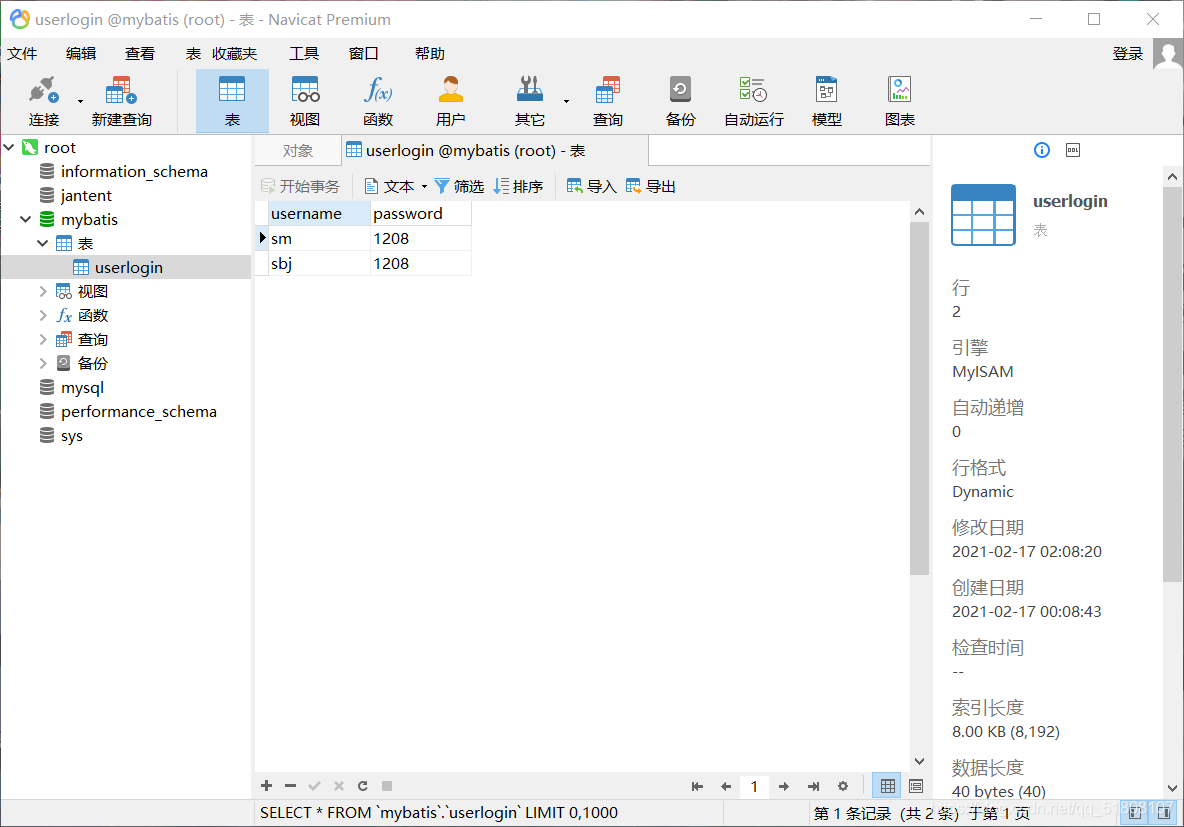
packagespringbootweb04.demo.pojo;importlombok.AllArgsConstructor;importlombok.Data;importlombok.NoArgsConstructor;@Data@AllArgsConstructor@NoArgsConstructorpublicclassUserLogin{privateStringusername;privateStringpassword;publicStringgetUsername(){returnusername;}}2.5、新建数据库,名为mybatis,创建用户表,名为userLogin,创建username、password字段
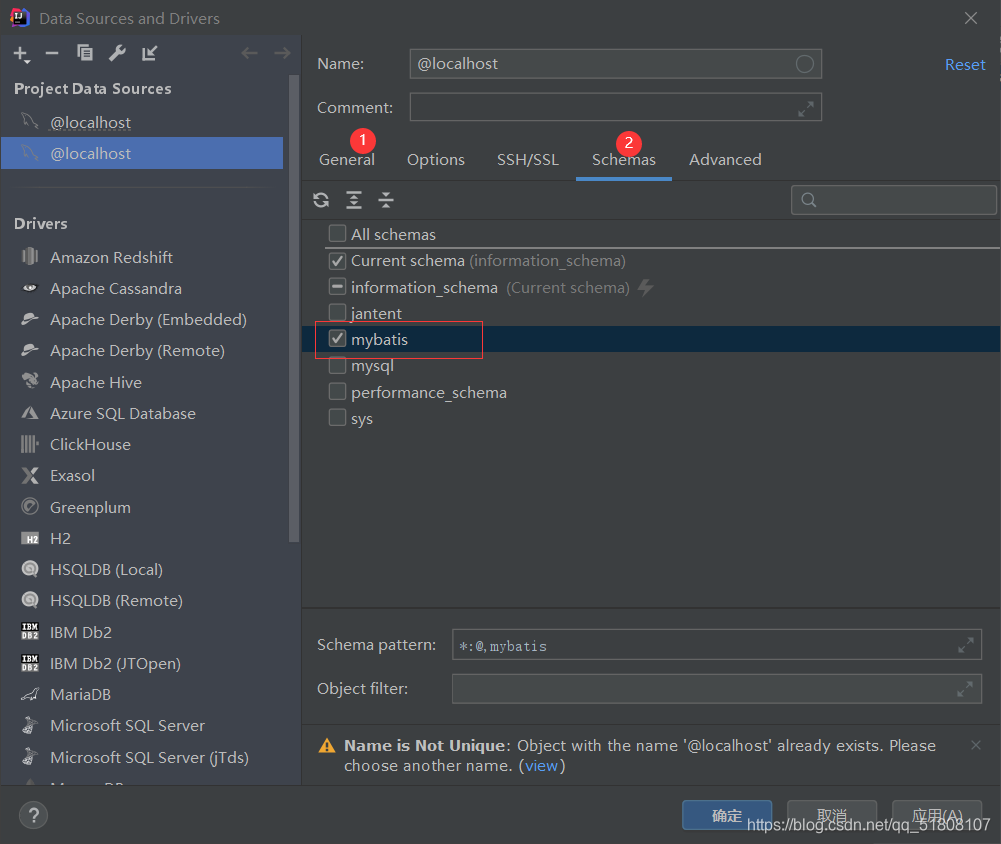
2.5.1、数据库名可以随意,不过要与application.yml文件中的一致
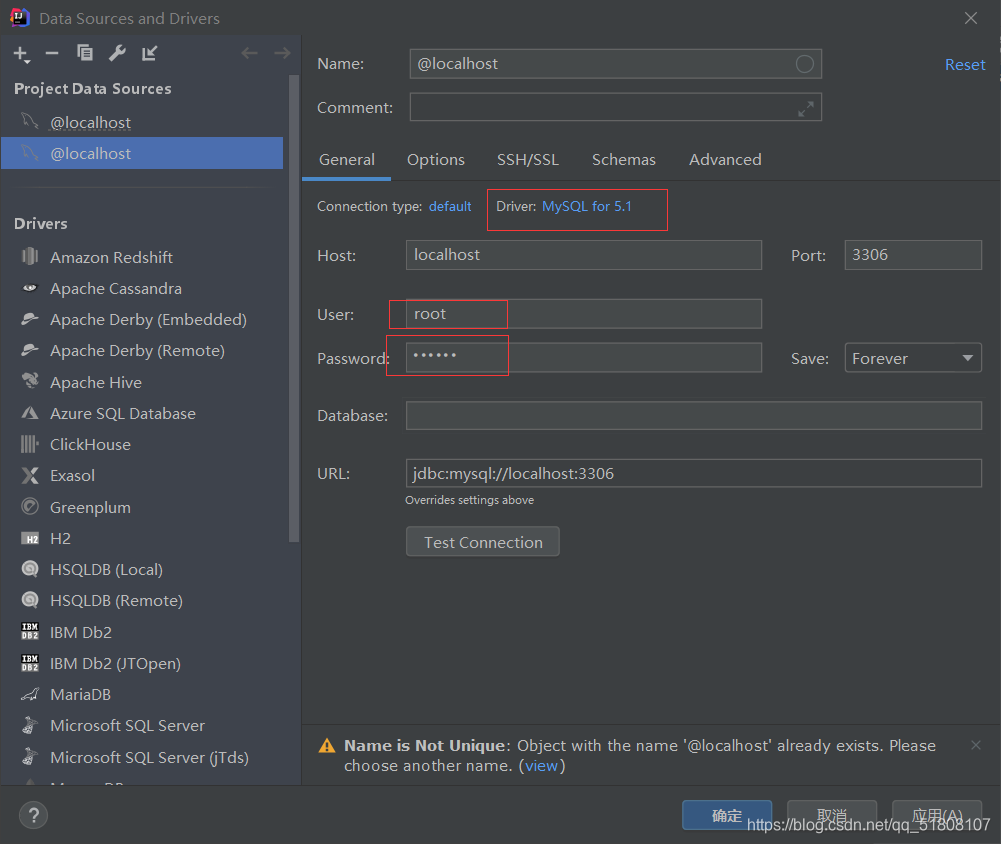
2.5.2、IDEA中连接数据库
Database——> +——> Data Source——> Mysql
2.6、mapper层
新建UserLoginMapper接口
packagespringbootweb04.demo.mapper;importorg.apache.ibatis.annotations.Mapper;importorg.springframework.stereotype.Repository;importspringbootweb04.demo.pojo.UserLogin;importjava.util.List;@Mapper@RepositorypublicinterfaceUserLoginMapper{//查询publicList<UserLogin>queryAll();//添加数据publicintadd(UserLoginuserLogin);//根据用户名查询数据publicUserLoginqueryByName(Stringusername);}2.7、resources目录下的mapper目录
在resources目录下新建mapper目录,并在这个目录下新建UserLoginMapper.xml文件
<?xmlversion="1.0"encoding="UTF-8"?><!DOCTYPEmapperPUBLIC"-//mybatis.org//DTDMapper3.0//EN""http://mybatis.org/dtd/mybatis-3-mapper.dtd"><mappernamespace="springbootweb04.demo.mapper.UserLoginMapper"><selectid="queryAll"resultType="springbootweb04.demo.pojo.UserLogin">select*fromuserLogin</select><insertid="add"parameterType="springbootweb04.demo.pojo.UserLogin">insertintouserLoginvalues(#{username},#{password})</insert><selectid="queryByName"resultType="springbootweb04.demo.pojo.UserLogin">select*fromuserLoginwhereusername=#{username}</select></mapper>2.8、测试
在test.Java.springbootweb04.demo类中,测试是否能联通数据库,没有报错说明成功。
packagespringbootweb04.demo;importorg.junit.jupiter.api.Test;importorg.springframework.boot.test.context.SpringBootTest;importspringbootweb04.demo.mapper.UserLoginMapper;importspringbootweb04.demo.pojo.UserLogin;importorg.springframework.beans.factory.annotation.Autowired;importjavax.sql.DataSource;importjava.sql.Connection;importjava.sql.SQLException;importjava.util.List;@SpringBootTestclassDemoApplicationTests{@AutowiredDataSourcedataSource;@TestvoidcontextLoads()throwsSQLException{System.out.println(dataSource.getClass());Connectionconnection=dataSource.getConnection();System.out.println(connection);//template模板,拿来即用connection.close();}@AutowiredUserLoginMapperuserLoginMapper;@TestpublicvoidtoTest(){List<UserLogin>userLogins=userLoginMapper.queryAll();userLogins.forEach(e->System.out.println(e));}}2.9、services层
在services下新建接口UserLoginServicesI和类UserLoginServicesImpl
UserLoginServicesI接口:
packagespringbootweb04.demo.services;importspringbootweb04.demo.pojo.UserLogin;importjava.util.List;publicinterfaceUserLoginServicesI{//查询publicList<UserLogin>queryAll();//添加数据publicintadd(UserLoginuserLogin);//根据用户名查询数据publicUserLoginqueryByName(Stringusername);}UserLoginServicesImpl类
packagespringbootweb04.demo.services;importspringbootweb04.demo.mapper.UserLoginMapper;importspringbootweb04.demo.pojo.UserLogin;importorg.springframework.beans.factory.annotation.Autowired;importorg.springframework.stereotype.Service;importjava.util.List;@ServicepublicclassUserLoginServicesImplimplementsUserLoginServicesI{@AutowiredUserLoginMapperuserLoginMapper;@OverridepublicList<UserLogin>queryAll(){returnuserLoginMapper.queryAll();}@Overridepublicintadd(UserLoginuserLogin){returnuserLoginMapper.add(userLogin);}@OverridepublicUserLoginqueryByName(Stringusername){returnuserLoginMapper.queryByName(username);}}2.A、conteoller层
编写MyController类
packagespringbootweb04.demo.controller;importspringbootweb04.demo.pojo.UserLogin;importspringbootweb04.demo.services.UserLoginServicesImpl;importorg.springframework.beans.factory.annotation.Autowired;importorg.springframework.stereotype.Controller;importorg.springframework.ui.Model;importorg.springframework.web.bind.annotation.RequestMapping;@ControllerpublicclassMyController{@AutowiredUserLoginServicesImpluserLoginServicesImpl;@RequestMapping("/toLogin")publicStringtoLogin(){return"login";}@RequestMapping("/LoginSuccess")publicStringLoginSuccess(Modelmodel,UserLoginuserLogin){//先查询看该用户名是否存在UserLoginuserLogin1=userLoginServicesImpl.queryByName(userLogin.getUsername());if(userLogin1!=null){//如果查询的用户不为空System.out.println(userLogin1.toString());return"success";}else{//返回到登录页面model.addAttribute("data","该用户不存在,请先注册");return"login";}}//登录界面@RequestMapping("/toRegister")publicStringtoRegister(){return"register";}@RequestMapping("/RegisterSuccess")publicStringtoRegisterSuccess(Modelmodel,UserLoginuserLogin){//将账号密码加入到数据库中intadd=userLoginServicesImpl.add(userLogin);System.out.println("数据插入成功!");model.addAttribute("data","注册成功,请登录!");return"login";}}三、编写前端页面
将以下三个页面放在templates下面
login.html:登录页面
<!DOCTYPEhtml><htmllang="en"xmlns:th="http://www.thymeleaf.org"><head><metacharset="UTF-8"><title>Title</title></head><body><divalign="center"><br><br><h3>登录界面</h3><br><br><spanth:text="${data}"></span><formmethod="get"action="/LoginSuccess">用户名:<inputtype="text"name="username"placeholder="请输入用户名"required/><br><br>密码:<inputtype="text"name="password"placeholder="请输入密码"required/><br><br><inputtype="submit"value="登录"></form><br><formmethod="get"action="/toRegister"><inputtype="submit"value="注册"></form></div></body></html>register.html:注册页面
<!DOCTYPEhtml><htmllang="en"xmlns:th="http://www.thymeleaf.org"><head><metacharset="UTF-8"><title>Title</title></head><body><divalign="center"><br><br>注册界面<br><br><formmethod="get"action="/RegisterSuccess">用户名:<inputtype="text"name="username"placeholder="请输入用户名"required/><br><br>密码:<inputtype="text"name="password"placeholder="请输入密码"required/><br><br>确认密码:<inputtype="text"name="password2"placeholder="请输入密码"required/><br><br><inputtype="submit"value="注册"></form></div></body></html>
success.html:成功界面
<!DOCTYPEhtml><htmllang="en"><head><metacharset="UTF-8"><title>Title</title></head><body></body></html>
</div> <div class="zixun-tj-product adv-bottom"></div> </div> </div> <div class="prve-next-news">怎么在IDEA中使用SpringBoot+MyBatis+MySql实现一个动态登录与注册功能的详细内容,希望对您有所帮助,信息来源于网络。