golang的基础运用
导读:本文共25154字符,通常情况下阅读需要84分钟。同时您也可以点击右侧朗读,来听本文内容。按键盘←(左) →(右) 方向键可以翻页。
摘要: Go语言Go(又称Golang)是Google开发的一种静态强类型、编译型、并发型,并具有垃圾回收功能的编程语言。罗伯特·格瑞史莫(Robert Griesemer),罗勃·派克(Rob Pike)及肯·汤普逊(Ken Thompson)于2007年9月开始设计Go,稍后Ian Lance Taylor、Russ Cox加入项目。Go是基于Inferno操作系统... ...
目录
(为您整理了一些要点),点击可以直达。Go语言
Go(又称Golang)是Google开发的一种静态强类型、编译型、并发型,并具有垃圾回收功能的编程语言。
罗伯特·格瑞史莫(Robert Griesemer),罗勃·派克(Rob Pike)及肯·汤普逊(Ken Thompson)于2007年9月开始设计Go,稍后Ian Lance Taylor、Russ Cox加入项目。Go是基于Inferno操作系统所开发的。Go于2009年11月正式宣布推出,成为开放源代码项目,并在Linux及Mac OS X平台上进行了实现,后来追加了Windows系统下的实现。在2016年,Go被软件评价公司TIOBE 选为“TIOBE 2016 年最佳语言”。 目前,Go每半年发布一个二级版本(即从a.x升级到a.y)。
Interfaces
Go 在类型和接口上的思考是:
Type System
Go 的类型系统是比较容易和 C++/Java 混淆的,特别是习惯于类体系和虚函数的思路后,很容易想在 Go 走这个路子,可惜是走不通的。而 interface 因为太过于简单,而且和 C++/Java 中的概念差异不是特别明显,所以本章节专门分析 Go 的类型系统。
先看一个典型的问题Is it possible to call overridden method from parent struct in golang?代码如下所示:
package mainimport ( "fmt")type A struct {}func (a *A) Foo() { fmt.Println("A.Foo()")}func (a *A) Bar() { a.Foo()}type B struct { A}func (b *B) Foo() { fmt.Println("B.Foo()")}func main() { b := B{A: A{}} b.Bar()}本质上它是一个模板方法模式 (TemplateMethodPattern),A 的 Bar 调用了虚函数 Foo,期待子类重写虚函数 Foo,这是典型的 C++/Java 解决问题的思路。
我们借用模板方法模式 (TemplateMethodPattern)中的例子,考虑实现一个跨平台编译器,提供给用户使用的函数是crossCompile,而这个函数调用了两个模板方法collectSource和compileToTarget:
public abstract class CrossCompiler { public final void crossCompile() { collectSource(); compileToTarget(); } //Template methods protected abstract void collectSource(); protected abstract void compileToTarget();}C 版,不用 OOAD 思维参考 C: CrossCompiler use StateMachine,代码如下所示:
// g++ compiler.cpp -o compiler && ./compiler#include <stdio.h>void beforeCompile() { printf("Before compile\n");}void afterCompile() { printf("After compile\n");}void collectSource(bool isIPhone) { if (isIPhone) { printf("IPhone: Collect source\n"); } else { printf("Android: Collect source\n"); }}void compileToTarget(bool isIPhone) { if (isIPhone) { printf("IPhone: Compile to target\n"); } else { printf("Android: Compile to target\n"); }}void IDEBuild(bool isIPhone) { beforeCompile(); collectSource(isIPhone); compileToTarget(isIPhone); afterCompile();}int main(int argc, char** argv) { IDEBuild(true); //IDEBuild(false); return 0;}C 版本使用 OOAD 思维,可以参考 C: CrossCompiler,代码如下所示:
// g++ compiler.cpp -o compiler && ./compiler#include <stdio.h>class CrossCompiler {public: void crossCompile() { beforeCompile(); collectSource(); compileToTarget(); afterCompile(); }private: void beforeCompile() { printf("Before compile\n"); } void afterCompile() { printf("After compile\n"); }// Template methods.public: virtual void collectSource() = 0; virtual void compileToTarget() = 0;};class IPhoneCompiler : public CrossCompiler {public: void collectSource() { printf("IPhone: Collect source\n"); } void compileToTarget() { printf("IPhone: Compile to target\n"); }};class AndroidCompiler : public CrossCompiler {public: void collectSource() { printf("Android: Collect source\n"); } void compileToTarget() { printf("Android: Compile to target\n"); }};void IDEBuild(CrossCompiler* compiler) { compiler->crossCompile();}int main(int argc, char** argv) { IDEBuild(new IPhoneCompiler()); //IDEBuild(new AndroidCompiler()); return 0;}我们可以针对不同的平台实现这个编译器,比如 Android 和 iPhone:
public class IPhoneCompiler extends CrossCompiler { protected void collectSource() { //anything specific to this class } protected void compileToTarget() { //iphone specific compilation }}public class AndroidCompiler extends CrossCompiler { protected void collectSource() { //anything specific to this class } protected void compileToTarget() { //android specific compilation }}在 C++/Java 中能够完美的工作,但是在 Go 中,使用结构体嵌套只能这么实现,让 IPhoneCompiler 和 AndroidCompiler 内嵌 CrossCompiler,参考 Go: TemplateMethod,代码如下所示:
package mainimport ( "fmt")type CrossCompiler struct {}func (v CrossCompiler) crossCompile() { v.collectSource() v.compileToTarget()}func (v CrossCompiler) collectSource() { fmt.Println("CrossCompiler.collectSource")}func (v CrossCompiler) compileToTarget() { fmt.Println("CrossCompiler.compileToTarget")}type IPhoneCompiler struct { CrossCompiler}func (v IPhoneCompiler) collectSource() { fmt.Println("IPhoneCompiler.collectSource")}func (v IPhoneCompiler) compileToTarget() { fmt.Println("IPhoneCompiler.compileToTarget")}type AndroidCompiler struct { CrossCompiler}func (v AndroidCompiler) collectSource() { fmt.Println("AndroidCompiler.collectSource")}func (v AndroidCompiler) compileToTarget() { fmt.Println("AndroidCompiler.compileToTarget")}func main() { iPhone := IPhoneCompiler{} iPhone.crossCompile()}执行结果却让人手足无措:
# ExpectIPhoneCompiler.collectSourceIPhoneCompiler.compileToTarget# OutputCrossCompiler.collectSourceCrossCompiler.compileToTargetGo 并没有支持类继承体系和多态,Go 是面向对象却不是一般所理解的那种面向对象,用老子的话说“道可道,非常道”。
实际上在 OOAD 中,除了类继承之外,还有另外一个解决问题的思路就是组合 Composition,面向对象设计原则中有个很重要的就是The Composite Reuse Principle (CRP),Favor delegation over inheritance as a reuse mechanism,重用机制应该优先使用组合(代理)而不是类继承。类继承会丧失灵活性,而且访问的范围比组合要大;组合有很高的灵活性,另外组合使用另外对象的接口,所以能获得最小的信息。
C++ 如何使用组合代替继承实现模板方法?可以考虑让 CrossCompiler 使用其他的类提供的服务,或者说使用接口,比如CrossCompiler依赖于ICompiler:
public interface ICompiler { //Template methods protected abstract void collectSource(); protected abstract void compileToTarget();}public abstract class CrossCompiler { public ICompiler compiler; public final void crossCompile() { compiler.collectSource(); compiler.compileToTarget(); }}C 版本可以参考 C: CrossCompiler use Composition,代码如下所示:
// g++ compiler.cpp -o compiler && ./compiler#include <stdio.h>class ICompiler {// Template methods.public: virtual void collectSource() = 0; virtual void compileToTarget() = 0;};class CrossCompiler {public: CrossCompiler(ICompiler* compiler) : c(compiler) { } void crossCompile() { beforeCompile(); c->collectSource(); c->compileToTarget(); afterCompile(); }private: void beforeCompile() { printf("Before compile\n"); } void afterCompile() { printf("After compile\n"); } ICompiler* c;};class IPhoneCompiler : public ICompiler {public: void collectSource() { printf("IPhone: Collect source\n"); } void compileToTarget() { printf("IPhone: Compile to target\n"); }};class AndroidCompiler : public ICompiler {public: void collectSource() { printf("Android: Collect source\n"); } void compileToTarget() { printf("Android: Compile to target\n"); }};void IDEBuild(CrossCompiler* compiler) { compiler->crossCompile();}int main(int argc, char** argv) { IDEBuild(new CrossCompiler(new IPhoneCompiler())); //IDEBuild(new CrossCompiler(new AndroidCompiler())); return 0;}我们可以针对不同的平台实现这个ICompiler,比如 Android 和 iPhone。这样从继承的类体系,变成了更灵活的接口的组合,以及对象直接服务的调用:
public class IPhoneCompiler implements ICompiler { protected void collectSource() { //anything specific to this class } protected void compileToTarget() { //iphone specific compilation }}public class AndroidCompiler implements ICompiler { protected void collectSource() { //anything specific to this class } protected void compileToTarget() { //android specific compilation }}在 Go 中,推荐用组合和接口,小的接口,大的对象。这样有利于只获得自己应该获取的信息,或者不会获得太多自己不需要的信息和函数,参考Clients should not be forced to depend on methods they do not use. –Robert C. Martin,以及The bigger the interface, the weaker the abstraction, Rob Pike。关于面向对象的原则在 Go 中的体现,参考Go: SOLID或中文版 Go: SOLID。
先看如何使用 Go 的思路实现前面的例子,跨平台编译器,Go Composition: Compiler,代码如下所示:
package mainimport ( "fmt")type SourceCollector interface { collectSource()}type TargetCompiler interface { compileToTarget()}type CrossCompiler struct { collector SourceCollector compiler TargetCompiler}func (v CrossCompiler) crossCompile() { v.collector.collectSource() v.compiler.compileToTarget()}type IPhoneCompiler struct {}func (v IPhoneCompiler) collectSource() { fmt.Println("IPhoneCompiler.collectSource")}func (v IPhoneCompiler) compileToTarget() { fmt.Println("IPhoneCompiler.compileToTarget")}type AndroidCompiler struct {}func (v AndroidCompiler) collectSource() { fmt.Println("AndroidCompiler.collectSource")}func (v AndroidCompiler) compileToTarget() { fmt.Println("AndroidCompiler.compileToTarget")}func main() { iPhone := IPhoneCompiler{} compiler := CrossCompiler{iPhone, iPhone} compiler.crossCompile()}这个方案中,将两个模板方法定义成了两个接口,CrossCompiler使用了这两个接口,因为本质上 C++/Java 将它的函数定义为抽象函数,意思也是不知道这个函数如何实现。而IPhoneCompiler和AndroidCompiler并没有继承关系,而它们两个实现了这两个接口,供CrossCompiler使用;也就是它们之间的关系,从之前的强制绑定,变成了组合。
type SourceCollector interface { collectSource()}type TargetCompiler interface { compileToTarget()}type CrossCompiler struct { collector SourceCollector compiler TargetCompiler}func (v CrossCompiler) crossCompile() { v.collector.collectSource() v.compiler.compileToTarget()}Rob Pike 在Go Language: Small and implicit中描述 Go 的类型和接口,第 29 页说:
隐式实现接口有个很好的作用,就是两个类似的模块实现同样的服务时,可以无缝的提供服务,甚至可以同时提供服务。比如改进现有模块时,比如两个不同的算法。更厉害的时,两个模块创建的私有接口,如果它们签名一样,也是可以互通的,其实签名一样就是一样的接口,无所谓是不是私有的了。这个非常强大,可以允许不同的模块在不同的时刻升级,这对于提供服务的服务器太重要了。
比较被严重误认为是继承的,莫过于是 Go 的内嵌Embeding,因为 Embeding 本质上还是组合不是继承,参考Embeding is still composition。
Embeding 在 UTest 的 Mocking 中可以显著减少需要 Mock 的函数,比如Mocking net.Conn,如果只需要 mock Read 和 Write 两个函数,就可以通过内嵌 net.Conn 来实现,这样 loopBack 也实现了整个 net.Conn 接口,不必每个接口全部写一遍:
type loopBack struct { net.Conn buf bytes.Buffer}func (c *loopBack) Read(b []byte) (int, error) { return c.buf.Read(b)}func (c *loopBack) Write(b []byte) (int, error) { return c.buf.Write(b)}Embeding 只是将内嵌的数据和函数自动全部代理了一遍而已,本质上还是使用这个内嵌对象的服务。Outer 内嵌了Inner,和 Outer 继承 Inner 的区别在于:内嵌 Inner 是不知道自己被内嵌,调用 Inner 的函数,并不会对 Outer 有任何影响,Outer 内嵌 Inner 只是自动将 Inner 的数据和方法代理了一遍,但是本质上 Inner 的东西还不是 Outer 的东西;对于继承,调用 Inner 的函数有可能会改变 Outer 的数据,因为 Outer 继承 Inner,那么 Outer 就是 Inner,二者的依赖是更紧密的。
如果很难理解为何 Embeding 不是继承,本质上是没有区分继承和组合的区别,可以参考Composition not inheritance,Go 选择组合不选择继承是深思熟虑的决定,面向对象的继承、虚函数、多态和类树被过度使用了。类继承树需要前期就设计好,而往往系统在演化时发现类继承树需要变更,我们无法在前期就精确设计出完美的类继承树;Go 的接口和组合,在接口变更时,只需要变更最直接的调用层,而没有类子树需要变更。
The designs are nothing like hierarchical, subtype-inherited methods. They are looser (even ad hoc), organic, decoupled, independent, and therefore scalable.
组合比继承有个很关键的优势是正交性orthogonal,详细参考正交性。
Orthogonal
真水无香,真的牛逼不用装。——来自网络
软件是一门科学也是艺术,换句话说软件是工程。科学的意思是逻辑、数学、二进制,比较偏基础的理论都是需要数学的,比如 C 的结构化编程是有论证的,那些关键字和逻辑是够用的。实际上 Go 的 GC 也是有数学证明的,还有一些网络传输算法,又比如奠定一个新领域的论文比如 Google 的论文。艺术的意思是,大部分时候都用不到严密的论证,有很多种不同的路,还需要看自己的品味或者叫偏见,特别容易引起口水仗和争论,从好的方面说,好的软件或代码,是能被感觉到很好的。
由于大部分时候软件开发是要靠经验的,特别是国内填鸭式教育培养了对于数学的莫名的仇恨(“莫名”主要是早就把该忘的不该忘记的都忘记了),所以在代码中强调数学,会激发起大家心中一种特别的鄙视和怀疑,而这种鄙视和怀疑应该是以葱白和畏惧为基础——大部分时候在代码中吹数学都会被认为是装逼。而 Orthogonal (正交性)则不择不扣的是个数学术语,是线性代数(就是矩阵那个玩意儿)中用来描述两个向量相关性的,在平面中就是两个线条的垂直。比如下图:

Vectors A and B are orthogonal to each other.
旁白:妮玛,两个线条垂直能和代码有个毛线关系,八竿子打不着关系吧,请继续吹。
先请看 Go 关于 Orthogonal 相关的描述,可能还不止这些地方:
Composition not inheritance Object-oriented programming provides a powerful insight: that the behavior of data can be generalized independently of the representation of that data. The model works best when the behavior (method set) is fixed, but once you subclass a type and add a method, the behaviors are no longer identical. If instead the set of behaviors is fixed, such as in Go's statically defined interfaces, the uniformity of behavior enables data and programs to be composed uniformly, orthogonally, and safely.
JSON-RPC: a tale of interfaces In an inheritance-oriented language like Java or C++, the obvious path would be to generalize the RPC class, and create JsonRPC and GobRPC subclasses. However, this approach becomes tricky if you want to make a further generalization orthogonal to that hierarchy.
实际上 Orthogonal 并不是只有 Go 才提,参考Orthogonal Software。实际上很多软件设计都会提正交性,比如 OOAD 里面也有不少地方用这个描述。我们先从实际的例子出发吧,关于线程一般 Java、Python、C# 等语言,会定义个线程的类 Thread,可能包含以下的方法管理线程:
var thread = new Thread(thread_main_function);thread.Start();thread.Interrupt();thread.Join();thread.Stop();如果把 goroutine 也看成是 Go 的线程,那么实际上 Go 并没有提供上面的方法,而是提供了几种不同的机制来管理线程:
s := make(chan bool, 0)q := make(chan bool, 0)go func() { s <- true // goroutine started. for { select { case <-q: return default: // do something. } }} ()<- s // wait for goroutine started.time.Sleep(10)q <- true // notify goroutine quit.注意上面只是例子,实际中推荐用Context管理 goroutine。
如果把 goroutine 看成一个向量,把 sync 看成一个向量,把 chan 看成一个向量,这些向量都不相关,也就是它们是正交的。
再举个Orthogonal Software的例子,将对象存储到 TEXT 或 XML 文件,可以直接写对象的序列化函数:
def read_dictionary(file) if File.extname(file) == ".xml" # read and return definitions in XML from file else # read and return definitions in text from file endend这个的坏处包括:
如果改进下这个例子,将存储分离:
class Dictionary def self.instance(file) if File.extname(file) == ".xml" XMLDictionary.new(file) else TextDictionary.new(file) end endendclass TextDictionary < Dictionary def write # write text to @file using the @definitions hash end def read # read text from @file and populate the @definitions hash endend如果把 Dictionay 看成一个向量,把存储方式看成一个向量,再把 JSON 或 INI 格式看成一个向量,他们实际上是可以不相关的。
再看一个例子,考虑上面JSON-RPC: a tale of interfaces的修改,实际上是将序列化的部分,从*gob.Encoder变成了接口ServerCodec,然后实现了 jsonCodec 和 gobCodec 两种 Codec,所以 RPC 和 ServerCodec 是正交的。非正交的做法,就是从 RPC 继承两个类 jsonRPC 和 gobRPC,这样 RPC 和 Codec 是耦合的并不是不相关的。
Orthogonal 不相关到底有什么好说的?
由此可见,Orthogonal 是接口设计中非常关键的要素,我们需要从概念上考虑接口,尽量提供正交的接口和函数。比如io.Reader、io.Writer和io.Closer是正交的,因为有时候我们需要的新向量是读写那么可以使用io.ReadWriter,这实际上是两个接口的组合。
我们如何才能实现 Orthogonal 的接口呢?特别对于公共库,这个非常关键,直接决定了我们是否能提供好用的库,还是很烂的不知道怎么用的库。有几个建议:
如果上面数学上有不严谨的请原谅我,我数学很渣。
Modules
先把最重要的说了,关于 modules 的最新详细信息可以执行命令go help modules或者查这个长长的手册Go Modules,另外 modules 弄清楚后很好用迁移成本低。
Go Module 的好处,可以参考Demo:
Go 最初是使用 GOPATH 存放依赖的包(项目和代码),这个 GOPATH 是公共的目录,如果依赖的库的版本不同就杯具了。2016 年也就是 7 年后才支持vendor规范,就是将依赖本地化了,每个项目都使用自己的 vendor 文件夹,但这样也解决不了冲突的问题(具体看下面的分析),相反导致各种包管理项目天下混战,参考pkg management tools。
2017 年也就是 8 年后,官方的 vendor 包管理器dep才确定方案,看起来命中注定的 TheOne 终于尘埃落定。不料 2018 年也就是 9 年后,又提出比较完整的方案versioning和vgo,这年 Go1.11 支持了 Modules,2019 年 Go1.12 和 Go1.13 改进了不少 Modules 内容,Go 官方文档推出一系列的Part 1 — Using Go Modules、Part 2 — Migrating To Go Modules和Part 3 — Publishing Go Modules,终于应该大概齐能明白,这次真的确定和肯定了,Go Modules 是最终方案。
为什么要搞出 GOPATH、Vendor 和 GoModules 这么多技术方案?本质上是为了创造就业岗位,一次创造了index、proxy和sum三个官网,哈哈哈。当然技术上也是必须要这么做的,简单来说是为了解决古老的DLL Hell问题,也就是依赖管理和版本管理的问题。版本说起来就是几个数字,比如1.2.3,实际上是非常复杂的问题,推荐阅读Semantic Versioning,假设定义了良好和清晰的 API,我们用版本号来管理 API 的兼容性;版本号一般定义为MAJOR.MINOR.PATCH,Major 变更时意味着不兼容的API变更,Minor 是功能变更但是是兼容的,Patch 是 BugFix 也是兼容的,Major 为 0 时表示 API 还不稳定。由于 Go 的包是 URL 的,没有版本号信息,最初对于包的版本管理原则是必须一直保持接口兼容:
If an old package and a new package have the same import path, the new package must be backwards compatible with the old package.
试想下如果所有我们依赖的包,一直都是接口兼容的,那就没有啥问题,也没有DLL Hell。可惜现实却不是这样,如果我们提供过包就知道,对于持续维护和更新的包,在最初不可能提供一个永远不变的接口,变化的接口就是不兼容的了。就算某个接口可以不变,还有依赖的包,还有依赖的依赖的包,还有依赖的依赖的依赖的包,以此往复,要求世界上所有接口都不变,才不会有版本问题,这么说起来,包管理是个极其难以解决的问题,Go 花了 10 年才确定最终方案就是这个原因了,下面举例子详细分析这个问题。
备注:标准库也有遇到接口变更的风险,比如Context是 Go1.7 才引入标准库的,控制程序生命周期,后续有很多接口的第一个参数都是
ctx context.Context,比如net.DialContext就是后面加的一个函数,而net.Dial也是调用它。再比如http.Request.WithContext则提供了一个函数,将 context 放在结构体中传递,这是因为要再为每个 Request 的函数新增一个参数不太合适。从 context 对于标准库的接口的变更,可以看得到这里有些不一致性,有很多批评的声音比如Context should go away for Go 2,就是觉得在标准库中加 context 作为第一个参数不能理解,比如Read(ctx context.Context等。
GOPATH & Vendor
咱们先看 GOPATH 的方式。Go 引入外部的包,是 URL 方式的,先在环境变量$GOROOT中搜索,然后在$GOPATH中搜索,比如我们使用 Errors,依赖包github.com/o***s/go-oryx-lib/errors,代码如下所示:
package mainimport ( "fmt" "github.com/o***s/go-oryx-lib/errors")func main() { fmt.Println(errors.New("Hello, playground"))}如果我们直接运行会报错,错误信息如下:
prog.go:5:2: cannot find package "github.com/o***s/go-oryx-lib/errors" in any of: /usr/local/go/src/github.com/o***s/go-oryx-lib/errors (from $GOROOT) /go/src/github.com/o***s/go-oryx-lib/errors (from $GOPATH)需要先下载这个依赖包go get -d github.com/o***s/go-oryx-lib/errors,然后运行就可以了。下载后放在 GOPATH 中:
Mac $ ls -lh $GOPATH/src/github.com/o***s/go-oryx-lib/errorstotal 72-rw-r--r-- 1 chengli.ycl staff 1.3K Sep 8 15:35 LICENSE-rw-r--r-- 1 chengli.ycl staff 2.2K Sep 8 15:35 README.md-rw-r--r-- 1 chengli.ycl staff 1.0K Sep 8 15:35 bench_test.go-rw-r--r-- 1 chengli.ycl staff 6.7K Sep 8 15:35 errors.go-rw-r--r-- 1 chengli.ycl staff 5.4K Sep 8 15:35 example_test.go-rw-r--r-- 1 chengli.ycl staff 4.7K Sep 8 15:35 stack.go如果我们依赖的包还依赖于其他的包,那么go get会下载所有依赖的包到 GOPATH。这样是下载到公共的 GOPATH 的,可以想到,这会造成几个问题:
为了解决这些问题,引入了 vendor,在 src 下面有个 vendor 目录,将依赖的库都下载到这个目录,同时会有描述文件说明依赖的版本,这样可以实现升级不同库的升级。参考vendor,以及官方的包管理器dep。但是 vendor 并没有解决所有的问题,特别是包的不兼容版本的问题,只解决了项目或应用,也就是会编译出二进制的项目所依赖库的问题。
咱们把上面的例子用 vendor 实现,先要把项目软链或者挪到 GOPATH 里面去,若没有 dep 工具可以参考Installation安装,然后执行下面的命令来将依赖导入到 vendor 目录:
dep init && dep ensure这样依赖的文件就会放在 vendor 下面,编译时也不再需要从远程下载了:
├── Gopkg.lock├── Gopkg.toml├── t.go└── vendor └── github.com └── o***s └── go-oryx-lib └── errors ├── errors.go └── stack.goRemark: Vendor 也会选择版本,也有版本管理,但每个包它只会选择一个版本,也就是本质上是本地化的 GOPATH,如果出现钻石依赖和冲突还是无解,下面会详细说明。
何为版本冲突?
我们来看 GOPATH 和 Vencor 无法解决的一个问题,版本依赖问题的一个例子Semantic Import Versioning,考虑钻石依赖的情况,用户依赖于两个云服务商的 SDK,而它们可能都依赖于公共的库,形成一个钻石形状的依赖,用户依赖 AWS 和 Azure 而它们都依赖 OAuth:
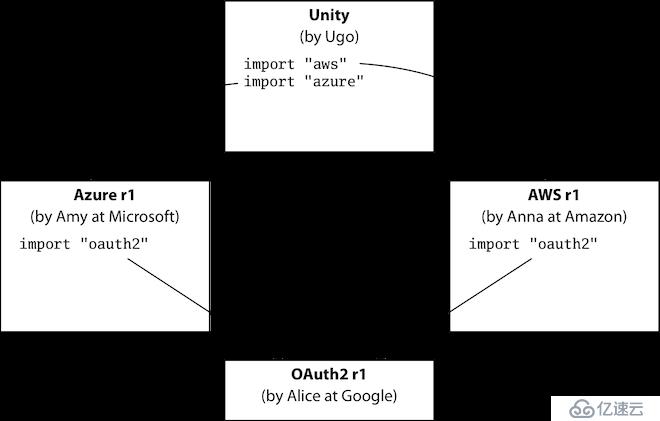
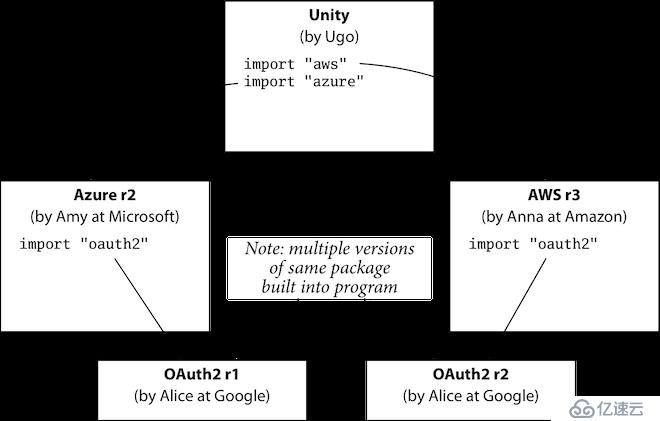
如果公共库 package(这里是 OAuth)的导入路径一样(比如是 github.com/google/oauth),但是做了非兼容性变更,发布了 OAuth-r1 和 OAuth-r2,其中一个云服务商更新了自己的依赖,另外一个没有更新,就会造成冲突,他们依赖的版本不同:
在 Go 中无论怎么修改都无法支持这种情况,除非在 package 的路径中加入版本语义进去,也就是在路径上带上版本信息(这就是 Go Modules了),这和优雅没有关系,这实际上是最好的使用体验:
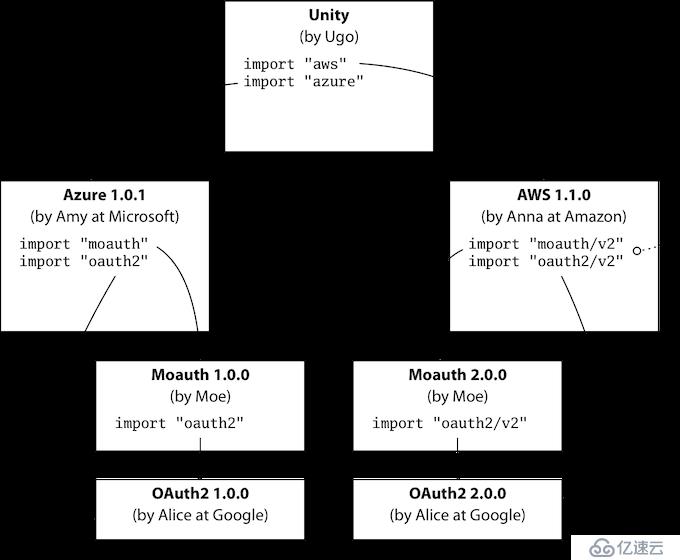
另外做法就是改变包路径,这要求包提供者要每个版本都要使用一个特殊的名字,但使用者也不能分辨这些名字代表的含义,自然也不知道如何选择哪个版本。
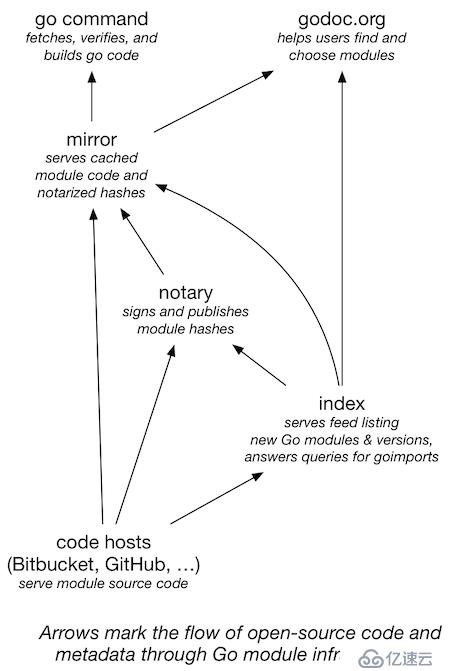
先看看 Go Modules 创造的三大就业岗位,index负责索引、proxy负责代理缓存和sum负责签名校验,它们之间的关系在Big Picture中有描述。可见 go-get 会先从 index 获取指定 package 的索引,然后从 proxy 下载数据,最后从 sum 来获取校验信息:
vgo 全面实践
还是先跟着官网的三部曲,先了解下 modules 的基本用法,后面补充下特别要注意的问题就差不多齐了。首先是Using Go Modules,如何使用 modules,还是用上面的例子,代码不用改变,只需要执行命令:
go mod init private.me/app && go run t.goRemark:和vendor并不相同,modules并不需要在GOPATH下面才能创建,所以这是非常好的。
执行的结果如下,可以看到 vgo 查询依赖的库,下载后解压到了 cache,并生成了 go.mod 和 go.sum,缓存的文件在$GOPATH/pkg下面:
Mac:gogogo chengli.ycl$ go mod init private.me/app && go run t.gogo: creating new go.mod: module private.me/appgo: finding github.com/o***s/go-oryx-lib v0.0.7go: downloading github.com/o***s/go-oryx-lib v0.0.7go: extracting github.com/o***s/go-oryx-lib v0.0.7Hello, playgroundMac:gogogo chengli.ycl$ cat go.modmodule private.me/appgo 1.13require github.com/o***s/go-oryx-lib v0.0.7 // indirectMac:gogogo chengli.ycl$ cat go.sumgithub.com/o***s/go-oryx-lib v0.0.7 h2:k8ml3ZLsjIMoQEdZdWuy8zkU0w/fbJSyHvT/s9NyeCc=github.com/o***s/go-oryx-lib v0.0.7/go.mod h2:i2tH4TZBzAw5h+HwGrNOKvP/nmZgSQz0OEnLLdzcT/8=Mac:gogogo chengli.ycl$ tree $GOPATH/pkg/Users/winlin/go/pkg├── mod│ ├── cache│ │ ├── download│ │ │ ├── github.com│ │ │ │ └── o***s│ │ │ │ └── go-oryx-lib│ │ │ │ └── @v│ │ │ │ ├── list│ │ │ │ ├── v0.0.7.info│ │ │ │ ├── v0.0.7.zip│ │ │ └── sumdb│ │ │ └── sum.golang.org│ │ │ ├── lookup│ │ │ │ └── github.com│ │ │ │ └── o***s│ │ │ │ └── go-oryx-lib@v0.0.7│ └── github.com│ └── o***s│ └── go-oryx-lib@v0.0.7│ ├── errors│ │ ├── errors.go│ │ └── stack.go└── sumdb└── sum.golang.org└── latest可以手动升级某个库,即 go get 这个库:
Mac:gogogo chengli.ycl$ go get github.com/o***s/go-oryx-libgo: finding github.com/o***s/go-oryx-lib v0.0.8go: downloading github.com/o***s/go-oryx-lib v0.0.8go: extracting github.com/o***s/go-oryx-lib v0.0.8Mac:gogogo chengli.ycl$ cat go.mod module private.me/appgo 1.13require github.com/o***s/go-oryx-lib v0.0.8升级某个包到指定版本,可以带上版本号,例如go get github.com/o***s/go-oryx-lib@v0.0.8。当然也可以降级,比如现在是 v0.0.8,可以go get github.com/o***s/go-oryx-lib@v0.0.7降到 v0.0.7 版本。也可以升级所有依赖的包,执行go get -u命令就可以。查看依赖的包和版本,以及依赖的依赖的包和版本,可以执行go list -m all命令。查看指定的包有哪些版本,可以用go list -m -versions github.com/o***s/go-oryx-lib命令。
Note: 关于 vgo 如何选择版本,可以参考Minimal Version Selection。
如果依赖了某个包大版本的多个版本,那么会选择这个大版本最高的那个,比如:
比如下面代码,依赖了四个包,而这四个包依赖了某个包的不同版本,分别选择不同的包,执行rm -f go.mod && go mod init private.me/app && go run t.go,可以看到选择了不同的版本,始终选择的是大版本最高的那个(也就是满足要求的最小版本):
package mainimport ( "fmt" "github.com/winlinvip/mod_ref_a" // 1.0.1 "github.com/winlinvip/mod_ref_b" // 1.2.3 "github.com/winlinvip/mod_ref_c" // 1.0.3 "github.com/winlinvip/mod_ref_d" // 0.0.7)func main() { fmt.Println("Hello", mod_ref_a.Version(), mod_ref_b.Version(), mod_ref_c.Version(), mod_ref_d.Version(), )}若包需要升级大版本,则需要在路径上加上版本,包括本身的 go.mod 中的路径,依赖这个包的 go.mod,依赖它的代码,比如下面的例子,同时使用了 v1 和 v2 两个版本(只用一个也可以):
package mainimport ( "fmt" "github.com/winlinvip/mod_major_releases" v2 "github.com/winlinvip/mod_major_releases/v2")func main() { fmt.Println("Hello", mod_major_releases.Version(), v2.Version2(), )}运行这个程序后,可以看到 go.mod 中导入了两个包:
module private.me/appgo 1.13require ( github.com/winlinvip/mod_major_releases v1.0.1 github.com/winlinvip/mod_major_releases/v2 v2.0.3)Remark: 如果需要更新 v2 的指定版本,那么路径中也必须带 v2,也就是所有 v2 的路径必须带 v2,比如
go get github.com/winlinvip/mod_major_releases/v2@v2.0.3。
而库提供大版本也是一样的,参考mod_major_releases/v2,主要做的事情:
其中 go.mod 更新如下:
module github.com/winlinvip/mod_major_releases/v2go 1.13代码更新如下,由于是大版本,所以就变更了函数名称:
package mod_major_releasesfunc Version2() string { return "mmv/2.0.3"}Note: 更多信息可以参考Modules: v2,还有Russ Cox: From Repository to Modules介绍了两种方式,常见的就是上面的分支方式的例子,还有一种文件夹方式。
Go Modules 特别需要注意的问题:
总结来说:
如何无缝迁移?
现有 GOPATH 和 vendor 的项目,如何迁移到 modules 呢?官方的迁移指南Migrating to Go Modules,说明了项目会有三种状态:
Note: 特别注意如果是库支持了 v2 及以上的版本,那么路径中一定需要包含 v2,比如
github.com/ru***oss/blackfriday/v2。而且需要更新引用了这个包的 v2 的库,比较蛋疼,不过这种情况还好是不多的。
咱们先看一个使用 GOPATH 的例子,我们新建一个测试包,先以 GOPATH 方式提供,参考github.com/winlinvip/mod_gopath,依赖于github.com/pkg/errors,rsc.io/quote和github.com/gorilla/websocket。
再看一个 vendor 的例子,将这个 GOPATH 的项目,转成 vendor 项目,参考github.com/winlinvip/mod_vendor,安装完dep后执行dep init就可以了,可以查看依赖:
chengli.ycl$ dep statusPROJECT CONSTRAINT VERSION REVISION LATEST PKGS USEDgithub.com/gorilla/websocket ^1.4.1 v1.4.1 c3e18be v1.4.1 1 github.com/pkg/errors ^0.8.1 v0.8.1 ba968bf v0.8.1 1 golang.org/x/text v0.3.2 v0.3.2 342b2e1 v0.3.2 6 rsc.io/quote ^3.1.0 v3.1.0 0406d72 v3.1.0 1 rsc.io/sampler v1.99.99 v1.99.99 732a3c4 v1.99.99 1接下来转成 modules 包,先拷贝一份github.com/winlinvip/mod_gopath代码(这里为了演示差别所以拷贝了一份,直接转换也是可以的),变成github.com/winlinvip/mod_gopath_vgo,然后执行命令go mod init github.com/winlinvip/mod_gopath_vgo && go test ./... && go mod tidy,接着发布版本比如git add . && git commit -am "Migrate to vgo" && git tag v1.0.1 && git push origin v1.0.1:
Mac:mod_gopath_vgo chengli.ycl$ cat go.modmodule github.com/winlinvip/mod_gopath_vgogo 1.13require ( github.com/gorilla/websocket v1.4.1 github.com/pkg/errors v0.8.1 rsc.io/quote v1.5.2)depd 的 vendor 的项目也是一样的,先拷贝一份github.com/winlinvip/mod_vendor成github.com/winlinvip/mod_vendor_vgo,执行命令go mod init github.com/winlinvip/mod_vendor_vgo && go test ./... && go mod tidy,接着发布版本比如git add . && git commit -am "Migrate to vgo" && git tag v1.0.3 && git push origin v1.0.3:
module github.com/winlinvip/mod_vendor_vgogo 1.13require ( github.com/gorilla/websocket v1.4.1 github.com/pkg/errors v0.8.1 golang.org/x/text v0.3.2 // indirect rsc.io/quote v1.5.2 rsc.io/sampler v1.99.99 // indirect)这样就可以在其他项目中引用它了:
package mainimport ( "fmt" "github.com/winlinvip/mod_gopath" "github.com/winlinvip/mod_gopath/core" "github.com/winlinvip/mod_vendor" vcore "github.com/winlinvip/mod_vendor/core" "github.com/winlinvip/mod_gopath_vgo" core_vgo "github.com/winlinvip/mod_gopath_vgo/core" "github.com/winlinvip/mod_vendor_vgo" vcore_vgo "github.com/winlinvip/mod_vendor_vgo/core")func main() { fmt.Println("mod_gopath is", mod_gopath.Version(), core.Hello(), core.New("gopath")) fmt.Println("mod_vendor is", mod_vendor.Version(), vcore.Hello(), vcore.New("vendor")) fmt.Println("mod_gopath_vgo is", mod_gopath_vgo.Version(), core_vgo.Hello(), core_vgo.New("vgo(gopath)")) fmt.Println("mod_vendor_vgo is", mod_vendor_vgo.Version(), vcore_vgo.Hello(), vcore_vgo.New("vgo(vendor)"))}Note: 对于私有项目,可能无法使用三大件来索引校验,那么可以设置 GOPRIVATE 来禁用校验,参考Module configuration for non public modules。
vgo with vendor
Vendor 并非不能用,可以用 modules 同时用 vendor,参考How do I use vendoring with modules? Is vendoring going away?,其实 vendor 并不会消亡,Go 社区有过详细的讨论vgo & vendoring决定在 modules 中支持 vendor,有人觉得,把 vendor 作为 modules 的存储目录挺好的啊。在 modules 中开启 vendor 有几个步骤:
调用这个包时,先使用 modules 把依赖下载下来,比如go mod init private.me/app && go run t.go:
package mainimport ( "fmt" "github.com/winlinvip/mod_vendor_vgo" vcore_vgo "github.com/winlinvip/mod_vendor_vgo/core" "github.com/winlinvip/mod_vgo_with_vendor" vvgo_core "github.com/winlinvip/mod_vgo_with_vendor/core")func main() { fmt.Println("mod_vendor_vgo is", mod_vendor_vgo.Version(), vcore_vgo.Hello(), vcore_vgo.New("vgo(vendor)")) fmt.Println("mod_vgo_with_vendor is", mod_vgo_with_vendor.Version(), vvgo_core.Hello(), vvgo_core.New("vgo with vendor"))}然后一样的也要转成 vendor,执行命令go mod vendor && go run -mod=vendor t.go。如果有新的依赖的包需要导入,则需要先使用 modules 方式导入一次,然后go mod vendor拷贝到 vendor。其实一句话来说,modules with vendor 就是最后提交代码时,把依赖全部放到 vendor 下面的一种方式。
Note: IDE 比如 goland 的设置里面,有个
Preferences /Go /Go Modules(vgo) /Vendoring mode,这样会从项目的 vendor 目录解析,而不是从全局的 cache。如果不需要导入新的包,可以默认开启 vendor 方式,执行命令go env -w GOFLAGS='-mod=vendor'。
Concurrency&Control
并发是服务器的基本问题,并发控制当然也是基本问题,Go 并不能避免这个问题,只是将这个问题更简化。
Concurrency
早在十八年前的 1999 年,千兆网卡还是一个新玩意儿,想当年有吉比特带宽却只能支持 10K 客户端,还是个值得研究的问题,毕竟Nginx在 2009 年才出来,在这之前大家还在内核折腾过 HTTP 服务器,服务器领域还在讨论如何解决C10K问题,C10K 中文翻译在这里。读这个文章,感觉进入了繁忙服务器工厂的车间,成千上万错综复杂的电缆交织在一起,甚至还有古老的惊群 (thundering herd)问题,惊群像远古狼人一样就算是在 21 世纪还是偶然能听到它的传说。现在大家讨论的都是如何支持C10M,也就是千万级并发的问题。
并发,无疑是服务器领域永远无法逃避的话题,是服务器软件工程师的基本能力。Go 的撒手锏之一无疑就是并发处理,如果要从 Go 众多优秀的特性中挑一个,那就是并发和工程化,如果只能选一个的话,那就是并发的支持。大规模软件,或者云计算,很大一部分都是服务器编程,服务器要处理的几个基本问题:并发、集群、容灾、兼容、运维,这些问题都可以因为 Go 的并发特性得到改善,按照《人月神话》的观点,并发无疑是服务器领域的固有复杂度 (Essential Complexity)之一。Go 之所以能迅速占领云计算的市场,Go 的并发机制是至关重要的。
借用《人月神话》中关于固有复杂度 (Essential Complexity)的概念,能比较清晰的说明并发问题。就算没有读过这本书,也肯定听过软件开发“没有银弹”,要保持软件的“概念完整性”,Brooks 作为硬件和软件的双重专家和出色的教育家始终活跃在计算机舞台上,在计算机技术的诸多领域中都作出了巨大的贡献,在 1964 年 (33 岁) 领导了IBM System/360和IBM OS/360的研发,于 p1993 年 (62 岁) 获得冯诺依曼奖,并于 1999 年 (68 岁) 获得图灵奖,在 2010 年 (79 岁) 获得虚拟现实 (VR) 的奖项IEEE Virtual Reality Career Award (2010)。
在软件领域,很少能有像《人月神话》一样具有深远影响力和畅销不衰的著作。Brooks 博士为人们管理复杂项目提供了具有洞察力的见解,既有很多发人深省的观点,又有大量软件工程的实践。本书内容来自 Brooks 博士在 IBM 公司System/360家族和OS/360中的项目管理经验,该项目堪称软件开发项目管理的典范。该书英文原版一经面世,即引起业内人士的强烈反响,后又译为德、法、日、俄、中、韩等多种文字,全球销售数百万册。确立了其在行业内的经典地位。
Brooks 是我最崇拜的人,有理论有实践,懂硬件懂软件,致力于大规模软件(当初还没有云计算)系统,足够(长达十年甚至二十年)的预见性,孜孜不倦奋斗不止,强烈推荐软件工程师读《人月神话》。
短暂的广告回来,继续讨论并发 (Concurrency) 的问题,要理解并发的问题就必须从了解并发问题本身,以及并发处理模型开始。2012 年我在当时中国最大的 CDN 公司蓝汛设计和开发流媒体服务器时,学习了以高并发闻名的NGINX的并发处理机制EDSM(Event-Driven State Machine Architecture),自己也照着这套机制实现了一个流媒体服务器,和 HTTP 的 Request-Response 模型不同,流媒体的协议比如 RTMP 非常复杂中间状态非常多,特别是在做到集群Edge时和上游服务器的交互会导致系统的状态机翻倍,当时请教了公司的北美研发中心的架构师 Michael,Michael 推荐我用一个叫做 ST(StateThreads) 的技术解决这个问题,ST 实际上使用 setjmp 和 longjmp 实现了用户态线程或者叫协程,协程和 goroutine 是类似的都是在用户空间的轻量级线程,当时我本没有懂为什么要用一个完全不懂的协程的东西,后来我花时间了解了 ST 后豁然开朗,原来服务器的并发处理有几种典型的并发模型,流媒体服务器中超级复杂的状态机,也广泛存在于各种服务器领域中,属于这个复杂协议服务器领域不可 Remove 的一种固有复杂度 (Essential Complexity)。
我翻译了 ST(StateThreads) 总结的并发处理模型高性能、高并发、高扩展性和可读性的网络服务器架构:State Threads for Internet Applications,这篇文章也是理解 Go 并发处理的关键,本质上 ST 就是 C 语言的协程库(腾讯微信也开源过一个libco协程库),而 goroutine 是 Go 语言级别的实现,本质上他们解决的领域问题是一样的,当然 goroutine 会更广泛一些,ST 只是一个网络库。我们一起看看并发的本质目标,一起看图说话吧,先从并发相关的性能和伸缩性问题说起:
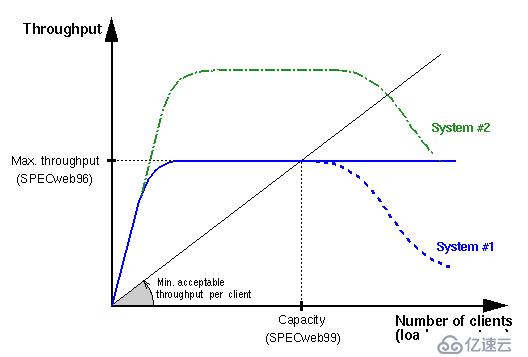
并发的模型包括几种,总结Existing Architectures如下表:
我将 Go 也放在了 ST 这种模型中,虽然它是
多线程+协程,和 SRS 不同是多进程+协程(SRS 本身是单进程+协程可以扩展为多进程+协程)。
从并发模型看 Go 的 goroutine,Go 有 ST 的优势,没有 ST 的劣势,这就是 Go 的并发模型厉害的地方了。当然 Go 的多线程是有一定开销的,并没有纯粹多进程单线程那么高的负载伸缩性,在活跃的连接过多时,可能会激活多个物理线程,导致性能降低。也就是 Go 的性能会比 ST 或 EDSM 要差,而这些性能用来交换了系统的维护性,个人认为很值得。除了 goroutine,另外非常关键的就是 chan。Go 的并发实际上并非只有 goroutine,而是 goroutine+chan,chan 用来在多个 goroutine 之间同步。实际上在这两个机制上,还有标准库中的 context,这三板斧是 Go 的并发的撒手锏。
由于 Go 是多线程的,关于多线程或协程同步,除了 chan 也提供了 Mutex,其实这两个都是可以用的,而且有时候比较适合用 chan 而不是用 Mutex,有时候适合用 Mutex 不适合用 chan,参考Mutex or Channel。
特别提醒:不要惧怕使用 Mutex,不要什么都用 chan,千里马可以一日千里却不能抓老鼠,HelloKitty 跑不了多快抓老鼠却比千里马强。
Context
实际上 goroutine 的管理,在真正高可用的程序中是非常必要的,我们一般会需要支持几种gorotine的控制方式:
而 goroutine 的管理,最开始只有 chan 和 sync,需要自己手动实现 goroutine 的生命周期管理,参考Go Concurrency Patterns: Timing out, moving on和Go Concurrency Patterns: Context,这些都是 goroutine 的并发范式。
直接使用原始的组件管理 goroutine 太繁琐了,后来在一些大型项目中出现了 context 这些库,并且 Go1.7 之后变成了标准库的一部分。具体参考GOLANG 使用 Context 管理关联 goroutine以及GOLANG 使用 Context 实现传值、超时和取消。
Context 也有问题:
备注:关于对 Context 的批评,可以参考Context should go away for Go 2,作者觉得在标准库中加 context 作为第一个参数不能理解,比如
Read(ctx context.Context等。
</div> <div class="zixun-tj-product adv-bottom"></div> </div> </div> <div class="prve-next-news">golang的基础运用的详细内容,希望对您有所帮助,信息来源于网络。