python自动化测试通过日志3分钟定位bug的示例分析
导读:本文共5376字符,通常情况下阅读需要18分钟。同时您也可以点击右侧朗读,来听本文内容。按键盘←(左) →(右) 方向键可以翻页。
摘要: 一、简单使用入门小案例importlogginglogging.basicConfig(level=logging.DEBUG,#设置级别,根据等级显示format='%(asctime)s-[%(filename)s-->line:%(lineno)d]-%(levelname)s:%(message)s')#设置输出格式loggi... ...
目录
(为您整理了一些要点),点击可以直达。一、简单使用
入门小案例
importlogginglogging.basicConfig(level=logging.DEBUG,#设置级别,根据等级显示format='%(asctime)s-[%(filename)s-->line:%(lineno)d]-%(levelname)s:%(message)s')#设置输出格式logging.debug('Thisisadebuglog')logging.info('Thisisainfolog')logging.warning('Thisisawarninglog')logging.error('Thisisaerrorlog')logging.critical('Thisisacriticallog')日志级别
根据不同情况设置了五种日志等级,不同情况输出不同等级的日志。
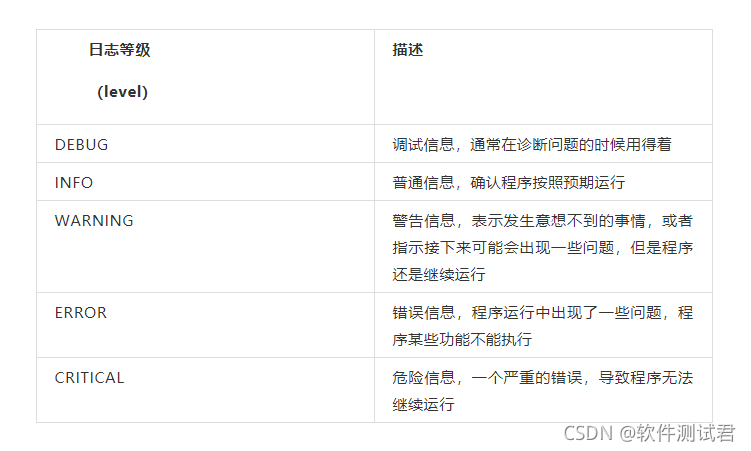
日志器设置的级别会过滤掉低于这个级别的日志
importlogginglogging.basicConfig(level=logging.WARNING,#设置级别,根据等级显示format='%(asctime)s-[%(filename)s-->line:%(lineno)d]-%(levelname)s:%(message)s')#设置输出格式logging.debug('Thisisadebuglog')logging.info('Thisisainfolog')logging.warning('Thisisawarninglog')logging.error('Thisisaerrorlog')logging.critical('Thisisacriticallog')2020-09-11 17:39:26,667-WARNING-This is a warning log
2020-09-11 17:39:26,669-ERROR-This is a error log
2020-09-11 17:39:26,669-CRITICAL-This is a critical log
配置
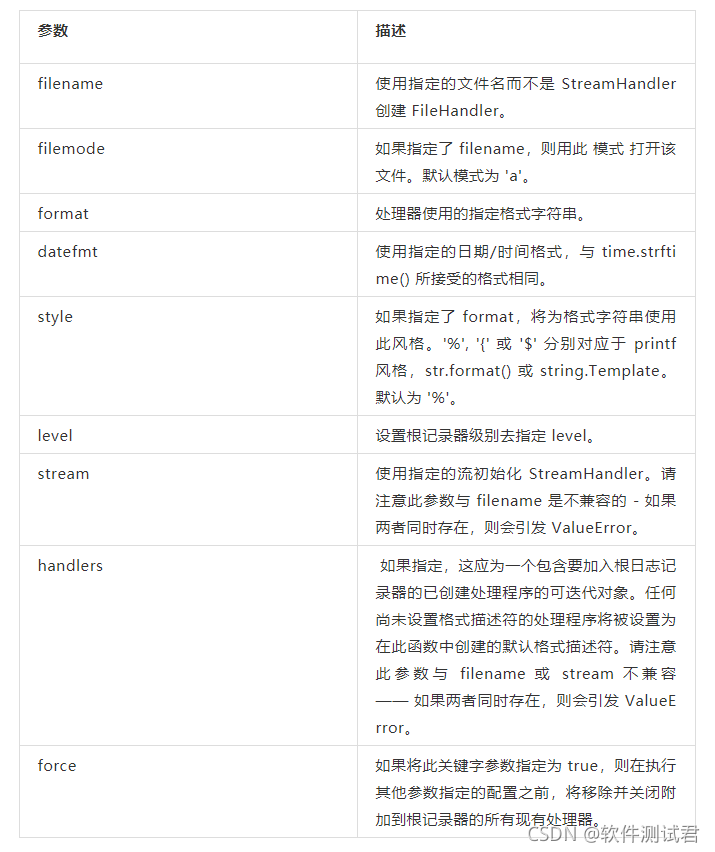
basicConfig 方法支持一下关键字参数进行配置。
格式化规则
日志的输出格式可以通过下面格式自由组合输出
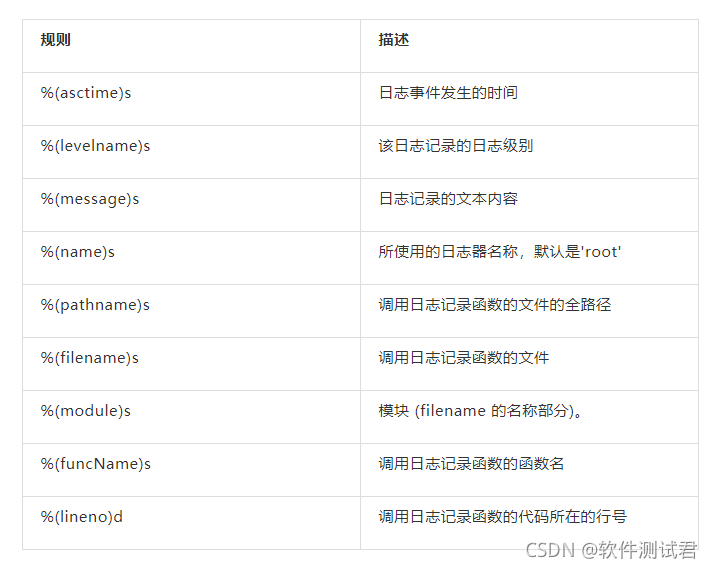
常用格式:%(asctime)s-[%(filename)s–>line:%(lineno)d]-%(levelname)s:% (message)s
importlogginglogging.basicConfig(level=logging.DEBUG,#设置级别,根据等级显示format='%(asctime)s-[%(filename)s-->line:%(lineno)d]-%(levelname)s:%(message)s')#设置输出格式logging.debug('Thisisadebuglog')[DEBUG]-2020-09-11 17:36:50,125–4:This is a debug log
日志写到文件
只需要配置 filename 参数即可
importlogginglogging.basicConfig(level=logging.WARNING,#设置级别,根据等级显示filename='example.log'format='%(asctime)s-[%(filename)s-->line:%(lineno)d]-%(levelname)s:%(message)s')#设置输出格式logging.debug('Thisisadebuglog')logging.info('Thisisainfolog')logging.warning('Thisisawarninglog')logging.error('Thisisaerrorlog')logging.critical('Thisisacriticallog')注意,配置了 fielname 后,日志将不会输出在控制台。
二、高级用法
简单的代码通过 logging 直接使用即可,如果要深入使用需要按照面向对象的方式使用 logging。
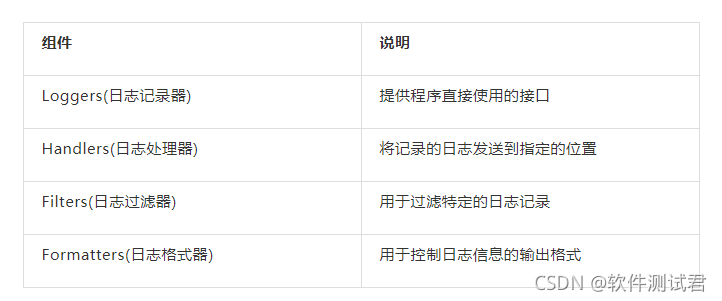
日志组件
logging 模块包含一下几个组件。
步骤
1创建日志记录器
importlogging#第一步创建一个logger,用来产生日志logger=logging.getLogger('%s_log'%__name__)logger.setLevel(logging.DEBUG)#设置日志等级通过 getLogger 这个方法可以创建一个日志记录器,注意要给名字否则返回根日志记录器。
通过 setLevel 设置日志记录器的等级。
2创建日志处理器
#创建一个文本处理器用来将日志写入到文件file_handler=logging.FileHandler(filename='py34.log',encoding='utf-8')
file_handler.setLevel('WARNING')#设置处理器的日志等级#创建一个控制台处理器用来将日志输出到控制台console_handler=logging.StreamHandler()console_handler.setLevel('INFO')#设置控制台处理器的日志等级日志处理器就是将日志发送到指定的位置
FileHandler 将日志发送到文件
StreaHandler 将它可将日志记录输出发送到数据流例如 sys.stdout, sys.stderr 或任何文件类对象默认sys.stdout 即控制台。
RotatingFileHandler 支持根据日志文件大小进行轮转
TimedRotatingFileHandler 支持根据时间进行轮转日志文件
更多详情见官方文档
(https://docs.python.org/zh-cn/3/library/logging.handlers.html?utm_source=testingpai.com#module-logging.handlers)
3创建格式化器
formatter=logging.Formatter(fmt='%(levelname)s%(asctime)s[%(filename)s-->line:%(lineno)d]:%(message)s')
格式化器需要设置到处理器上
file_handler.setFormatter(formatter)console_handler.setFormatter(formatter)
4创建过滤器
过滤器用来过滤指定日志。具体使用略,一般用不到。
详情见官方文档
(https://docs.python.org/zh-cn/3/howto/logging-cookbook.html?utm_source=testingpai.com#filters-contextual )
5 将处理器添加到记录器上
logger.addHandler(file_handler)logger.addHandler(console_handler)
6 记录日志
logger.info('Thisisainfo')2020-09-11 22:22:44,095-[–>line:1]-INFO:This is a info
logger.warning('Thisisawarning')2020-09-11 22:23:20,337-[–>line:1]-WARNING:This is a warning
三、日志模块封装
功能分析
能够自定义日志器名
能够自定义日志文件名和路径
能够自定义日志文件编码方式
能够自定义日志格式
使用时间轮转处理器,并能够配置
封装成函数
在 common 目录下创建模块 log_handler.py 在其中创建如下函数。
importloggingfromlogging.handlersimportTimedRotatingFileHandlerdefget_logger(name,filename,encoding='utf-8',fmt=None,when='d',interval=1,backup_count=7,debug=False):""":paramname:日志器的名字:paramfilename:日志文件名(包含路径):paramencoding:字符编码:paramfmt:日志格式:paramwhen:日志轮转时间单位:paraminterval:间隔:parambackup_count:日志文件个数:paramdebug:调试模式:return:"""logger=logging.getLogger(name)logger.setLevel(logging.DEBUG)#文件处理器的等级一般情况一定比控制台要高ifdebug:file_level=logging.DEBUGconsole_level=logging.DEBUGelse:file_level=logging.WARNINGconsole_level=logging.INFOiffmtisNone:fmt='%(levelname)s%(asctime)s[%(filename)s-->line:%(lineno)d]:%(message)s'file_handler=TimedRotatingFileHandler(filename=filename,when=when,interval=interval,backupCount=backup_count,encoding=encoding)file_handler.setLevel(file_level)console_handler=logging.StreamHandler()console_handler.setLevel(console_level)formatter=logging.Formatter(fmt=fmt)file_handler.setFormatter(formatter)console_handler.setFormatter(formatter)logger.addHandler(file_handler)logger.addHandler(console_handler)returnloggerif__name__=='__main__':log=get_logger(name='py41',filename='py41.log',debug=True,when='s')log.info('我是普通信息')importtimetime.sleep(3)log.warning('我是警告信息')四、应用到项目中
导入
日志器生成函数的导入不能像 Excel 数据读取函数一样,每个用例模块里都导入一遍。因为它返回一个日志器对象,当多次调用日志器生成函数,且日志器名称相同时,会给同一个日志器添加多个日志处理器,从而出现重复记录日志器的问题。
为了解决上面的问题,在 common 文件夹下创建一个名为 init.py 的文件,在 common 模块被导入时会自动执行这个文件里的代码,且只会执行一次。
在 init.py 文件编写如下代码:
from.log_handlerimportget_loggerlogger=get_logger('py41','py38.log')那么在项目中的其他模块中就可以通过如下代码导入
fromcommonimportlogger
从而可以保证在项目执行过程中,get_logger 方法只会执行一遍。
记录日志
日志的作用是记录程序的运行状态和当程序出现问题时能提供定位分析错误的依据。
什么时候需要记录日志,记录什么日志,根据每个人对程序的理解,以及经验。
我们的项目中,在用例执行的过程是核心,所以我们的日志也是围绕着用例的执行。
使用日志记录每个用例的测试数据,和测试结果,代码如下:
...@list_data(*cases)deftest_login(self,case):"""登陆测试"""logger.info('测试用例【{}】开始测试'.format(case['title']))#1.测试数据#传入进来的case参数logger.info('测试用例【{}】的测试数据是:{}'.format(case['title'],case))#2.测试步骤res=login_check(case['username'],case['password'])logger.info('测试用例【{}】的测试结果是:{}'.format(case['title'],res))#3.断言try:self.assertEqual(res,case['expect'])exceptAssertionErrorase:logger.error('测试用例【{}】断言失败'.format(case['title']))raiseeelse:logger.info('测试用例【{}】断言成功'.format(case['title']))finally:logger.info('测试用例【{}】测试结束') </div> <div class="zixun-tj-product adv-bottom"></div> </div> </div> <div class="prve-next-news">python自动化测试通过日志3分钟定位bug的示例分析的详细内容,希望对您有所帮助,信息来源于网络。