docker如何使用Dockerfile构建镜像
导读:本文共7182.5字符,通常情况下阅读需要24分钟。同时您也可以点击右侧朗读,来听本文内容。按键盘←(左) →(右) 方向键可以翻页。
摘要: 1、使用 commit 命令构建docker commit 命令是创建新镜像最直观的方法,其过程包含三个步骤:运行容器;修改容器;将容器保存为新的镜像。先从创建一个新容器开始,这个容器我们就使用很常见的 ubuntu 镜像,操作步骤如下1.1 运行一个要进行修改的容器root@ubuntu:~#dockerrun-tiubuntu/bin/bashroot@7... ...
目录
(为您整理了一些要点),点击可以直达。1、使用 commit 命令构建
docker commit 命令是创建新镜像最直观的方法,其过程包含三个步骤:
运行容器;
修改容器;
将容器保存为新的镜像。
先从创建一个新容器开始,这个容器我们就使用很常见的 ubuntu 镜像,操作步骤如下
1.1 运行一个要进行修改的容器
root@ubuntu:~#dockerrun-tiubuntu/bin/bashroot@733a4b080491:/#
1.2 安装 apache 软件包
root@733a4b080491:/#apt-getupdate......root@733a4b080491:/#apt-getinstall-yapache2......
我们启动了一个容器,并在里面安装了 apache 。我们将会拿这个容器作为一个 web 服务器来运行,我们需要把它保存下来,这样就不用每次都运行这个步骤了。
1.3 提交定制容器
root@ubuntu:~#dockerps-acontaineridimagecommandcreatedstatusportsnames733a4b080491ubuntu"/bin/bash"11minutesagoexited(0)5secondsagosuspicious_mestorf
root@ubuntu:~#dockercommit733a4b080491wzlinux/ubuntu_with_apachesha256:902ac2c87147fefc5b70c741ce9550dcda426cea9f824f442d5cc2744bdc90ae
root@ubuntu:~#dockerimagesrepositorytagimageidcreatedsizewzlinux/ubuntu_with_apachelatest902ac2c8714733secondsago261mbubuntulatest20c44cd7596f10daysago123mb
可以看到,我们使用 docker commit 提交了修改过的容器,从 size 上可以看到镜像因为安装软件而变大了,docker commit 提交的只是创建容器的镜像与容器的当前状态之间有差异的部分,这使得该更新非常轻量。
以上演示了如何用 docker commit 创建新镜像。然而,docker 并不建议用户通过这种方式构建镜像。因为这是一种手工创建镜像的方式,容易出错,效率低且可重复性弱。比如要在 debian base 镜像中也加入 apache,还得重复前面的所有步骤。更重要的:使用者并不知道镜像是如何创建出来的,里面是否有恶意程序。也就是说无法对镜像进行审计,存在安全隐患。
不过,为了对 docker 有一个更全面的了解,我们还是要了解一下如何使用 docker commit 构建 docker 镜像。因为即便是用 dockerfile(推荐方法)构建镜像,底层也 docker commit 一层一层构建新镜像的。学习 docker commit 能够帮助我们更加深入地理解构建过程和镜像的分层结构。
2、使用 dockerfile 构建
dockerfile 使用基本的基于dsl(domain specific language)语法的指令来构建一个 docker 镜像,我们推荐使用 dockerfile 方法来代替 docker commit,因为通过前者构建镜像更具备可重复性、透明性以及幂等性。
一旦有了 dockerfile,我们就可以使用 docker build 命令基于该 dockerfile 中的指令构建一个新的镜像。
2.1 我们的第一个 dockerfile
用 dockerfile 创建上面的 ubuntu_with_apache,内容如下。
#version0.0.1fromubunturunsed-i's/archive.ubuntu.com/cn.archive.ubuntu.com/g'/etc/apt/sources.listrunsed-i's/security.ubuntu/cn.archive.ubuntu/g'/etc/apt/sources.listrunapt-get-yupdate&&apt-get-yinstallapache2expose80
执行 docker build 命令时,dockerfile 中的所有指令都会被执行并且提交,并且在该命令成功结束后返回一个新镜像。
root@ubuntu:~/sample#dockerbuild-tubuntu_with_apache_dockerfile.①sendingbuildcontexttodockerdaemon6.144kb②step1/5:fromubuntu③--->20c44cd7596fstep2/5:runsed-i's/archive.ubuntu.com/cn.archive.ubuntu.com/g'/etc/apt/sources.list--->runninginbac6dc3b900f--->c66ad94ad8a4removingintermediatecontainerbac6dc3b900fstep3/5:runsed-i's/security.ubuntu/cn.archive.ubuntu/g'/etc/apt/sources.list--->runningin5158558b6403--->0a4c480147c5removingintermediatecontainer5158558b6403step4/5:runapt-get-yupdate&&apt-get-yinstallapache2④--->runninginf547ce7a1b39⑤…………--->118bde35120a⑥removingintermediatecontainerf547ce7a1b39⑦step5/5:expose80--->runningine546786de05b--->f55d7b07365bremovingintermediatecontainere546786de05bsuccessfullybuiltf55d7b07365b⑧successfullytaggedubuntu_with_apache_dockerfile:latest
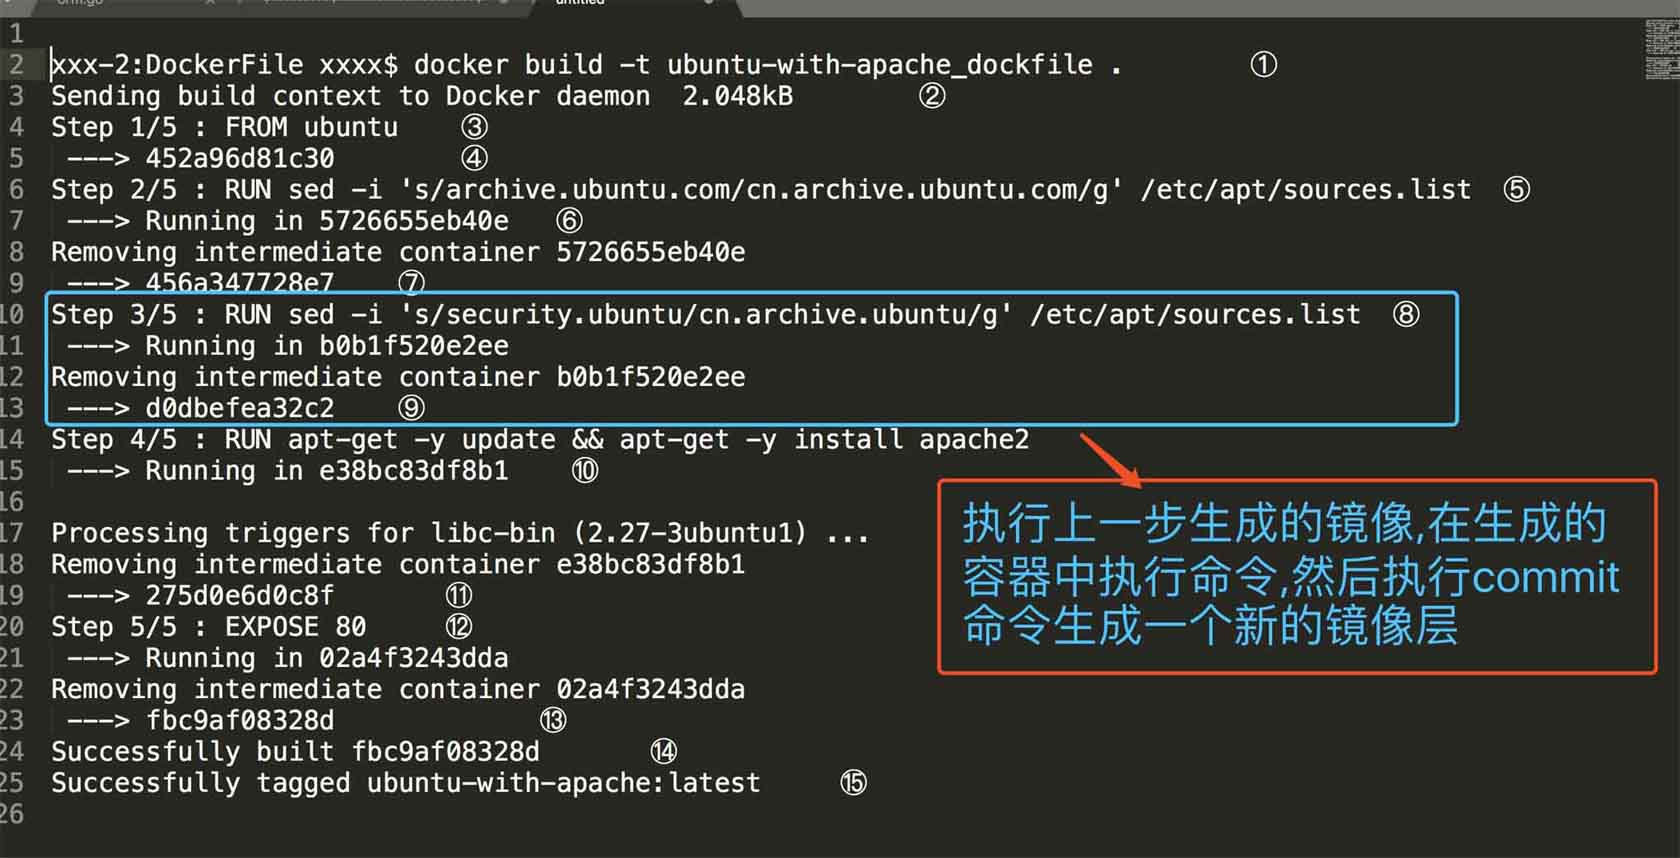
① 运行 docker build 命令,-t 将新镜像命名为 ubuntu-with-apache-dockerfile,命令末尾的 . 指明 build context 为当前目录。docker 默认会从 build context 中查找 dockerfile 文件,我们也可以通过 -f 参数指定 dockerfile 的位置。
② 从这步开始就是镜像真正的构建过程。 首先 docker 将 build context 中的所有文件发送给 docker daemon。build context 为镜像构建提供所需要的文件或目录。
dockerfile 中的 add、copy 等命令可以将 build context 中的文件添加到镜像。此例中,build context 为当前目录 /sample,该目录下的所有文件和子目录都会被发送给 docker daemon。
所以,使用 build context 就得小心了,不要将多余文件放到 build context,特别不要把 /、/usr 作为 build context,否则构建过程会相当缓慢甚至失败。
③ step 1:执行 from,将 ubuntu 作为 base 镜像。ubuntu 镜像 id 为 452a96d81c30。
④ step 4:执行 run,安装 apache,具体步骤为 ⑤ ~ ⑬。
⑤ 启动 id 为 e38bc83df8b1 的临时容器,在容器中通过 apt-get 安装 apache。
⑥ 安装成功后,将容器保存为镜像,其 id 为 fbc9af08328d。这一步底层使用的是类似 docker commit 的命令。
⑦ 删除临时容器 02a4f3243dda。
⑧ 镜像构建成功。
通过 docker images 查看镜像信息。
root@ubuntu:~/sample#dockerimagesrepositorytagimageidcreatedsizeubuntu_with_apache_dockerfilelatestf55d7b07365b27minutesago261mbwzlinux/ubuntu_with_apachelatest902ac2c87147aboutanhourago261mbubuntulatest20c44cd7596f10daysago123mb
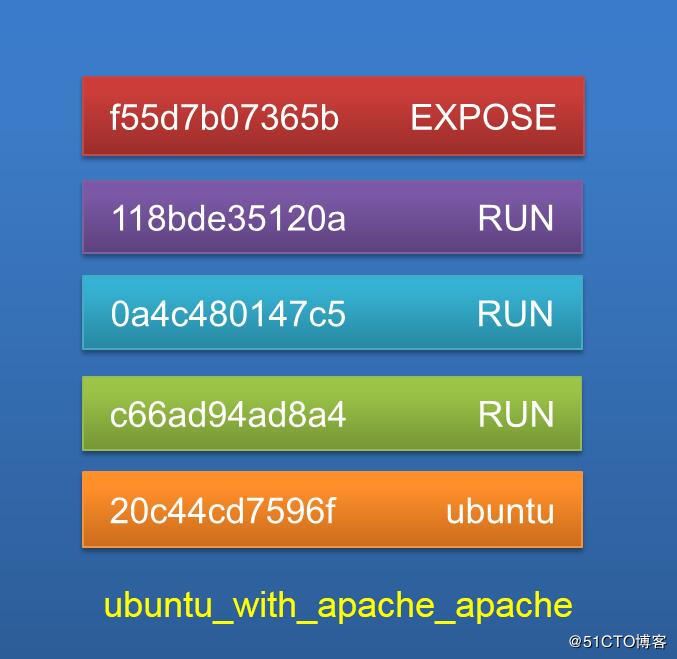
2.2 查看镜像分成结构
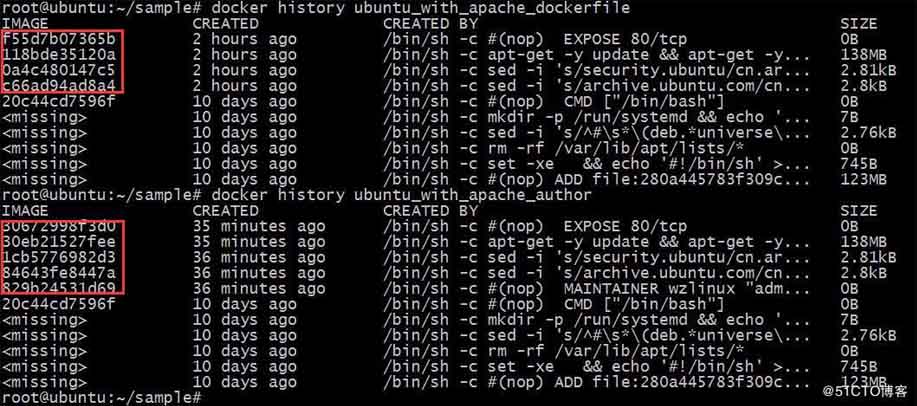
ubuntu_with_apache_dockerfile 是通过在 base 镜像的顶部添加几个新的镜像层而得到的。
上图是从原文中拷贝的,下图是在我的电脑上面实验得到的数据,image的id不同,但是其他都是相同的。
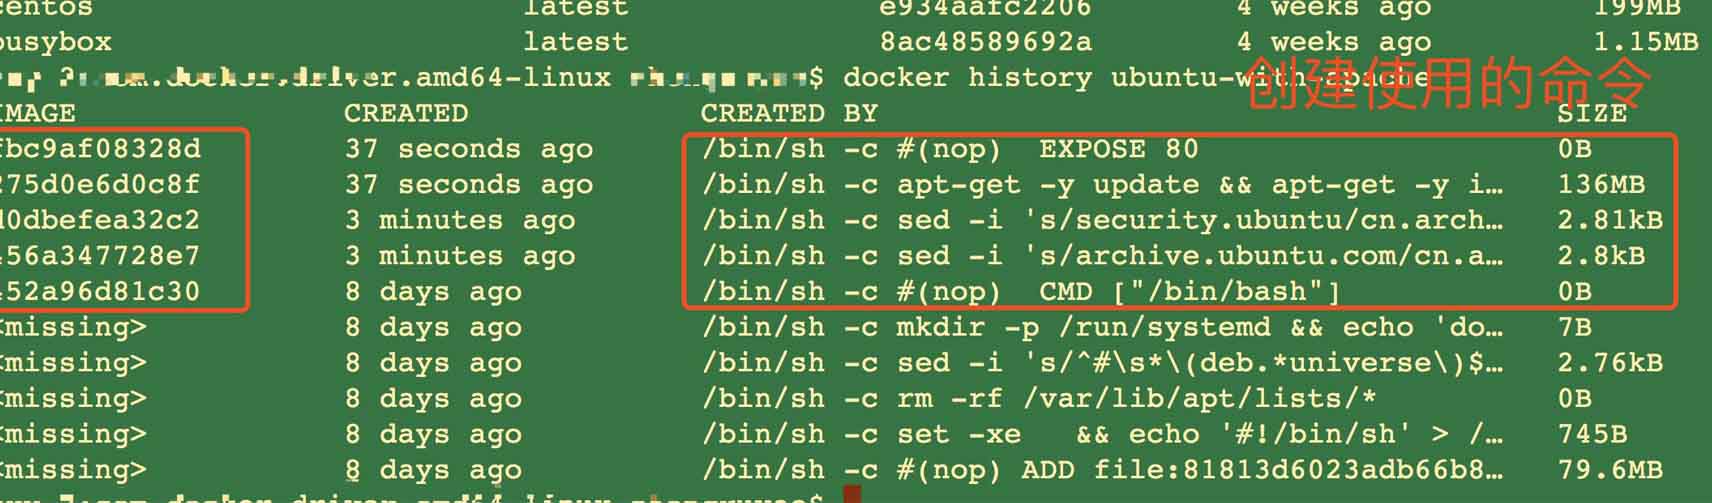
查看我本机的ubuntu的image历史如下:

从输出的结果可以看出来,每个命令都会生成一个镜像层。
docker history 会显示镜像的构建历史,也就是 dockerfile 的执行过程。
ubuntu_with_apache_dockerfile 与 ubuntu 镜像相比,确实只是多了几层,dockerfile 中的每个指令都会创建一层,docker history 也向我们展示了镜像的分层结构,每一层由上至下排列。
2.3 镜像的缓存特性
由于每一步的构建过程都会将结果提交为镜像,所以 docker 的构建镜像过程就显得非常聪明。它会将之前的镜像层看作缓存。
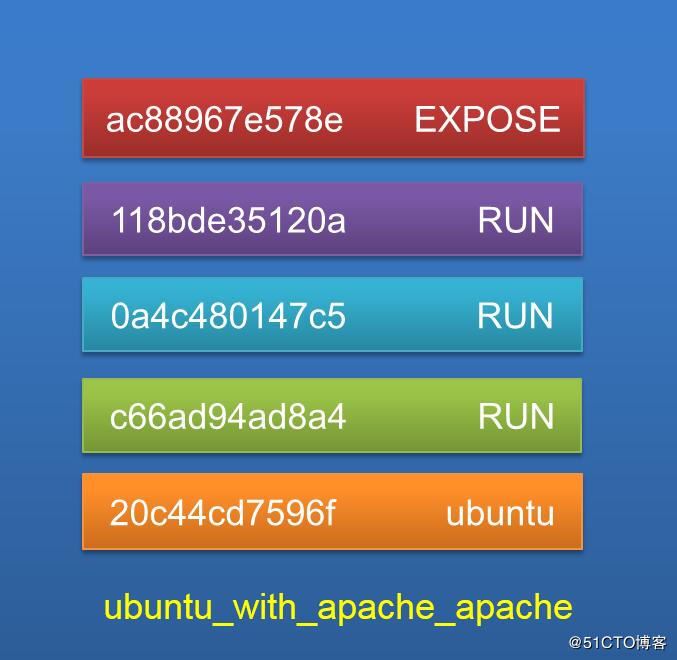
比如我们把 expose 80 改为 expose 8080。
root@ubuntu:~/sample#dockerbuild-tubuntu_with_apache_8080.sendingbuildcontexttodockerdaemon6.144kbstep1/5:fromubuntu--->20c44cd7596fstep2/5:runsed-i's/archive.ubuntu.com/cn.archive.ubuntu.com/g'/etc/apt/sources.list--->usingcache--->c66ad94ad8a4step3/5:runsed-i's/security.ubuntu/cn.archive.ubuntu/g'/etc/apt/sources.list--->usingcache--->0a4c480147c5step4/5:runapt-get-yupdate&&apt-get-yinstallapache2--->usingcache--->118bde35120astep5/5:expose8080--->runninginc89f8210c56a--->ac88967e578eremovingintermediatecontainerc89f8210c56asuccessfullybuiltac88967e578esuccessfullytaggedubuntu_with_apache_8080:latest
我们可以看到,之前的指令都是一样的,所以 docker 直接利用之前的缓存,只构建我们更改的指令,新的镜像层如下。
如果我们希望在构建镜像时不使用缓存,可以在 docker build 命令中加上 --no-cache 参数。
dockerfile 中每一个指令都会创建一个镜像层,上层是依赖于下层的。无论什么时候,只要某一层发生变化,其上面所有层的缓存都会失效。也就是说,如果我们改变 dockerfile 指令的执行顺序,或者修改或添加指令,都会使缓存失效。比如我们在前面添加指令 maintainer wzlinux "admin@wzlinux.com"。如下:
#version0.0.1fromubuntumaintainerwzlinux"admin@wzlinux.com"runsed-i's/archive.ubuntu.com/cn.archive.ubuntu.com/g'/etc/apt/sources.listrunsed-i's/security.ubuntu/cn.archive.ubuntu/g'/etc/apt/sources.listrunapt-get-yupdate&&apt-get-yinstallapache2expose80
然后使用docker进行构建,查看其过程。
root@ubuntu:~/sample#dockerbuild-tubuntu_with_apache_author.sendingbuildcontexttodockerdaemon6.144kbstep1/6:fromubuntu--->20c44cd7596fstep2/6:maintainerwzlinux"admin@wzlinux.com"--->runningin637bb3457407--->829b24531d69removingintermediatecontainer637bb3457407step3/6:runsed-i's/archive.ubuntu.com/cn.archive.ubuntu.com/g'/etc/apt/sources.list--->runningin416ae8aefb61--->84643fe8447aremovingintermediatecontainer416ae8aefb61step4/6:runsed-i's/security.ubuntu/cn.archive.ubuntu/g'/etc/apt/sources.list--->runningin58d8375fd5c3--->1cb5776982d3removingintermediatecontainer58d8375fd5c3step5/6:runapt-get-yupdate&&apt-get-yinstallapache2--->runningin0514a7d04814…………processingtriggersforsgml-base(1.26+nmu4ubuntu1)...--->30eb21527feeremovingintermediatecontainer0514a7d04814step6/6:expose80--->runningin476ca5f98886--->30672998f3d0removingintermediatecontainer476ca5f98886successfullybuilt30672998f3d0successfullytaggedubuntu_with_apache_author:latest
从输出的结果生成了很多新的镜像层,缓存已经失效。
2.4 调试 dockerfile
包括 dockerfile 在内的任何脚本和程序都会出错。有错并不可怕,但必须有办法排查,那我们测试一下在构建的过程中指令出现错误怎么办,比如我们把第二个sed指令写错了,写错了sd。
#version0.0.1fromubuntumaintainerwzlinux"admin@wzlinux.com"runsed-i's/archive.ubuntu.com/cn.archive.ubuntu.com/g'/etc/apt/sources.listrunsd-i's/security.ubuntu/cn.archive.ubuntu/g'/etc/apt/sources.listrunapt-get-yupdate&&apt-get-yinstallapache2expose80
执行 docker build,如下。

dockerfile 在执行第四步 run 指令时失败。我们可以利用第三步创建的镜像 84643fe8447a 进行调试,方式是通过 docker run -it 启动镜像的一个容器。
root@ubuntu:~/sample#dockerrun-ti84643fe8447a/bin/bashroot@422ecce78664:/#sdbash:sd:commandnotfound
其实我们肯定不会傻到连 sd 不存在也不知道,我这里只是作为一个例子,其他更难的排错方法我们就使用这种方式。
2.5 dockerfile 指令
from
指定 base 镜像。
maintainer
设置镜像的作者,可以是任意字符串。
copy
将文件从 build context 复制到镜像。
copy 支持两种形式:
copy src destcopy ["src", "dest"]
注意:src 只能指定 build context 中的文件或目录。
add
与 copy 类似,从 build context 复制文件到镜像。不同的是,如果 src 是归档文件(tar, zip, tgz, xz 等),文件会被自动解压到 dest。
env
设置环境变量,环境变量可被后面的指令使用。例如:
envmy_version1.3runapt-getinstall-ymypackage=$my_version
expose
指定容器中的进程会监听某个端口,docker 可以将该端口暴露出来。
volume
将文件或目录声明为 volume。
workdir
为后面的 run, cmd, entrypoint, add 或 copy 指令设置镜像中的当前工作目录。
run
在容器中运行指定的命令。
cmd
容器启动时运行指定的命令。
dockerfile 中可以有多个 cmd 指令,但只有最后一个生效。cmd 可以被 docker run 之后的参数替换。
entrypoint
设置容器启动时运行的命令。
dockerfile 中可以有多个 entrypoint 指令,但只有最后一个生效。cmd 或 docker run 之后的参数会被当做参数传递给 entrypoint。
</div> <div class="zixun-tj-product adv-bottom"></div> </div> </div> <div class="prve-next-news">docker如何使用Dockerfile构建镜像的详细内容,希望对您有所帮助,信息来源于网络。