怎么用SpringBoot+RabbitMQ实现消息可靠传输
导读:本文共4909.5字符,通常情况下阅读需要16分钟。同时您也可以点击右侧朗读,来听本文内容。按键盘←(左) →(右) 方向键可以翻页。
摘要: 环境配置SpringBoot整合RabbitMQ实现消息的发送。1.添加maven依赖<dependency><groupId>org.springframework.boot</groupId><artifactId>spring-boot-starter</artifactId></de... ...
目录
(为您整理了一些要点),点击可以直达。环境配置
SpringBoot整合RabbitMQ实现消息的发送。
1.添加maven依赖
<dependency><groupId>org.springframework.boot</groupId><artifactId>spring-boot-starter</artifactId></dependency><dependency><groupId>org.springframework.boot</groupId><artifactId>spring-boot-starter-web</artifactId></dependency><dependency><groupId>org.springframework.boot</groupId><artifactId>spring-boot-starter-amqp</artifactId></dependency>
2.添加 application.yml 配置文件
spring:rabbitmq:host:192.168.3.19port:5672username:adminpassword:xxxx
3.配置交换机、队列以及绑定
@BeanpublicDirectExchangemyExchange(){DirectExchangedirectExchange=newDirectExchange("myExchange");returndirectExchange;}@BeanpublicQueuemyQueue(){Queuequeue=newQueue("myQueue");returnqueue;}@BeanpublicBindingbinding(){returnBindingBuilder.bind(myQueue()).to(myExchange()).with("myRoutingKey");}4.生产发送消息
@AutowiredprivateRabbitTemplaterabbitTemplate;@GetMapping("/send")publicStringsend(Stringmessage){rabbitTemplate.convertAndSend("myExchange","myRoutingKey",message);System.out.println("【发送消息】"+message)return"【sendmessage】"+message;}5.消费者接收消息
@RabbitListener(queuesToDeclare=@Queue("myQueue"))publicvoidprocess(Stringmsg,Channelchannel,Messagemessage){SimpleDateFormatsdf=newSimpleDateFormat("yyyy-MM-ddHH:mm:ss");Datedate=newDate();Stringtime=sdf.format(date);System.out.println("【接收信息】"+msg+"当前时间"+time);6.调用生产端发送消息hello,控制台输出:
【发送消息】hello
【接收信息】hello 当前时间2022-05-12 10:21:14
说明消息已经被成功接收。
消息丢失分析
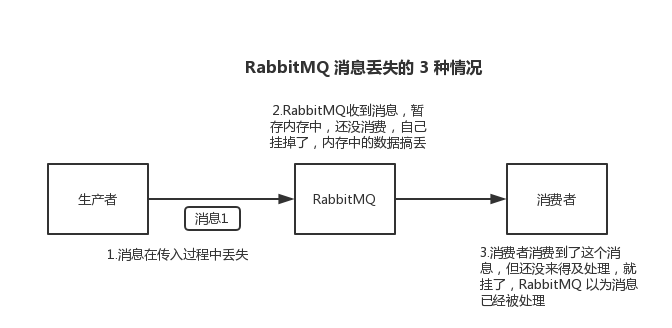
一条消息的从生产到消费,消息丢失可能发生在以下几个阶段:
生产端丢失: 生产者无法传输到
RabbitMQ存储端丢失:
RabbitMQ存储自身挂了消费端丢失:存储由于网络问题,无法发送到消费端,或者消费挂了,无法发送正常消费
RabbitMQ从生产端、储存端、消费端都对可靠性传输做很好的支持。
生产阶段
生产阶段通过请求确认机制,来确保消息的可靠传输。当发送消息到 RabbitMQ 服务器 之后,RabbitMQ 收到消息之后,给发送返回一个请求确认,表示RabbitMQ 服务器已成功的接收到了消息。
配置application.yml
spring:rabbitmq:#消息确认机制生产者->交换机publisher-confirms:true#消息返回机制交换机->队列publisher-returns:true
配置
@Configuration@Slf4jpublicclassRabbitConfig{@AutowiredprivateConnectionFactoryconnectionFactory;@BeanpublicRabbitTemplaterabbitTemplate(){RabbitTemplaterabbitTemplate=newRabbitTemplate(connectionFactory);rabbitTemplate.setConfirmCallback(newRabbitTemplate.ConfirmCallback(){@Overridepublicvoidconfirm(CorrelationDatacorrelationData,booleanack,Stringcause){log.info("【correlationData】:"+correlationData);log.info("【ack】"+ack);log.info("【cause】"+cause);if(ack){log.info("【发送成功】");}else{log.info("【发送失败】correlationData:"+correlationData+"cause:"+cause);}}});rabbitTemplate.setMandatory(true);rabbitTemplate.setReturnCallback(newRabbitTemplate.ReturnCallback(){@OverridepublicvoidreturnedMessage(Messagemessage,intreplyCode,StringreplyText,Stringexchange,StringroutingKey){log.warn("【消息发送失败】");log.info("【message】"+message);log.info("【replyCode】"+replyCode);}});returnrabbitTemplate;}}消息从生产者到交换机, 有confirmCallback确认模式。发送消息成功后消息会调用方法confirm(CorrelationData correlationData, boolean ack, String cause),根据ack判断消息是否发送成功。
消息从交换机到队列,有returnCallback退回模式。
发送消息product message控制台输出如下:
【发送消息】product message
【接收信息】product message 当前时间2022-05-12 11:27:56
【correlationData】:null
【ack】true
【cause】null
【发送成功】
生产端模拟消息丢失
这里有两个方案:
发送消息后立马关闭 broke,后者把网络关闭,但是broker关闭之后控制台一直就会报错,发送消息也报500错误。
发送不存在的交换机:
//myExchange修改成myExchangexxxxxrabbitTemplate.convertAndSend("myExchangexxxxx","myRoutingKey",message);结果:
【correlationData】:null
【ack】false
【cause】channel error; protocol method: #method<channel.close>(reply-code=404, reply-text=NOT_FOUND - no exchange 'myExchangexxxxx' in vhost '/', class-id=60, method-id=40)
【发送失败】
当发送失败可以对消息进行重试
交换机正确,发送不存在的队列:
交换机接收到消息,返回成功通知,控制台输出:
【correlationData】:CorrelationData [id=7d468b47-b422-4523-b2a2-06b14aef073c]
【ack】true
【cause】null
【发送成功】
交换机没有找到队列,返回失败信息:
【消息发送失败】
【message】product message
【replyCode】312
RabbitMQ
开启队列持久化,创建的队列和交换机默认配置是持久化的。首先把队列和交换机设置正确,修改消费监听的队列,使得消息存放在队列里。
修改队列的持久化,修改成非持久化:
@BeanpublicQueuemyQueue(){Queuequeue=newQueue("myQueue",false);returnqueue;}发送消息之后,消息存放在队列中,然后重启RabbitMQ,消息不存在了。
设置队列持久化:
@BeanpublicQueuemyQueue(){Queuequeue=newQueue("myQueue",true);returnqueue;}重启之后,队列的消息还存在。
消费端
消费端默认开始ack自动确认模式,当队列消息被消费者接收,不管有没有被消费端消息,都自动删除队列中的消息。所以为了确保消费端能成功消费消息,将自动模式改成手动确认模式:
修改application.yml文件
spring:rabbitmq:#手动消息确认listener:simple:acknowledge-mode:manual
消费接收消息之后需要手动确认:
channel.basicAck(message.getMessageProperties().getDeliveryTag(),false);
@RabbitListener(queuesToDeclare=@Queue("myQueue"))publicvoidprocess(Stringmsg,Channelchannel,Messagemessage){SimpleDateFormatsdf=newSimpleDateFormat("yyyy-MM-ddHH:mm:ss");Datedate=newDate();Stringtime=sdf.format(date);System.out.println("【接收信息】"+msg+"当前时间"+time);System.out.println(message.getMessageProperties().getDeliveryTag());try{channel.basicAck(message.getMessageProperties().getDeliveryTag(),false);}catch(IOExceptione){e.printStackTrace();}}如果不添加:
channel.basicAck(message.getMessageProperties().getDeliveryTag(),false);
发送两条消息
消息被接收后,没有确认,重新放到队列中:
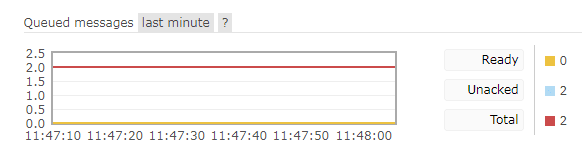
重启项目,之后,队列的消息会发送到消费者,但是没有 ack 确认,还是继续会放回队列中。
加上channel.basicAck之后,再重启项目
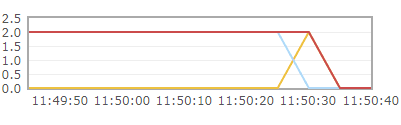
队列消息就被删除了
basicAck方法最后一个参数multiple表示是删除之前的队列。
multiple设置成true,把后面的队列都清理掉了

</div> <div class="zixun-tj-product adv-bottom"></div> </div> </div> <div class="prve-next-news">怎么用SpringBoot+RabbitMQ实现消息可靠传输的详细内容,希望对您有所帮助,信息来源于网络。