.NET Core分布式任务调度ScheduleMaster怎么使用
导读:本文共8149字符,通常情况下阅读需要27分钟。同时您也可以点击右侧朗读,来听本文内容。按键盘←(左) →(右) 方向键可以翻页。
摘要: 1.什么是ScheduleMasterScheduleMaster是分布式任务调度系统,是国内的一位开发者写的。简称:集中任务调度系统,最简单的理解ScheduleMaster,就是对不同的系统里面的调度任务做统一管理的框架。例如我们现在有多个系统,每个系统针对自己处理不同的业务场景。衍生出自己的调度任务,想象一下,如果每个系统人为去维护,那随着调度任务越来越多... ...
目录
(为您整理了一些要点),点击可以直达。1.什么是ScheduleMaster
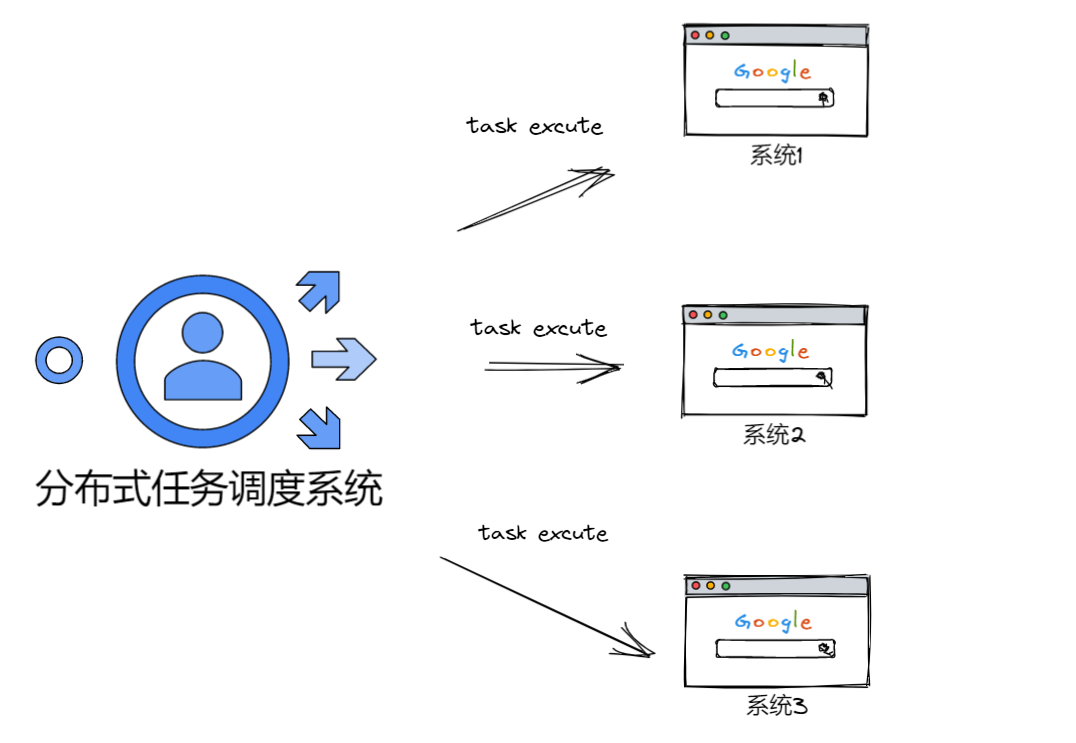
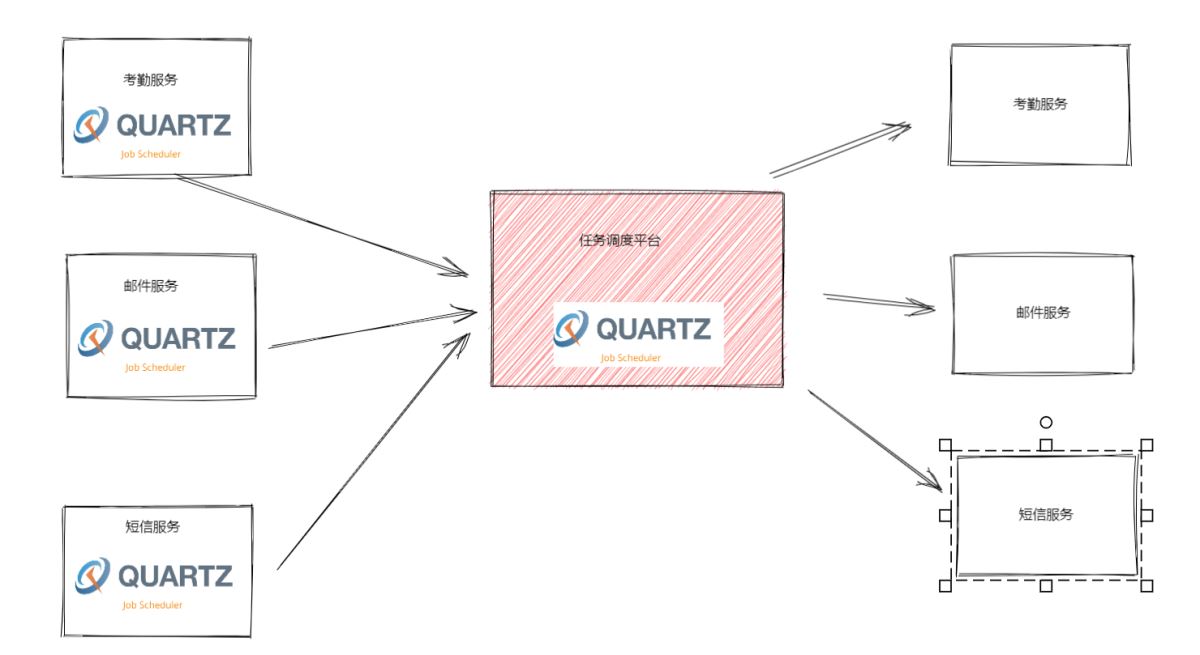
ScheduleMaster是分布式任务调度系统,是国内的一位开发者写的。简称:集中任务调度系统,最简单的理解ScheduleMaster,就是对不同的系统里面的调度任务做统一管理的框架。
例如我们现在有多个系统,每个系统针对自己处理不同的业务场景。衍生出自己的调度任务,想象一下,如果每个系统人为去维护,那随着调度任务越来越多,人是崩溃的吧,可见维护和技术成本是巨大的,这时我们需要选择分布式任务系统框架做统一的管理
当然有目前有很多相对优秀分布式任务系统框架,我们主要学习 ScheduleMaster
2.使用ScheduleMaster
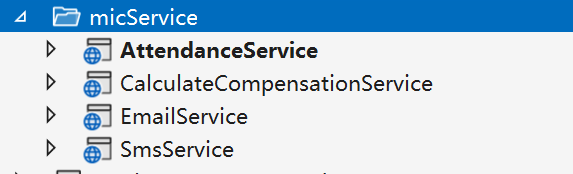
1.首先我们需要使用NET Core web Api创建几个模拟的微服务,分别为 考勤、算薪、邮件、短信
2.下载开源的ScheduleMaster,并且使用ScheduleMaster调度我们的微服务接口
- sqlserver:"Persist Security Info = False; User ID =sa; Password =123456; Initial Catalog =schedule_master; Server =."
- postgresql:"Server=localhost;Port=5432;Database=schedule_master;User Id=postgres;Password=123456;Pooling=true;MaxPoolSize=20;"
- mysql:"Data Source=localhost;Database=schedule_master;User ID=root;Password=123456;pooling=true;CharSet=utf8mb4;port=3306;sslmode=none;TreatTinyAsBoolean=true"
修改Host的配置文件和支持的数据库,框架默认使用Mysql
修改Web的配置文件和支持的数据库,框架默认使用Mysql
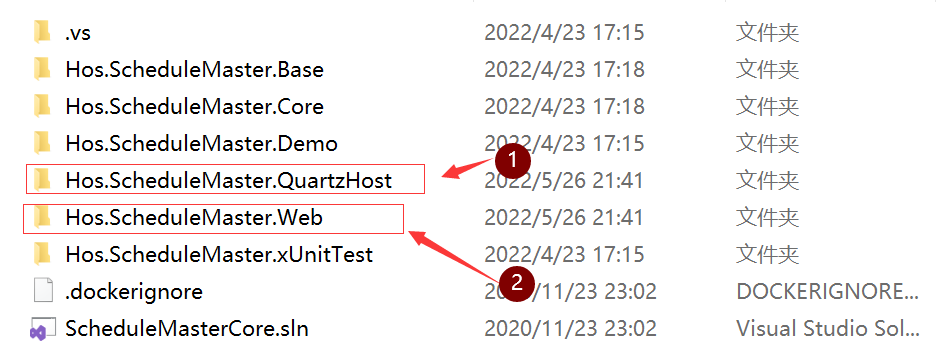
3.进入Hos.ScheduleMaster.Web项目的发布目录,dotnet Hos.ScheduleMaster.Web.dll启动项目 ,此时会生成数据库
登录账号:admin
密码:111111
4.进入Hos.ScheduleMaster.QuartzHost项目的发布目录,执行命令,启动项目
dotnetHos.ScheduleMaster.QuartzHost.dll--urlshttp://*:30003
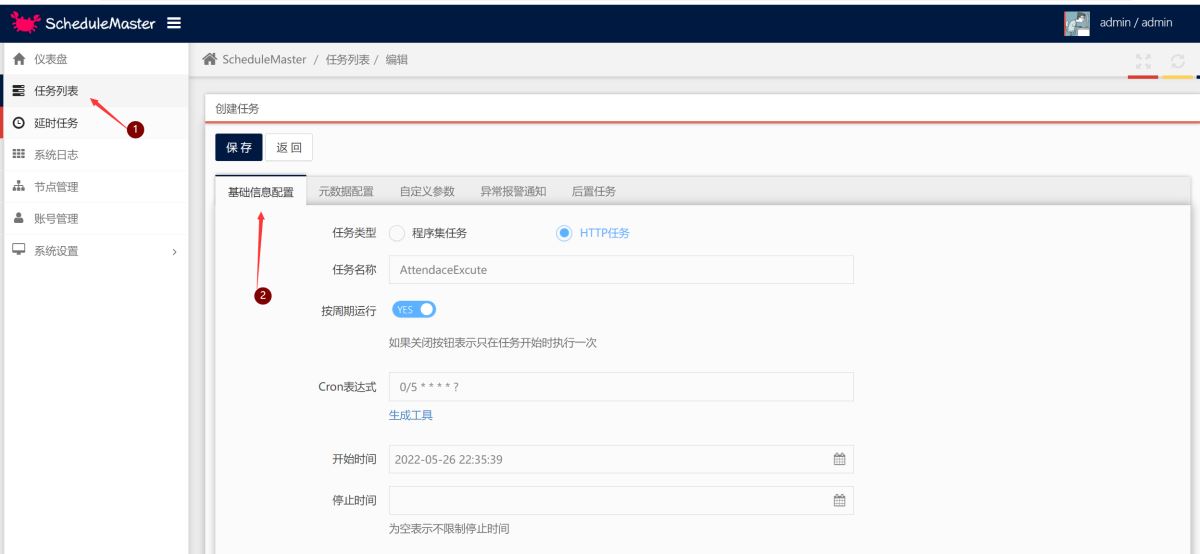
1.配置Http调度任务
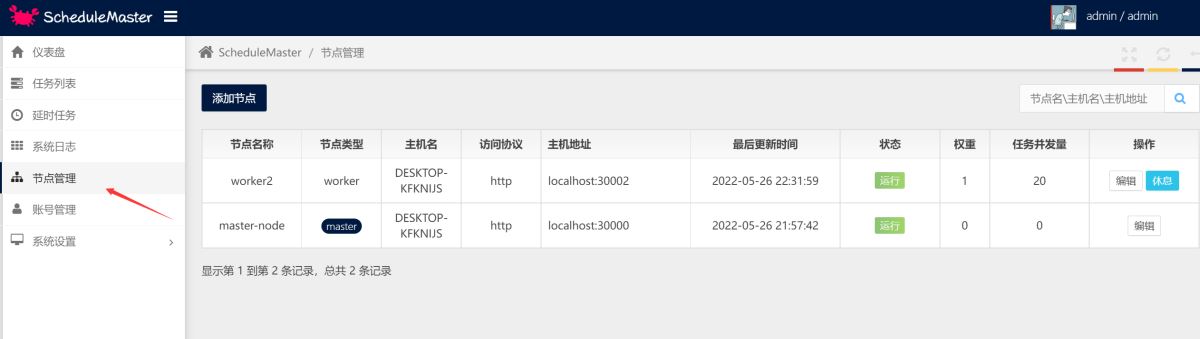
5.准备就绪后,使用后台查看节点管理,可以看到web主节点30000和任务调度的接口30002已经在运行
6.使用任务列表菜单,创建定时调度任务,配置基础信息和元数据配置,然后点击保存就开始执行任务
2.配置程序集调度任务
1.创建一个类库,安装ScheduleMaster库, 创建一个类继承TaskBase,实现抽象方法,然后编译程序集
namespaceTaskExcuteService{classAssemblyTask:TaskBase{publicoverridevoidRun(TaskContextcontext){context.WriteLog("程序集任务");}}}2.找到debug目录,去掉Base程序集,然后添加为压缩文件
3.在web界面找到任务配置,选择程序集进行基本配置,配置元数据,输入程序集名称,然后输入类,并将程序集上传,保存就可以运行了
3.使用Api接入任务
为了方便业务系统更好的接入调度系统,ScheduleMaster创建任务不仅可以在控制台中实现,系统也提供了WebAPI供业务系统使用代码接入,这种方式对延时任务来说尤其重要。
1.API Server 对接流程
在控制台中创建好专用的API对接用户账号。
使用对接账号的用户名设置为http header中的
ms_auth_user值。使用经过哈希运算过的秘钥设置为http header中的
ms_auth_secret值,计算规则:按{用户名}{hash(密码)}{用户名}的格式拼接得到字符串str,然后再对str做一次hash运算即得到最终秘钥,hash函数是小写的32位MD5算法。使用form格式发起http调用,如果非法用户会返回401-Unauthorized。
HttpClientclient=newHttpClient();client.DefaultRequestHeaders.Add("ms_auth_user","admin");client.DefaultRequestHeaders.Add("ms_auth_secret",SecurityHelper.MD5($"admin{SecurityHelper.MD5("111111")}}admin"));所有接口采用统一的返回格式,字段如下:
2.创建程序集任务
使用API创建任务的方式不支持上传程序包,所以在任务需要启动时要确保程序包已通过其他方式上传,否则会启动失败。
接口地址:
http://yourip:30000/api/task/create请求类型:
POST参数格式:
application/x-www-form-urlencoded返回结果:创建成功返回任务id
参数列表:
ScheduleParam:
HttpClientclient=newHttpClient();List<KeyValuePair<string,string>>args=newList<KeyValuePair<string,string>>();args.Add(newKeyValuePair<string,string>("MetaType","1"));args.Add(newKeyValuePair<string,string>("RunLoop","true"));args.Add(newKeyValuePair<string,string>("CronExpression","330/8***?"));args.Add(newKeyValuePair<string,string>("Remark","ByXunitTesterCreated"));args.Add(newKeyValuePair<string,string>("StartDate",DateTime.Today.ToString("yyyy-MM-ddHH:mm:ss")));args.Add(newKeyValuePair<string,string>("Title","程序集接口测试任务"));args.Add(newKeyValuePair<string,string>("AssemblyName","Hos.ScheduleMaster.Demo"));args.Add(newKeyValuePair<string,string>("ClassName","Hos.ScheduleMaster.Demo.Simple"));args.Add(newKeyValuePair<string,string>("CustomParamsJson","[{\"ParamKey\":\"k1\",\"ParamValue\":\"1111\",\"ParamRemark\":\"r1\"},{\"ParamKey\":\"k2\",\"ParamValue\":\"2222\",\"ParamRemark\":\"r2\"}]"));args.Add(newKeyValuePair<string,string>("Keepers","1"));args.Add(newKeyValuePair<string,string>("Keepers","2"));//args.Add(newKeyValuePair<string,string>("Nexts",""));//args.Add(newKeyValuePair<string,string>("Executors",""));HttpContentreqContent=newFormUrlEncodedContent(args);varresponse=awaitclient.PostAsync("http://localhost:30000/api/Task/Create",reqContent);varcontent=awaitresponse.Content.ReadAsStringAsync();Debug.WriteLine(content);3.创建HTTP任务
接口地址:
http://yourip:30000/api/task/create请求类型:
POST参数格式:
application/x-www-form-urlencoded返回结果:创建成功返回任务id
参数列表:
HttpClientclient=newHttpClient();List<KeyValuePair<string,string>>args=newList<KeyValuePair<string,string>>();args.Add(newKeyValuePair<string,string>("MetaType","2"));args.Add(newKeyValuePair<string,string>("RunLoop","true"));args.Add(newKeyValuePair<string,string>("CronExpression","220/8***?"));args.Add(newKeyValuePair<string,string>("Remark","ByXunitTesterCreated"));args.Add(newKeyValuePair<string,string>("StartDate",DateTime.Today.ToString("yyyy-MM-ddHH:mm:ss")));args.Add(newKeyValuePair<string,string>("Title","Http接口测试任务"));args.Add(newKeyValuePair<string,string>("HttpRequestUrl","http://localhost:56655/api/1.0/value/jsonpost"));args.Add(newKeyValuePair<string,string>("HttpMethod","POST"));args.Add(newKeyValuePair<string,string>("HttpContentType","application/json"));args.Add(newKeyValuePair<string,string>("HttpHeaders","[]"));args.Add(newKeyValuePair<string,string>("HttpBody","{\"Posts\":[{\"PostId\":666,\"Title\":\"tester\",\"Content\":\"testtesttest\"}],\"BlogId\":111,\"Url\":\"qweqrrttryrtyrtrtrt\"}"));HttpContentreqContent=newFormUrlEncodedContent(args);varresponse=awaitclient.PostAsync("http://localhost:30000/api/Task/Create",reqContent);varcontent=awaitresponse.Content.ReadAsStringAsync();Debug.WriteLine(content);4.创建延时任务
接口地址:
http://yourip:30000/api/delaytask/create请求类型:
POST参数格式:
application/x-www-form-urlencoded返回结果:创建成功返回任务id
参数列表:
for(inti=0;i<5;i++){intrndNum=newRandom().Next(20,500);List<KeyValuePair<string,string>>args=newList<KeyValuePair<string,string>>();args.Add(newKeyValuePair<string,string>("SourceApp","TestApp"));args.Add(newKeyValuePair<string,string>("Topic","TestApp.Trade.TimeoutCancel"));args.Add(newKeyValuePair<string,string>("ContentKey",i.ToString()));args.Add(newKeyValuePair<string,string>("DelayTimeSpan",rndNum.ToString()));args.Add(newKeyValuePair<string,string>("DelayAbsoluteTime",DateTime.Now.AddSeconds(rndNum).ToString("yyyy-MM-ddHH:mm:ss")));args.Add(newKeyValuePair<string,string>("NotifyUrl","http://localhost:56655/api/1.0/value/delaypost"));args.Add(newKeyValuePair<string,string>("NotifyDataType","application/json"));args.Add(newKeyValuePair<string,string>("NotifyBody","{\"Posts\":[{\"PostId\":666,\"Title\":\"tester\",\"Content\":\"testtesttest\"}],\"BlogId\":111,\"Url\":\"qweqrrttryrtyrtrtrt\"}"));HttpContentreqContent=newFormUrlEncodedContent(args);varresponse=awaitclient.PostAsync("http://localhost:30000/api/DelayTask/Create",reqContent);varcontent=awaitresponse.Content.ReadAsStringAsync();Debug.WriteLine(content);}4.框架简单分析
1.全局设计
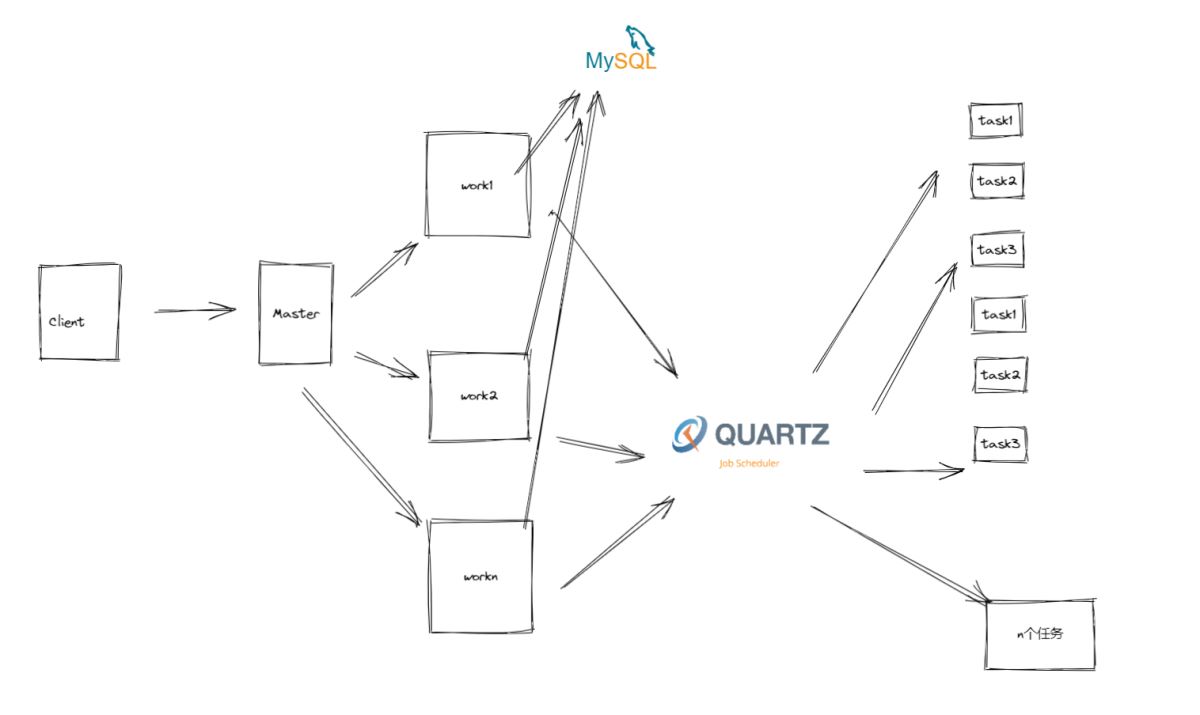
根据官网的设计图,以及操作的流程,简单总结一下任务全局流程为客户端—–>master——>work—–>执行任务。从大的架构方向的思想就是,将原有单个服务中业务和任务调度混合的方式做一些改变,使业务和调度分离,专门把任务调度部分剥离出来,作为一个独立的进程,来统一调用和管理任务,而原有服务只做业务处理。
2.Master和Work分析
我们主要从主节点,从节点,数据表这几个方面来简单分析,整个业务的时序流程,从本质来看并不复杂master和Work之间的关系是相互配合的,可能乍一看下面整个图有点混乱,下面来解释一下,其实Master节点将任务添加到数据中,然后work节点,去从对应的数据表中取出任务数据,然后根据任务对应的配置,生成配置信息,调用Quartz执行任务,这就是我们整个框架中最核心的业务。
当然master和work除了主要承载了整个管理系统的UI可视化、后台业务操作、任务执行之外,如果从细节以及实现方式来说主要做了以下事情:
Master
1.分配任务执行和选择节点
2.对work节点进行健康检查,对任务进行故障转移
Work
1.取出任务配置信息
2.使用Quartz根据配置运行任务
3.使用反射调用程序集
4.使用httpclient调用http 接口
</div> <div class="zixun-tj-product adv-bottom"></div> </div> </div> <div class="prve-next-news">.NET Core分布式任务调度ScheduleMaster怎么使用的详细内容,希望对您有所帮助,信息来源于网络。