OpenCV图像处理之图像拼接怎么实现
导读:本文共5012.5字符,通常情况下阅读需要17分钟。同时您也可以点击右侧朗读,来听本文内容。按键盘←(左) →(右) 方向键可以翻页。
摘要:本文小编为大家详细介绍“OpenCV图像处理之图像拼接怎么实现”,内容详细,步骤清晰,细节处理妥当,希望这篇“OpenCV图像处理之图像拼接怎么实现”文章能帮助大家解决疑惑,下面跟着小编的思路慢慢深入,一起来学习新知识吧。图像拼接技术一、需求分析将下面两张图像进行拼接拼接得到一张完整的图像二、具体步骤1.选择特征点//1、选择特征点//左图右图识别特征点是Mat对象用cd保存surf->... ...
音频解说
目录
(为您整理了一些要点),点击可以直达。本文小编为大家详细介绍“OpenCV图像处理之图像拼接怎么实现”,内容详细,步骤清晰,细节处理妥当,希望这篇“OpenCV图像处理之图像拼接怎么实现”文章能帮助大家解决疑惑,下面跟着小编的思路慢慢深入,一起来学习新知识吧。
图像拼接技术
一、需求分析
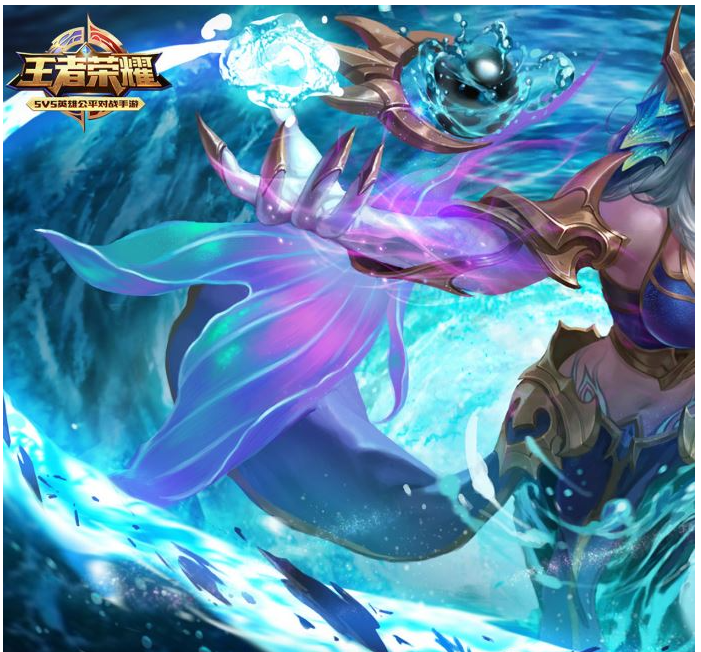
将下面两张图像进行拼接
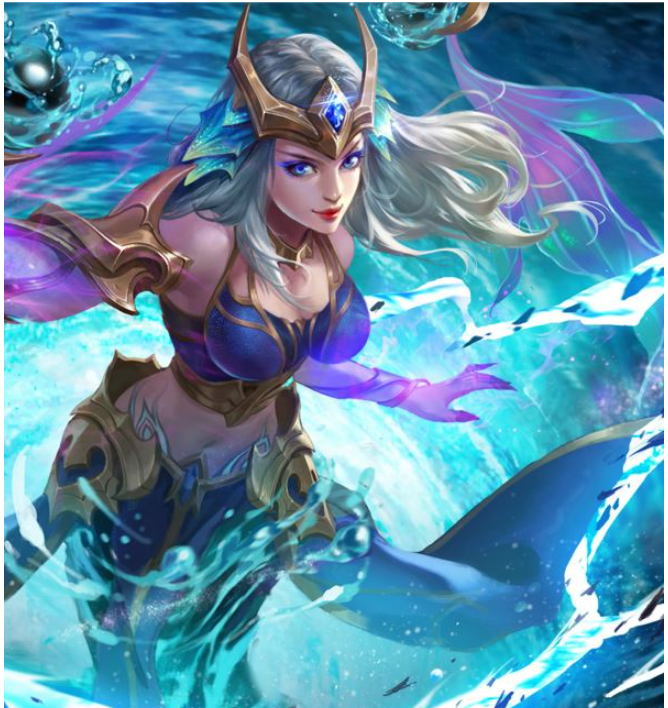
拼接得到一张完整的图像
二、具体步骤
1.选择特征点
//1、选择特征点//左图右图识别特征点是Mat对象用cd保存surf->detectAndCompute(left,Mat(),key2,d);surf->detectAndCompute(right,Mat(),key1,c);//特征点对比,保存特征点为中心点区域比对vector<DMatch>matches;matcher.match(d,c,matches);//排序从小到大找到特征点连线sort(matches.begin(),matches.end());
2.保存最优的特征点对象
//2、保存最优的特征点对象vector<DMatch>good_matches;intptrpoint=std::min(50,(int)(matches.size()*0.15));for(inti=0;i<ptrpoint;i++){good_matches.push_back(matches[i]);}//2-1、画线最优的特征点对象连线Matoutimg;drawMatches(left,key2,right,key1,good_matches,outimg,Scalar::all(-1),Scalar::all(-1),vector<char>(),DrawMatchesFlags::NOT_DRAW_SINGLE_POINTS);//imshow("outimg",outimg);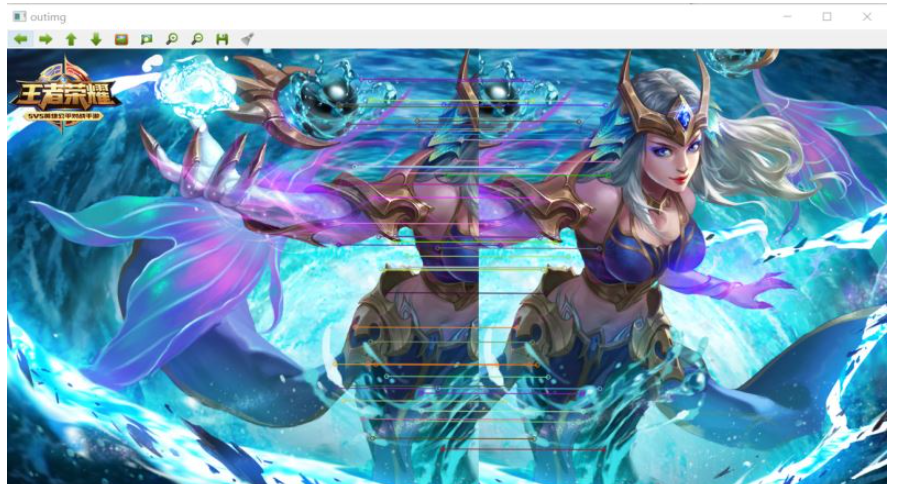
3.特征点匹配
//3、特征点匹配vector<Point2f>imagepoint1,imagepoint2;for(inti=0;i<good_matches.size();i++){//查找特征点可连接处变形imagepoint1.push_back(key1[good_matches[i].trainIdx].pt);//查找特征点可连接处查找基准线imagepoint2.push_back(key2[good_matches[i].queryIdx].pt);}4.透视转换 图像融合
//4、透视转换图形融合Mathomo=findHomography(imagepoint1,imagepoint2,CV_RANSAC);//imshow("homo",homo);//根据透视转换矩阵进行计算四个坐标CalcCorners(homo,right);//接收透视转换结果MatimageTransForm;//透视转换warpPerspective(right,imageTransForm,homo,Size(MAX(corners.right_top.x,corners.right_bottom.x),left.rows));//右图透视变换由于本次图片材料是自己截图拼接的因此看不出透视变换的明显特征//imshow("imageTransForm",imageTransForm);//结果进行整合intdst_width=imageTransForm.cols;intdst_height=left.rows;Matdst(dst_height,dst_width,CV_8UC3);dst.setTo(0);imageTransForm.copyTo(dst(Rect(0,0,imageTransForm.cols,imageTransForm.rows)));left.copyTo(dst(Rect(0,0,left.cols,left.rows)));
右图的透视转换,由于图像材料是自己截图拼接的,因此看不出透视变换的明显特征,但根据上图可知已经做出透视变换图像处理操作
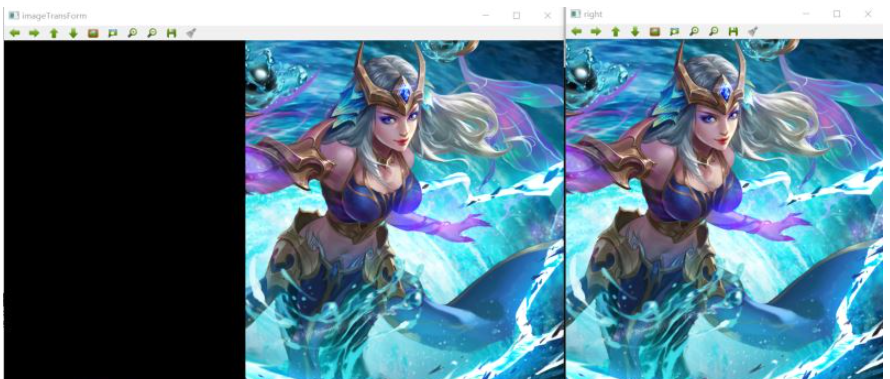
左图与右图的透视转换结果 拼接 【这里只是将窗口移动测试看下前面步骤是否正确】

可以看出左图与右图的透视转换结果 是可以进行接下来的图像融合操作的
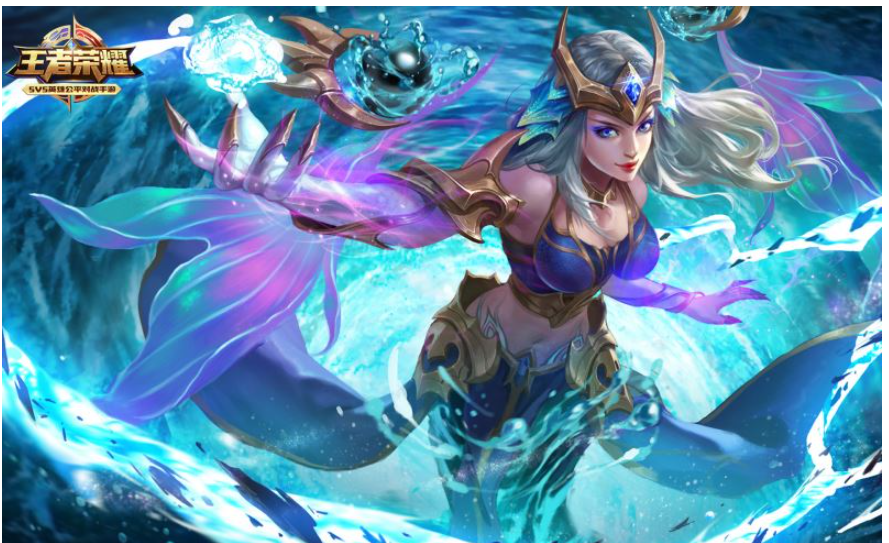
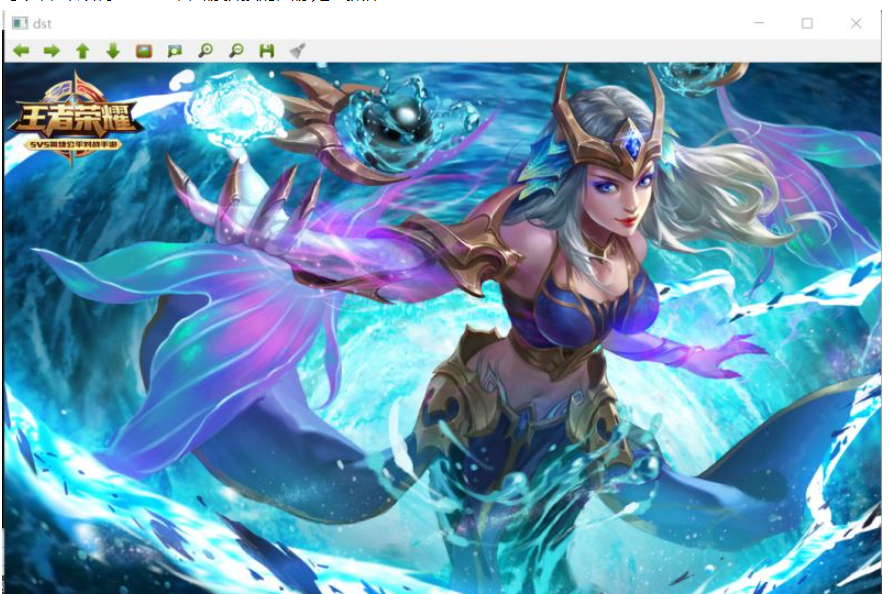
5.优化图像 进行最终的结果展示
//5、优化图像OptimizeSeam(left,imageTransForm,dst);//最终图像拼接结果imshow("dst",dst);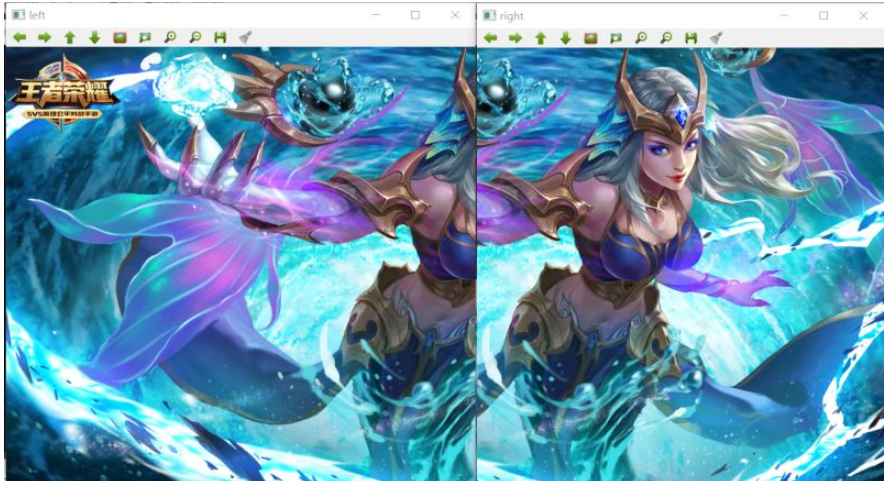
可以看出 顺利完成 两张图像拼接的图像处理操作
三、代码实现
#include<iostream>#include<opencv2/opencv.hpp>#include<opencv2/highgui.hpp>//图像融合#include<opencv2/xfeatures2d.hpp>//拼接算法#include<opencv2/calib3d.hpp>#include<opencv2/imgproc.hpp>usingnamespacestd;usingnamespacecv;usingnamespacecv::xfeatures2d;typedefstruct{Point2fleft_top;Point2fleft_bottom;Point2fright_top;Point2fright_bottom;}four_corners_t;four_corners_tcorners;voidCalcCorners(constMat&H,constMat&src){doublev2[]={0,0,1};//左上角doublev1[3];//变换后的坐标值MatV2=Mat(3,1,CV_64FC1,v2);//列向量MatV1=Mat(3,1,CV_64FC1,v1);//列向量V1=H*V2;//左上角(0,0,1)cout<<"V2:"<<V2<<endl;cout<<"V1:"<<V1<<endl;corners.left_top.x=v1[0]/v1[2];corners.left_top.y=v1[1]/v1[2];//左下角(0,src.rows,1)v2[0]=0;v2[1]=src.rows;v2[2]=1;V2=Mat(3,1,CV_64FC1,v2);//列向量V1=Mat(3,1,CV_64FC1,v1);//列向量V1=H*V2;corners.left_bottom.x=v1[0]/v1[2];corners.left_bottom.y=v1[1]/v1[2];//右上角(src.cols,0,1)v2[0]=src.cols;v2[1]=0;v2[2]=1;V2=Mat(3,1,CV_64FC1,v2);//列向量V1=Mat(3,1,CV_64FC1,v1);//列向量V1=H*V2;corners.right_top.x=v1[0]/v1[2];corners.right_top.y=v1[1]/v1[2];//右下角(src.cols,src.rows,1)v2[0]=src.cols;v2[1]=src.rows;v2[2]=1;V2=Mat(3,1,CV_64FC1,v2);//列向量V1=Mat(3,1,CV_64FC1,v1);//列向量V1=H*V2;corners.right_bottom.x=v1[0]/v1[2];corners.right_bottom.y=v1[1]/v1[2];}//图像融合的去裂缝处理操作voidOptimizeSeam(Mat&img1,Mat&trans,Mat&dst){intstart=MIN(corners.left_top.x,corners.left_bottom.x);//开始位置,即重叠区域的左边界doubleprocessWidth=img1.cols-start;//重叠区域的宽度introws=dst.rows;intcols=img1.cols;//注意,是列数*通道数doublealpha=1;//img1中像素的权重for(inti=0;i<rows;i++){uchar*p=img1.ptr<uchar>(i);//获取第i行的首地址uchar*t=trans.ptr<uchar>(i);uchar*d=dst.ptr<uchar>(i);for(intj=start;j<cols;j++){//如果遇到图像trans中无像素的黑点,则完全拷贝img1中的数据if(t[j*3]==0&&t[j*3+1]==0&&t[j*3+2]==0){alpha=1;}else{//img1中像素的权重,与当前处理点距重叠区域左边界的距离成正比,实验证明,这种方法确实好alpha=(processWidth-(j-start))/processWidth;}d[j*3]=p[j*3]*alpha+t[j*3]*(1-alpha);d[j*3+1]=p[j*3+1]*alpha+t[j*3+1]*(1-alpha);d[j*3+2]=p[j*3+2]*alpha+t[j*3+2]*(1-alpha);}}}intmain(){//左图Matleft=imread("D:/00000000000003jieduanshipincailliao/a1.png");//右图Matright=imread("D:/00000000000003jieduanshipincailliao/a2.png");//左右图显示imshow("left",left);imshow("right",right);//创建SURF对象Ptr<SURF>surf;//create函数参数海森矩阵阀值800特征点以内surf=SURF::create(800);//创建一个暴力匹配器用于特征点匹配BFMatchermatcher;//特征点容器存放特征点KeyPointvector<KeyPoint>key1,key2;//保存特征点Matc,d;//1、选择特征点//左图右图识别特征点是Mat对象用cd保存surf->detectAndCompute(left,Mat(),key2,d);surf->detectAndCompute(right,Mat(),key1,c);//特征点对比,保存特征点为中心点区域比对vector<DMatch>matches;matcher.match(d,c,matches);//排序从小到大找到特征点连线sort(matches.begin(),matches.end());//2、保存最优的特征点对象vector<DMatch>good_matches;intptrpoint=std::min(50,(int)(matches.size()*0.15));for(inti=0;i<ptrpoint;i++){good_matches.push_back(matches[i]);}//2-1、画线最优的特征点对象连线Matoutimg;drawMatches(left,key2,right,key1,good_matches,outimg,Scalar::all(-1),Scalar::all(-1),vector<char>(),DrawMatchesFlags::NOT_DRAW_SINGLE_POINTS);//imshow("outimg",outimg);//3、特征点匹配vector<Point2f>imagepoint1,imagepoint2;for(inti=0;i<good_matches.size();i++){//查找特征点可连接处变形imagepoint1.push_back(key1[good_matches[i].trainIdx].pt);//查找特征点可连接处查找基准线imagepoint2.push_back(key2[good_matches[i].queryIdx].pt);}//4、透视转换图形融合Mathomo=findHomography(imagepoint1,imagepoint2,CV_RANSAC);//imshow("homo",homo);//根据透视转换矩阵进行计算四个坐标CalcCorners(homo,right);//接收透视转换结果MatimageTransForm;//透视转换warpPerspective(right,imageTransForm,homo,Size(MAX(corners.right_top.x,corners.right_bottom.x),left.rows));//右图透视变换由于本次图片材料是自己截图拼接的因此看不出透视变换的明显特征//imshow("imageTransForm",imageTransForm);//结果进行整合intdst_width=imageTransForm.cols;intdst_height=left.rows;Matdst(dst_height,dst_width,CV_8UC3);dst.setTo(0);imageTransForm.copyTo(dst(Rect(0,0,imageTransForm.cols,imageTransForm.rows)));left.copyTo(dst(Rect(0,0,left.cols,left.rows)));//5、优化图像OptimizeSeam(left,imageTransForm,dst);//最终图像拼接结果imshow("dst",dst);waitKey(0);return0;}读到这里,这篇“OpenCV图像处理之图像拼接怎么实现”文章已经介绍完毕,想要掌握这篇文章的知识点还需要大家自己动手实践使用过才能领会,如果想了解更多相关内容的文章,欢迎关注亿速云行业资讯频道。
本文:
OpenCV图像处理之图像拼接怎么实现的详细内容,希望对您有所帮助,信息来源于网络。