web前端图片懒加载的原理与实现方式有哪些
导读:本文共5908.5字符,通常情况下阅读需要20分钟。同时您也可以点击右侧朗读,来听本文内容。按键盘←(左) →(右) 方向键可以翻页。
摘要: 一. 图片懒加载的目的大型网站如常用的淘宝,京东等页面,需要展示大量的商品图片信息,如果打开网页时让所有图片一次性加载完成,需要处理很多次网络请求,等待加载时间比较长,用户体验感很差。有一种常用的解决方式是:随着滚动动态加载,即图片的惰性加载。视图之外的图片默认不加载,随着页面的滚动,图片进入了显示的范围,则触发图片的加载显示。优点:页面加载速度快,用户体验感更... ...
目录
(为您整理了一些要点),点击可以直达。一. 图片懒加载的目的
大型网站如常用的淘宝,京东等页面,需要展示大量的商品图片信息,如果打开网页时让所有图片一次性加载完成,需要处理很多次网络请求,等待加载时间比较长,用户体验感很差。
有一种常用的解决方式是:随着滚动动态加载,即图片的惰性加载。视图之外的图片默认不加载,随着页面的滚动,图片进入了显示的范围,则触发图片的加载显示。
优点:页面加载速度快,用户体验感更好且节省流量
二. 图片懒加载的原理方法
1.初始化时,图片标签的src不能是真实的图片地址,也不可以是空地址或者坏地址(会出现图片加载失败的图标)。
2.初始化的时候,可以设置图片的src是某一个小型图片。例如一张1px*1px的透明图片。由于所有图片都使用这一张图片,只会发送一次请求,不会增加性能负担。将图片的真实路径绑定给一个自定义属性,例如data-url。注意:页面的img元素,如果没有src属性,浏览器就不会发出请求去下载图片
<imgdata-url="xxx"src="1px.gif"width="100"height="100"/>
3.定义滚动事件,判断元素进入视口,则将src替换为真正的url地址。利用js提取data-url的真实图片地址赋值给src属性
三. 图片懒加载的实现方法
图片懒加载的关键在于获取元素的位置,并判断其是否出现在视口。故有以下三种方式
滚动监听+scrollTop+offsetTop+innerHeight
滚动监听+getBoundingClientRect()
intersectionObserve()
3.1 滚动监听+scrollTop+offsetTop+innerHeight
scrollTop:指网页元素被滚动条卷去的部分。
offsetTop:元素相对父元素的位置
innerHeight:当前浏览器窗口的大小。需要注意兼容性问题。
IE8及更早版本以前没有提供取得浏览器窗口大小的属性,不过提供了API:document.documentElement.clientHeight/clientWidth:返回元素内容及其内边距所占据的空间大小。
IE6中,上述属性必须在标准模式才有效,如果是混杂模式,需要通过document.body.clientWidth 和 document.body. clientHeight 取得相同信息。
varpageWidth=window.innerWidthvarpageHeight=window.innerHeight;if(typeofpageWidth!="number"){//pageWidth的值不是数值,说明没有innerwidth属性if(document.compatMode=="CSS1Compat"){//标准模式 pageWidth=document.documentElement.clientWidth; pageHeight=document.documentElement.clientHeight; }else{//混杂模式 pageWidth=document.body.clientWidth; pageHeight=document.body.clientHeight; }}三个属性之间的关系如图所示,故当scrollTop+innerHeight > offsetTop,即图片在视口内,否则图片在可视区域外。
代码实现
滚动监听完成图片懒加载的简易版本
<!DOCTYPEhtml><htmllang="en"><head><metacharset="UTF-8"><metahttp-equiv="X-UA-Compatible"content="IE=edge"><metaname="viewport"content="width=device-width,initial-scale=1.0"><title>Document</title><style>*{margin:0;padding:0;}img{margin-top:400px;width:250px;display:block;}</style></head><body><imgsrc="img/1pxImg.png"data-url="img/1.jpg"><imgsrc="img/1pxImg.png"data-url="img/2.jpg"><imgsrc="img/1pxImg.png"data-url="img/3.jpg"><imgsrc="img/1pxImg.png"data-url="img/4.jpg"><imgsrc="img/1pxImg.png"data-url="img/5.jpg"><script>varimgs=document.getElementsByTagName('img')scrollFn()//监听滚动事件window.onscroll=scrollFnfunctionscrollFn(){varclietH=window.innerHeight||document.documentElement.clientHeight||document.body.clientHeight;varscrollTop=document.documentElement.scrollTop||window.pageYOffset||document.body.scrollTop;console.log(clietH,scrollTop);Array.from(imgs).forEach((item)=>{leteleTop=item.offsetTop//console.log(eleTop)letcount=scrollTop+clietH-eleTopconsole.log(count)//可设置为>100查看懒加载效果if(count>0){//从data-url中取出真实的图片地址赋值给scritem.setAttribute('src',item.getAttribute('data-url'))}})}</script></body></html>3.2 滚动监听+getBoundingClientRect() getBoundingClientRect()
Element.getBoundingClientRect() 方法返回元素的大小及其相对于视口的位置。返回一个对象,对象属性包括top,right
rectObject=object.getBoundingClientRect();
API返回一个对象,即rectObject为一个对象,其包含以下属性
rectObject.top:元素上边到视窗上边的距离;
rectObject.right:元素右边到视窗左边的距离;
rectObject.bottom:元素下边到视窗上边的距离;
rectObject.left:元素左边到视窗左边的距离;
rectObject.width:元素自身的宽度
rectObject.height:元素自身的高度
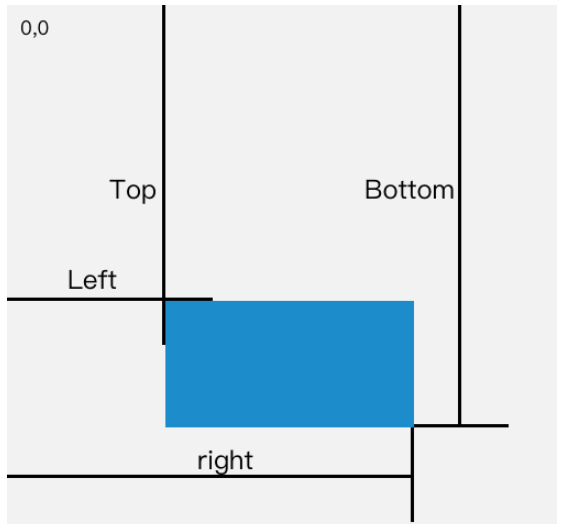
故当rectObject.top的值处于0-视口高度,则元素处于可视区。即
getBoundingClientRect(ele).top>=0&&getBoundingClientRect(ele).top<=offsetHeight
代码实现
<!DOCTYPEhtml><htmllang="en"><head><metacharset="UTF-8"><metahttp-equiv="X-UA-Compatible"content="IE=edge"><metaname="viewport"content="width=device-width,initial-scale=1.0"><title>Document</title><style>*{margin:0;padding:0;}img{margin-top:400px;width:250px;display:block;}</style></head><body><imgsrc="img/1pxImg.png"data-url="img/1.jpg"><imgsrc="img/1pxImg.png"data-url="img/2.jpg"><imgsrc="img/1pxImg.png"data-url="img/3.jpg"><imgsrc="img/1pxImg.png"data-url="img/4.jpg"><imgsrc="img/1pxImg.png"data-url="img/5.jpg"><script>varimgs=document.getElementsByTagName('img')scrollFn()//监听滚动事件window.onscroll=scrollFnfunctionscrollFn(){varclietH=window.innerHeight||document.documentElement.clientHeight||document.body.clientHeight;Array.from(imgs).forEach((item)=>{letele=item.getBoundingClientRect()console.log(clietH,ele.top)//可以设置为ele.top+200查看懒加载效果if(ele.top>0&&ele.top<clietH){//从data-url中取出真实的图片地址赋值给scritem.setAttribute('src',item.getAttribute('data-url'))}})}</script></body></html>3.3 intersectionObserve() intersectionObserve()
新的API,针对元素的可见时间进行监听。由于可见(visible)的本质是,目标元素与视口产生一个交叉区,所以这个 API 叫做"交叉观察器"。
vario=newIntersectionObserver(callback,option);
IntersectionObserver是浏览器原生提供的构造函数,接受两个参数:callback是可见性变化时的回调函数,option是配置对象(该参数可选)。
构造函数的返回值是一个观察器实例。实例的observe方法可以指定观察哪个 DOM 节点。
//开始观察io.observe(document.getElementById('example'));//停止观察io.unobserve(element);//关闭观察器io.disconnect();上面代码中,observe的参数是一个 DOM 节点对象。如果要观察多个节点,就要多次调用这个方法。
io.observe(elementA);io.observe(elementB);
callack参数
目标元素的可见性变化时,就会调用观察器的回调函数callback。
一般会触发两次:1.目标元素刚刚进入视口(开始可见),2.完全离开视口(开始不可见)。
callback函数的参数是一个数组,每个成员都是一个IntersectionObserverEntry对象。
IntersectionObserverEntry 对象
提供目标元素的信息,一共有六个属性。
time:可见性发生变化的时间,是一个高精度时间戳,单位为毫秒
target:被观察的目标元素,是一个 DOM 节点对象
rootBounds:根元素的矩形区域的信息,getBoundingClientRect()方法的返回值,如果没有根元素(即直接相对于视口滚动),则返回null
boundingClientRect:目标元素的矩形区域的信息
intersectionRect:目标元素与视口(或根元素)的交叉区域的信息
intersectionRatio:目标元素的可见比例,即intersectionRect占boundingClientRect的比例,完全可见时为1,完全不可见时小于等于0
所以可以通过判断intersectionRatio属性是否处于(0,1)来判断元素的可见性
代码实现
<!DOCTYPEhtml><htmllang="en"><head><metacharset="UTF-8"><metahttp-equiv="X-UA-Compatible"content="IE=edge"><metaname="viewport"content="width=device-width,initial-scale=1.0"><title>Document</title><style>*{margin:0;padding:0;}img{margin-top:400px;width:250px;display:block;}</style></head><body><imgsrc="img/1pxImg.png"data-url="img/1.jpg"><imgsrc="img/1pxImg.png"data-url="img/2.jpg"><imgsrc="img/1pxImg.png"data-url="img/3.jpg"><imgsrc="img/1pxImg.png"data-url="img/4.jpg"><imgsrc="img/1pxImg.png"data-url="img/5.jpg"><script>varimgs=document.getElementsByTagName('img')//观察器实例letio=newIntersectionObserver((entires)=>{entires.forEach(item=>{//原图片元素letoImg=item.targetif(item.intersectionRatio>0&&item.intersectionRatio<=1){oImg.setAttribute('src',oImg.getAttribute('data-url'))}})})//给每一个图片设置观察器Array.from(imgs).forEach(element=>{io.observe(element)});</script></body></html> </div> <div class="zixun-tj-product adv-bottom"></div> </div> </div> <div class="prve-next-news">web前端图片懒加载的原理与实现方式有哪些的详细内容,希望对您有所帮助,信息来源于网络。