Android如何开发MQTT协议的模型及通信
导读:本文共5962字符,通常情况下阅读需要20分钟。同时您也可以点击右侧朗读,来听本文内容。按键盘←(左) →(右) 方向键可以翻页。
摘要: 什么是MQTT协议MQTT协议又称为消息队列要测传输协议,他是一种基于发布/订阅范式的消息协议,并且它是一种基于TCP/IP协议族的应用层协议。可以看出的它的特点:轻量、简单、基于发布/订阅范式、基于TCP/IP、是一种应用层协议。如果还是不明白,我们可以简单拿它和我们常用的http协议做个比较。HTTP协议MQTT协议基于TCP或UDP基于TCP基于 请求/响... ...
目录
(为您整理了一些要点),点击可以直达。什么是MQTT协议
MQTT协议又称为消息队列要测传输协议,他是一种基于发布/订阅范式的消息协议,并且它是一种基于TCP/IP协议族的应用层协议。
可以看出的它的特点:轻量、简单、基于发布/订阅范式、基于TCP/IP、是一种应用层协议。
如果还是不明白,我们可以简单拿它和我们常用的http协议做个比较。
MQTT协议的模型
我们得知道它是一个怎样的模型才好去了解它的一个工作方式。比如说HTTP协议简单分为两个角色,一个Client代表客户端,一个Server代表服务端。
而MQTT简单来看分为3个角色,publisher表示发布者,subscriber表示订阅者,它们两个都是Client,所以任何一个Client客户端既能充当publisher,也能充当subscriber。还有一个角色是broker表示代理,它是Server服务端。可以看出MQTT也是基于C/S的通信架构,只不过分为3种角色。
如果理解了这个模型之后,你就会有个疑问,发布和订阅什么呢?这就需要引入一个新的东西叫主题topic(如果不理解主题这个概念的话也没关系,后面用代码就很容易理解主题是什么)
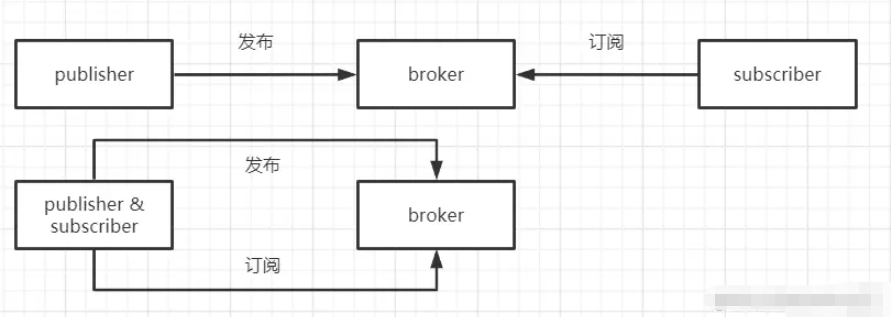
所以它的工作流程就是:
subscriber订阅者连接broker代理,并订阅主题topic
publisher发布者连接broker代理(当然如何订阅者和发布者是同一个Client的话就不需要重复连接),并发布消息到相应的主题
broker代理会把消息发给对应订阅的主题的subscriber订阅者
开发MQTT通信
1. 处理客户端和服务端
前面我们说了MQTT是继续C/S的结构,那我们就需要有一个客户端和一个服务端。
(1)服务端开发
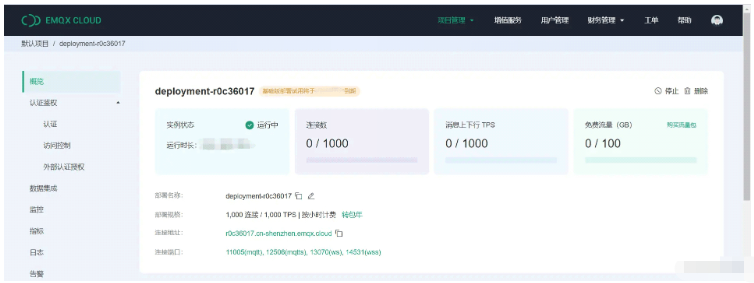
很不幸我是开发前端的,后台的开发我并不熟悉,所以这里的演示中我选择用云服务EMQX,想尝试的朋友可以上这个网页去部署自己的云服务,流程很简单 cloud.emqx.com/ ,免费试用14天。
(2)客户端开发
因为我是做Android开发的,所以这里我用Android来举例子。正常来说可以在TCP的基础上开发,自己去封装,但我这只是浅谈,所以我用第三方框架进行演示,用Paho的mqtt
2. 客户端开发
先导入Paho的mqtt
dependencies{......implementation'org.eclipse.paho:org.eclipse.paho.client.mqttv3:1.1.0'implementation'org.eclipse.paho:org.eclipse.paho.android.service:1.1.1'}在manifest中注册Paho的MqttService
<applicationandroid:allowBackup="true"android:icon="@mipmap/ic_launcher"android:label="@string/app_name"android:roundIcon="@mipmap/ic_launcher_round"android:supportsRtl="true"android:theme="@style/Theme.MyApplication"><activityandroid:name=".MainActivity"android:exported="true"><intent-filter><actionandroid:name="android.intent.action.MAIN"/><categoryandroid:name="android.intent.category.LAUNCHER"/></intent-filter></activity><serviceandroid:name="org.eclipse.paho.android.service.MqttService"/><serviceandroid:name=".MqttActionService"/></application>
我这边为了用一个项目来演示Mqtt通信,所有把MainActivity当成publisher发布者,把MqttActionService当成subscriber订阅者。
所以整体的流程是这样的,我们先开启MqttActionService,然后在MqttActionService中进行连接和订阅。再在MainActivity进行连接和发送消息。
先把Mqtt的Client给封装起来(我这里防止有些朋友看不懂Kotlin,我就用了Java,后面不重要的地方我直接用Kotlin,一般也比较容易看懂)。
publicclassMyMqttClient{privateMqttAndroidClientmClient;privateMqttConnectOptionsmOptions;privateOnMqttConnectListenermOnMqttConnectListener;privatefinalStringmClientId;privateMqttCallbackExtendedmExtended=newMqttCallbackExtended(){@OverridepublicvoidconnectComplete(booleanreconnect,StringserverURI){if(mOnMqttConnectListener!=null){mOnMqttConnectListener.onConnectComplete(serverURI);}}@OverridepublicvoidconnectionLost(Throwablecause){if(mOnMqttConnectListener!=null){mOnMqttConnectListener.onConnectFailure(cause);}}@OverridepublicvoidmessageArrived(Stringtopic,MqttMessagemessage)throwsException{}@OverridepublicvoiddeliveryComplete(IMqttDeliveryTokentoken){}};privateIMqttActionListenermConnectAction=newIMqttActionListener(){@OverridepublicvoidonSuccess(IMqttTokenasyncActionToken){}@OverridepublicvoidonFailure(IMqttTokenasyncActionToken,Throwableexception){if(mOnMqttConnectListener!=null){mOnMqttConnectListener.onConnectFailure(exception);}exception.printStackTrace();}};privateIMqttMessageListenermessageListener=newIMqttMessageListener(){@OverridepublicvoidmessageArrived(Stringtopic,MqttMessagemessage)throwsException{if(mOnMqttConnectListener!=null){mOnMqttConnectListener.onMessageArrived(topic,message);}}};publicMyMqttClient(Contextcontext){this(context,null);}publicMyMqttClient(Contextcontext,StringclientId){if(!TextUtils.isEmpty(clientId)){this.mClientId=clientId;}else{this.mClientId=MqttConfig.clientId;}init(context);}publicvoidinit(Contextcontext){mClient=newMqttAndroidClient(context,MqttConfig.mqttUrl,mClientId);mClient.setCallback(mExtended);mOptions=newMqttConnectOptions();mOptions.setConnectionTimeout(4000);mOptions.setKeepAliveInterval(30);mOptions.setUserName(MqttConfig.username);mOptions.setPassword(MqttConfig.password.toCharArray());}publicvoidsetOnMqttConnectListener(OnMqttConnectListeneronMqttConnectListener){this.mOnMqttConnectListener=onMqttConnectListener;}/***连接*/publicvoidconnect(){try{if(!mClient.isConnected()){mClient.connect(mOptions,null,mConnectAction);}}catch(Exceptione){e.printStackTrace();}}/***订阅*/publicvoidsubscribeToTopic(StringmTopic){this.subscribeToTopic(mTopic,0);}publicvoidsubscribeToTopic(StringmTopic,intqos){try{mClient.subscribe(mTopic,qos,null,null,messageListener);}catch(Exceptione){e.printStackTrace();}}/***发送消息*/publicvoidsendMessage(StringmTopic,byte[]data){try{MqttMessagemessage=newMqttMessage();message.setPayload(data);mClient.publish(mTopic,message);}catch(Exceptione){e.printStackTrace();}}publicvoidonDestroy(){try{mClient.disconnect();mExtended=null;mConnectAction=null;messageListener=null;}catch(Exceptione){e.printStackTrace();}}/***提供给外层的回调,更方便进行使用*/publicinterfaceOnMqttConnectListener{voidonConnectComplete(StringserverURI);voidonConnectFailure(Throwablee);voidonMessageArrived(Stringtopic,MqttMessagemessage);}}当中有些配置我直接抽出来
publicinterfaceMqttConfig{StringmqttUrl="tcp://r0c36017.cn-shenzhen.emqx.cloud:11005";StringclientId="deployment-r0c36017";Stringusername="yeshuaishizhenshuai";Stringpassword="123456";StringoneTopic="kylin/topic/one";}可以讲一下这些参数:
(1) mqttUrl: 连接代理的连接,可以看到我上面云服务那张截图里面的“连接地址”和“连接端口” (2) clientId: 客户端ID,无论是subscriber还是publisher都属于客户端,这个在上面说过,所以都有一个对应的ID标识他们是属于哪个客户端。我下面的Demo中MqttActionService用的ClienId是deployment-r0c36017,MainActivity用的ClienId是deployment-r0c36018,不同的,所以是两个客户端。 (3) username和password: 这两个参数都是一个标识,会和后台记录,如果你没有的话,那你就连不上代理,也就是连不上服务端。 (4) oneTopic: 就是主题,你订阅和发送消息都要对应是哪个主题。
然后subscriber连接并订阅主题
classMqttActionService:Service(){privatevarmqttClient:MyMqttClient?=nulloverridefunonCreate(){super.onCreate()mqttClient=MyMqttClient(this)mqttClient?.setOnMqttConnectListener(object:MyMqttClient.OnMqttConnectListener{overridefunonConnectComplete(serverURI:String?){mqttClient?.subscribeToTopic(MqttConfig.oneTopic)}overridefunonConnectFailure(e:Throwable?){}overridefunonMessageArrived(topic:String?,message:MqttMessage?){valh=Handler(Looper.getMainLooper())h.post{Toast.makeText(this@MqttActionService.applicationContext,message.toString(),Toast.LENGTH_SHORT).show();}}})}overridefunonStartCommand(intent:Intent?,flags:Int,startId:Int):Int{valhandler=Handler()handler.postDelayed({mqttClient?.connect()},1000)returnSTART_STICKY}overridefunonBind(intent:Intent?):IBinder?{returnnull}overridefunonDestroy(){super.onDestroy()mqttClient?.onDestroy()}}然后publisher连接并发送消息
classMainActivity:AppCompatActivity(){privatevarclinet:MyMqttClient?=nullprivatevarisConnect=falseoverridefunonCreate(savedInstanceState:Bundle?){super.onCreate(savedInstanceState)setContentView(R.layout.activity_main)init()valbtn:Button=findViewById(R.id.btn_connect)valsend:Button=findViewById(R.id.btn_send)valopen:Button=findViewById(R.id.open)open.setOnClickListener{valintent=Intent()intent.setClass(this,MqttActionService::class.java)startService(intent)}btn.setOnClickListener{clinet?.connect()}send.setOnClickListener{clinet?.sendMessage(MqttConfig.oneTopic,"你干嘛啊~哎呦~".toByteArray())}}privatefuninit(){clinet=MyMqttClient(this,"deployment-r0c36018")clinet?.setOnMqttConnectListener(object:MyMqttClient.OnMqttConnectListener{overridefunonConnectComplete(serverURI:String?){isConnect=true}overridefunonConnectFailure(e:Throwable?){e?.printStackTrace()isConnect=false}overridefunonMessageArrived(topic:String?,message:MqttMessage?){}})}}我这定了3个按钮,第一个按钮open会跳转Service然后subscriber连接并订阅主题,第二个按钮btn会连接代理,第三个按钮send发送消息。看MqttActionService的代码可以看出,我这里发送消息后,会弹出Toast。
Paho的mqtt的BUG
这库我也是第一次用,我们那用的都是自己撸的(这边肯定没法放上来),然后我用的时候发现一个问题。我想给Service去开一条进程去处理订阅的操作的,这样能更真实的去模拟,结果就在连接时出问题了
经检查,连接的context的进程要和org.eclipse.paho.android.service.MqttService的进程一致。我去看他源码是怎么回事。

发现它内部的Binder竟然做了强转,这里因为不是代理而会出现报错。如果使用这个库的话就小心点你要做的夸进程的操作。
</div> <div class="zixun-tj-product adv-bottom"></div> </div> </div> <div class="prve-next-news">Android如何开发MQTT协议的模型及通信的详细内容,希望对您有所帮助,信息来源于网络。