微信小程序怎么自定义组件Component使用
导读:本文共5632.5字符,通常情况下阅读需要19分钟。同时您也可以点击右侧朗读,来听本文内容。按键盘←(左) →(右) 方向键可以翻页。
摘要: 1- 前言在本文中你将收获小程序如何使用自定义组件自定义组件之间的传值自定义组件中插槽的使用2- 组件文件新建2.1 定义组件在根目录新建components文件夹,建立cell 文件夹,右击创建cell的Component组件cell.jscell.wxmlcell.jsoncell.wxss2.2 注册组件页面的xxx.json ,usingComponen... ...
音频解说
目录
(为您整理了一些要点),点击可以直达。1- 前言
在本文中你将收获
小程序如何使用自定义组件
自定义组件之间的传值
自定义组件中插槽的使用
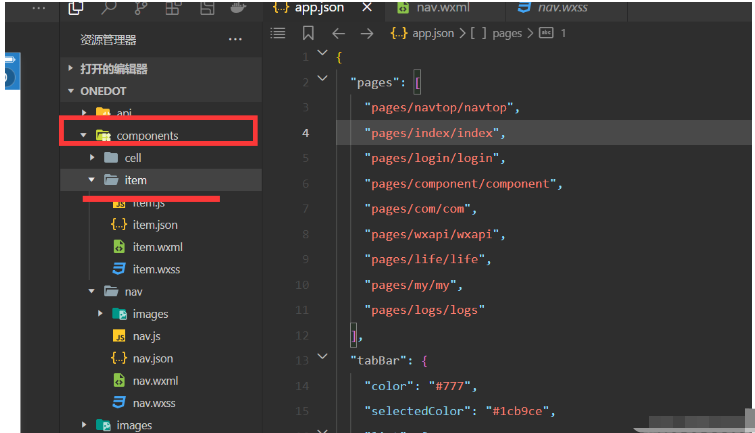
2- 组件文件新建
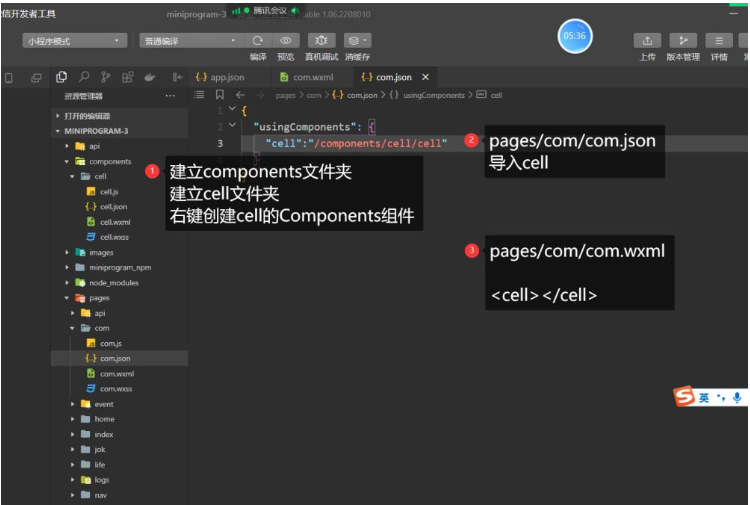
2.1 定义组件
在根目录新建components文件夹,建立cell 文件夹,右击创建cell的Component组件
cell.js
cell.wxml
cell.json
cell.wxss
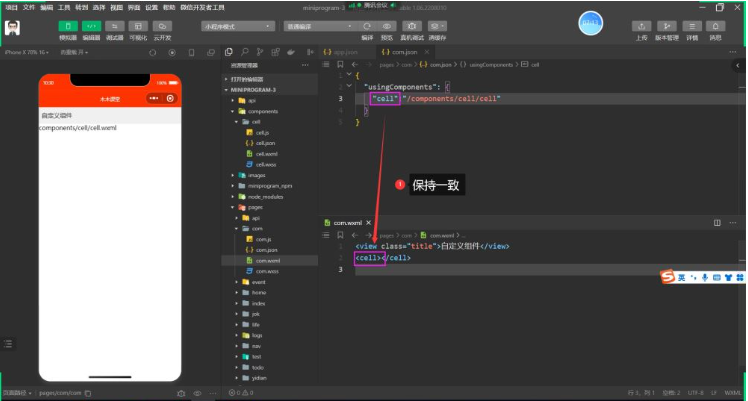
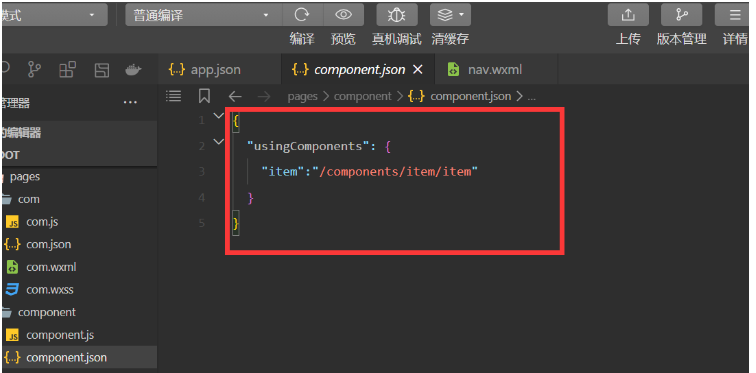
2.2 注册组件
页面的xxx.json ,usingComponent注册
"usingComponents":{"item":"/components/item/item"}2.3 使用组件
<item></item>
2.4 图参考
3- 外部类和样式隔离
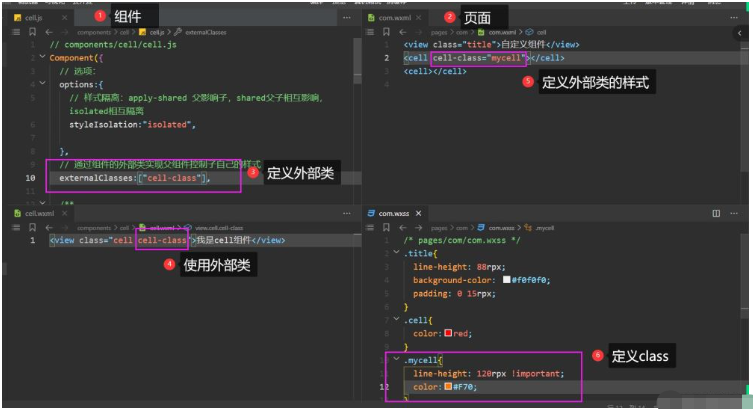
3.1定义组件
cell.wxml 文件
<viewclass="cellcell-class"></view>
cell.wxss
/*pages/com/com.wxss*/.cell{color:tomato;}.mycell{color:#f70;line-height:120rpx!important;}cell.js 文件
/*选项*/options:{/*样式隔离:apply-shared父影响子shared父子相互影响isolated相互隔离*/styleIsolation:'isolated',},//通过组件的外部类实现父组件控制自己的样式externalClasses:["cell-class"],3.2 使用组件
<cell></cell><cellcell-class="mycell"></cell>
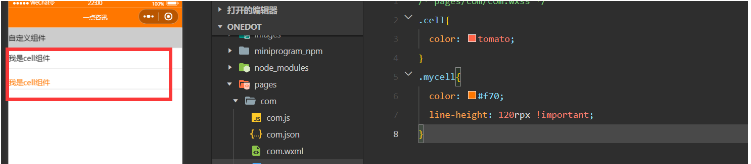
3.3 图解释
4- 组件插槽
4.1 默认插槽
cell.wxml
<viewclass="cell">我是cell组件<slot></slot></view>
cell.js
/*选项*/options:{//允许多个插槽multipleSlots:true,},cell.wxss
.cell{height:88rpx;line-height:88rpx;border-bottom:1rpxsolid#cccccc;}使用cell组件
<cell><text>放假</text><text>快点到来</text></cell>
4.2 命名多插槽
cell.wxml
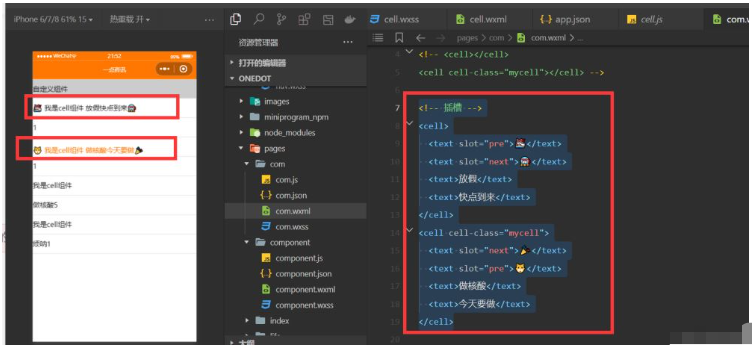
<viewclass="cellcell-class"><slotname="pre"></slot>我是cell组件<slot></slot><slotname="next"></slot></view>
cell.js
/*选项*/options:{//允许多个插槽multipleSlots:true,},cell.wxss
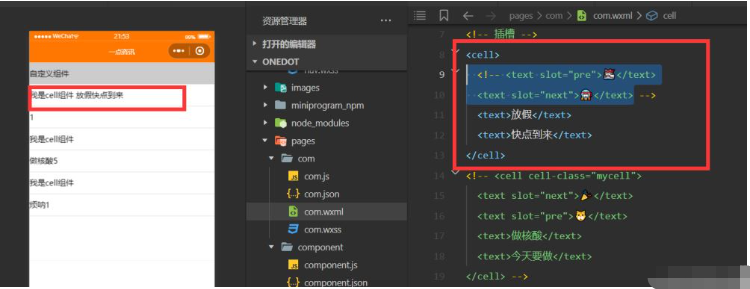
.cell{height:88rpx;line-height:88rpx;border-bottom:1rpxsolid#cccccc;}com.wxml
<!--插槽--><cell><textslot="pre">????????</text><textslot="next">????????</text><text>放假</text><text>快点到来</text></cell><cellcell-class="mycell"><textslot="next">????</text><textslot="pre">????</text><text>做核酸</text><text>今天要做</text></cell>
5- 组件传参
5.1 父传子
5.1.1 定义组件
cell.wxml
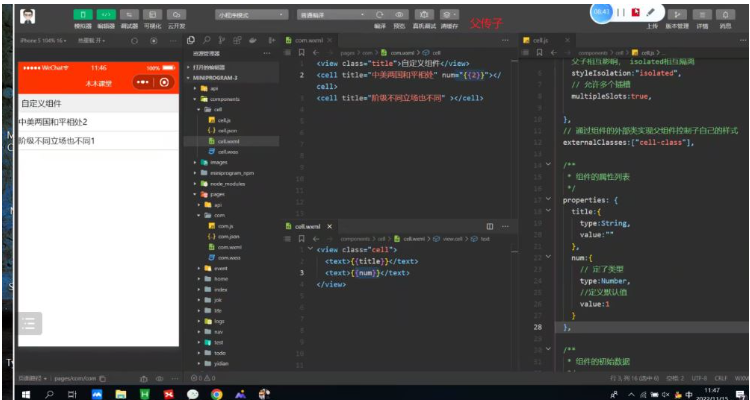
<viewclass="cell"><text>{{title}}</text><text>{{num}}</text></view>cell.js
//components/cell/cell.jsComponent({/*选项*/options:{/*样式隔离:apply-shared父影响子shared父子相互影响isolated相互隔离*/styleIsolation:'isolated',//允许多个插槽multipleSlots:true,},/***组件的属性列表*/properties:{title:{type:String,value:""},num:{type:Number,value:1}},/***组件的初始数据*/data:{//定义组件自己的数据countcount:1},/***组件的方法列表*/})5.1.2 使用组件
com.wxml
<celltitle="做核酸"num="{{5}}"></cell><celltitle="烦呐"></cell>5.1.3 图解
5.2 子传参父
5.2.1 定义组件
cell.wxml
<viewclass="cell"bindtap="tapHd"><text>{{title}}</text><text>{{count}}</text></view>cell.js
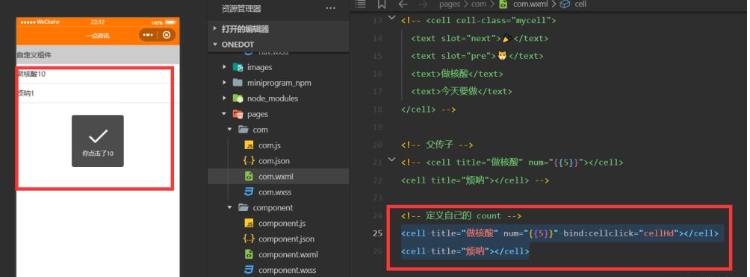
//components/cell/cell.jsComponent({/*选项*/options:{/*样式隔离:apply-shared父影响子shared父子相互影响isolated相互隔离*/styleIsolation:'isolated',//允许多个插槽multipleSlots:true,},/***组件的属性列表*/properties:{title:{type:String,value:""},num:{type:Number,value:1}},/***组件的初始数据*/data:{//定义组件自己的数据countcount:1},lifetimes:{//在组件生命周期attached挂载更新countattached(){console.log(this.data);//count的值为父组件传递的num值this.setData({count:this.data.num})}},/***组件的方法列表*/methods:{tapHd(){this.setData({count:this.data.count+5})//发送一个事件this.triggerEvent("cellclick",this.data.count)}}})5.2.2 使用组件
com.wxml
<viewclass="cell"bindtap="tapHd"><text>{{title}}</text><text>{{count}}</text></view>5.2.3 图解
6- 案例item组件
6.1 定义组件
首先在根目录下创建一个专门放自定义组件的文件夹;
然后在小程序编辑器里,右键,新建Component;
<!--components/item/item.wxml--><navigatorclass="itemitemclass"url="{{url}}"open-type="{{openType}}"bindtap="itemclick"><viewclass="icon"wx:if="{{icon}}"><imagesrc="{{icon}}"mode="aspectFill"/></view><viewclass="content"><viewclass="title"wx:if="{{title}}">{{title}}</view><slotname="title"wx:else></slot><viewclass="right"wx:if="{{!showrslot}}"><viewclass="tip">{{tip}}</view><viewclass="badge"wx:if="{{badge}}"><viewwx:if="{{badge===true}}"class="dot"></view><viewwx:elseclass="redbadge">{{badge}}</view></view><viewclass="arrow"></view></view><slotname="right"wx:else></slot></view></navigator>/*components/item/item.wxss*/.item{line-height:88rpx;display:flex;align-items:center;justify-content:space-between;}.icon{margin-left:30rpx;margin-right:30rpx;height:100%;display:flex;align-items:center;}.iconimage{width:60rpx;height:60rpx;}.content{padding:030rpx;border-bottom:1rpxsolid#ccc;display:flex;flex:1;}.title{flex:1;color:#333;font-size:35rpx;}.right{display:flex;align-items:center;}.right.arrow{height:25rpx;width:25rpx;border-top:3rpxsolid#999;border-right:3rpxsolid#999;transform:rotate(45deg);}.tip{color:#999;font-size:28rpx;}.dot{height:15rpx;width:15rpx;background-color:#f30;margin-left:15rpx;border-radius:50%;}.redbadge{font-size:20rpx;padding:5rpx;background-color:#f30;width:30rpx;max-height:30rpx;line-height:30rpx;color:#fff;text-align:center;margin-left:15rpx;border-radius:20rpx;}6.2 使用组件
引入组件:在页面的 json 文件中进行引用声明;
<!--引用组件的json文件-->{"usingComponents":{"cell":"/components/cell/cell"}}在页面的 wxml 中像使用基础组件一样使用自定义组件(名字和声明的保持一致)
<!--引用组件的wxml文件--><!--pages/component/component.wxml--><itemtitle="支付"icon="/images/icon01.png"></item><itemtitle="相册"icon="/images/icon02.png"></item><itemtitle="设置"></item><itemtitle="朋友圈"icon="/images/icon03.png"badge="{{true}}"tip="10条消息未读"></item><itemtitle="卡包"icon="/images/icon04.png"badge="{{12}}"tip="12条消息未读"></item><itemtitle="服务"icon="/images/icon05.png"showrslot="{{true}}"><switchchecked="true"slot="right"/></item><item><viewslot="title">插槽title</view></item><itemtitle="新闻"icon="/images/icon07.png"url="/pages/index/index"open-type="switchTab"></item><itemtitle="life"icon="/images/icon08.png"url="/pages/life/life"></item><itemtitle="消息"icon="/images/icon06.png"showrslot="{{true}}"itemclass="myitem"><switchchecked="true"slot="right"/></item>.myitem{line-height:120rpx!important;background-color:#f0f0f0;}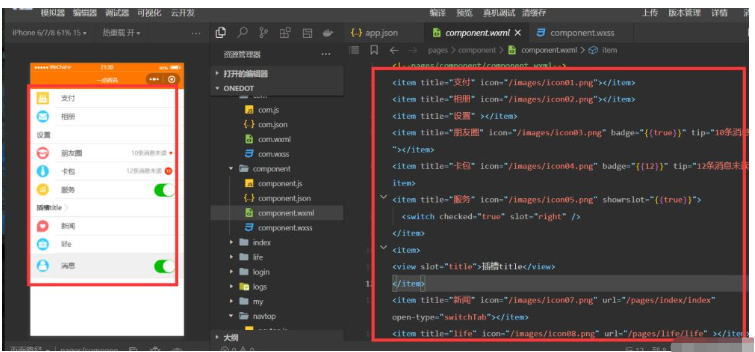
</div> <div class="zixun-tj-product adv-bottom"></div> </div> </div> <div class="prve-next-news">本文:
微信小程序怎么自定义组件Component使用的详细内容,希望对您有所帮助,信息来源于网络。