C#如何实现基于Socket套接字的网络通信封装
导读:本文共4054字符,通常情况下阅读需要14分钟。同时您也可以点击右侧朗读,来听本文内容。按键盘←(左) →(右) 方向键可以翻页。
摘要: 摘要之所以要进行Socket套接字通信库封装,主要是直接使用套接字进行网络通信编程相对复杂,特别对于初学者而言。实际上微软从.net 2.0开始已经提供了TCP、UDP通信高级封装类如下:TcpListenerTcpClientUdpClient微软从.net 4.0开始提供基于Task任务的异步通信接口。而直接使用socket封装库,很多socket本身的细节... ...
目录
(为您整理了一些要点),点击可以直达。摘要
之所以要进行Socket套接字通信库封装,主要是直接使用套接字进行网络通信编程相对复杂,特别对于初学者而言。实际上微软从.net 2.0开始已经提供了TCP、UDP通信高级封装类如下:
TcpListener
TcpClient
UdpClient
微软从.net 4.0开始提供基于Task任务的异步通信接口。而直接使用socket封装库,很多socket本身的细节没办法自行控制,本文目就是提供一种socket的封装供参考。文中展示部分封装了TCP通信库,UDP封装也可触类旁通:
CusTcpListener
CusTcpClient
TCP服务端
TCP服务端封装了服务端本地绑定、监听、接受客户端连接,并提供了网络数据流的接口。完整代码:
publicclassCusTcpListener{privateIPEndPointmServerSocketEndPoint;privateSocketmServerSocket;privateboolisActive;publicSocketServer{get{returnthis.mServerSocket;}}protectedboolActive{get{returnthis.isActive;}}publicEndPointLocalEndpoint{get{if(!this.isActive){returnthis.mServerSocketEndPoint;}returnthis.mServerSocket.LocalEndPoint;}}publicNetworkStreamDataStream{get{NetworkStreamnetworkStream=null;if(this.Server.Connected){networkStream=newNetworkStream(this.Server,true);}returnnetworkStream;}}publicCusTcpListener(IPEndPointlocalEP){this.mServerSocketEndPoint=localEP;this.mServerSocket=newSocket(this.mServerSocketEndPoint.AddressFamily,SocketType.Stream,ProtocolType.Tcp);}publicCusTcpListener(stringlocaladdr,intport){if(localaddr==null){thrownewArgumentNullException("localaddr");}this.mServerSocketEndPoint=newIPEndPoint(IPAddress.Parse(localaddr),port);this.mServerSocket=newSocket(this.mServerSocketEndPoint.AddressFamily,SocketType.Stream,ProtocolType.Tcp);}publicCusTcpListener(intport){this.mServerSocketEndPoint=newIPEndPoint(IPAddress.Any,port);this.mServerSocket=newSocket(this.mServerSocketEndPoint.AddressFamily,SocketType.Stream,ProtocolType.Tcp);}publicvoidStart(){this.Start(int.MaxValue);}///<summary>///开始服务器监听///</summary>///<paramname="backlog">同时等待连接的最大个数(半连接队列个数限制)</param>publicvoidStart(intbacklog){if(backlog>int.MaxValue||backlog<0){thrownewArgumentOutOfRangeException("backlog");}if(this.mServerSocket==null){thrownewNullReferenceException("套接字为空");}this.mServerSocket.Bind(this.mServerSocketEndPoint);this.mServerSocket.Listen(backlog);this.isActive=true;}publicvoidStop(){if(this.mServerSocket!=null){this.mServerSocket.Close();this.mServerSocket=null;}this.isActive=false;this.mServerSocket=newSocket(this.mServerSocketEndPoint.AddressFamily,SocketType.Stream,ProtocolType.Tcp);}publicSocketAcceptSocket(){Socketsocket=this.mServerSocket.Accept();returnsocket;}publicCusTcpClientAcceptTcpClient(){CusTcpClienttcpClient=newCusTcpClient(this.mServerSocket.Accept());returntcpClient;}}TCP客户端
TCP客户端封装了客户端本地绑定、连接服务器,并提供了网络数据流的接口。完整代码:
publicclassCusTcpClient:IDisposable{publicSocketClient{get;set;}protectedboolActive{get;set;}publicIPEndPointClientSocketEndPoint{get;set;}publicboolIsConnected{get{returnthis.Client.Connected;}}publicNetworkStreamDataStream{get{NetworkStreamnetworkStream=null;if(this.Client.Connected){networkStream=newNetworkStream(this.Client,true);}returnnetworkStream;}}publicCusTcpClient(IPEndPointlocalEP){if(localEP==null){thrownewArgumentNullException("localEP");}this.Client=newSocket(localEP.AddressFamily,SocketType.Stream,ProtocolType.Tcp);this.Active=false;this.Client.Bind(localEP);this.ClientSocketEndPoint=localEP;}publicCusTcpClient(stringlocaladdr,intport){if(localaddr==null){thrownewArgumentNullException("localaddr");}IPEndPointlocalEP=newIPEndPoint(IPAddress.Parse(localaddr),port);this.Client=newSocket(localEP.AddressFamily,SocketType.Stream,ProtocolType.Tcp);this.Active=false;this.Client.Bind(localEP);this.ClientSocketEndPoint=localEP;}internalCusTcpClient(SocketacceptedSocket){this.Client=acceptedSocket;this.Active=true;this.ClientSocketEndPoint=(IPEndPoint)this.Client.LocalEndPoint;}publicvoidConnect(stringaddress,intport){if(address==null){thrownewArgumentNullException("address");}IPEndPointremoteEP=newIPEndPoint(IPAddress.Parse(address),port);this.Connect(remoteEP);}publicvoidConnect(IPEndPointremoteEP){if(remoteEP==null){thrownewArgumentNullException("remoteEP");}this.Client.Connect(remoteEP);this.Active=true;}publicvoidClose(){this.Dispose(true);}protectedvirtualvoidDispose(booldisposing){if(disposing){IDisposabledataStream=this.DataStream;if(dataStream!=null){dataStream.Dispose();}else{Socketclient=this.Client;if(client!=null){client.Close();this.Client=null;}}GC.SuppressFinalize(this);}}publicvoidDispose(){this.Dispose(true);}}通信实验
控制台程序试验,服务端程序:
classProgram{staticvoidMain(string[]args){ThreadlistenerThread=newThread(ListenerClientConnection);listenerThread.IsBackground=true;listenerThread.Start();Console.ReadKey();}privatestaticvoidListenerClientConnection(){CusTcpListenertcpListener=newCusTcpListener("127.0.0.1",5100);tcpListener.Start();Console.WriteLine("等待客户端连接……");while(true){CusTcpClienttcpClient=tcpListener.AcceptTcpClient();Console.WriteLine("客户端接入,ip={0}port={1}",tcpClient.ClientSocketEndPoint.Address,tcpClient.ClientSocketEndPoint.Port);Threadthread=newThread(DataHandleProcess);thread.IsBackground=true;thread.Start(tcpClient);}}privatestaticvoidDataHandleProcess(objectobj){CusTcpClienttcpClient=(CusTcpClient)obj;StreamReaderstreamReader=newStreamReader(tcpClient.DataStream,Encoding.Default);Console.WriteLine("等待客户端输入:");while(true){try{stringreceStr=streamReader.ReadLine();Console.WriteLine(receStr);}catch(Exception){Console.WriteLine("断开连接");break;}Thread.Sleep(5);}}}客户端程序:
classProgram{staticvoidMain(string[]args){ThreadlistenerThread=newThread(UserProcess);listenerThread.IsBackground=true;listenerThread.Start();Console.ReadKey();}privatestaticvoidUserProcess(){Console.WriteLine("连接服务器");CusTcpClienttcpClient=newCusTcpClient("127.0.0.1",5080);tcpClient.Connect("127.0.0.1",5100);Console.WriteLine("开始和服务器通信");StreamWritersw=newStreamWriter(tcpClient.DataStream,Encoding.Default);sw.AutoFlush=true;while(true){for(inti=0;i<10;i++){stringstr=string.Format("第{0}次,内容:{1}",i,"测试通信");Console.WriteLine("发送数据:{0}",str);sw.WriteLine(str);}break;}}}通信成功:
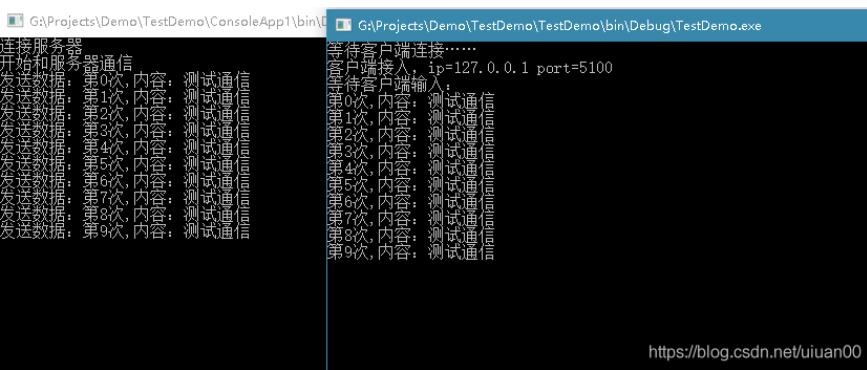
通过本次封装演示可实现基于Socket的通信库封装,目的就是使用Socket通信库让应用开发人员在进行网络通讯编程时无需关心底层通讯机制,而只关心应用层的开发,让开发变得更简洁。当然UDP封装类似,可自行设计。当然本文只是一种示例,实际使用可使用.net自带封装库或自定义封装。
</div> <div class="zixun-tj-product adv-bottom"></div> </div> </div> <div class="prve-next-news">C#如何实现基于Socket套接字的网络通信封装的详细内容,希望对您有所帮助,信息来源于网络。