C#中怎么创建控制Windows服务
导读:本文共4653.5字符,通常情况下阅读需要16分钟。同时您也可以点击右侧朗读,来听本文内容。按键盘←(左) →(右) 方向键可以翻页。
摘要: 需求针对一种特殊的应用, 不需要显示GUI, 希望常驻在Windows服务当中,在必要的时候我们可以进行启动或开机启动。这个时候我们就可以创建WindowsService 来实现。创建WindowsService下面演示了使用VisualStudio... ...
目录
(为您整理了一些要点),点击可以直达。
需求
针对一种特殊的应用, 不需要显示GUI, 希望常驻在Windows服务当中,在必要的时候我们可以进行启动或开机启动。
这个时候我们就可以创建WindowsService 来实现。
创建WindowsService
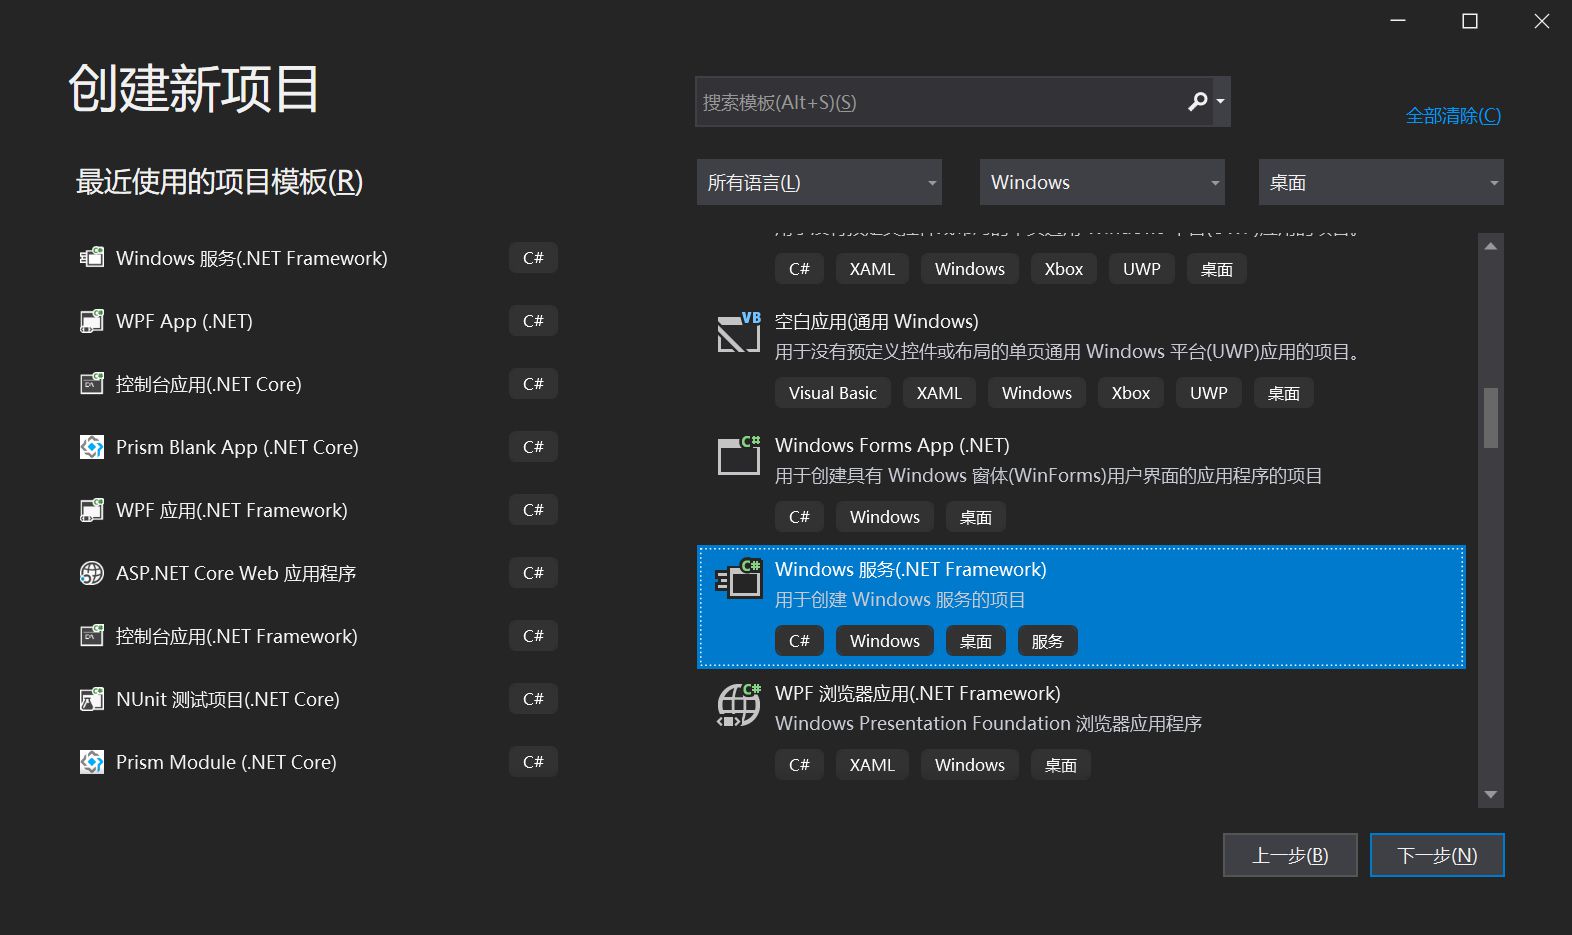
下面演示了使用VisualStudio2019创建一个基于.NetFramework的Windows服务
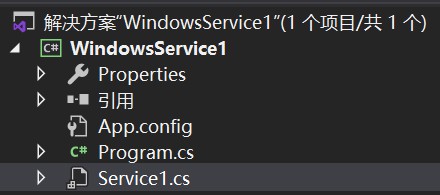
项目结构如下所示:
包含了一个启动项以及一个服务类
右键查看 Service1代码, 如下所示, 包含了重写OnStart方法以及OnStop方法:
publicpartialclassService1:ServiceBase{publicService1(){InitializeComponent();}protectedoverridevoidOnStart(string[]args){}protectedoverridevoidOnStop(){}}当服务被启动, 即启动OnStart方法内执行的代码, 而在ServiceBase当中, 同样提供了多种类型的方法被重写。

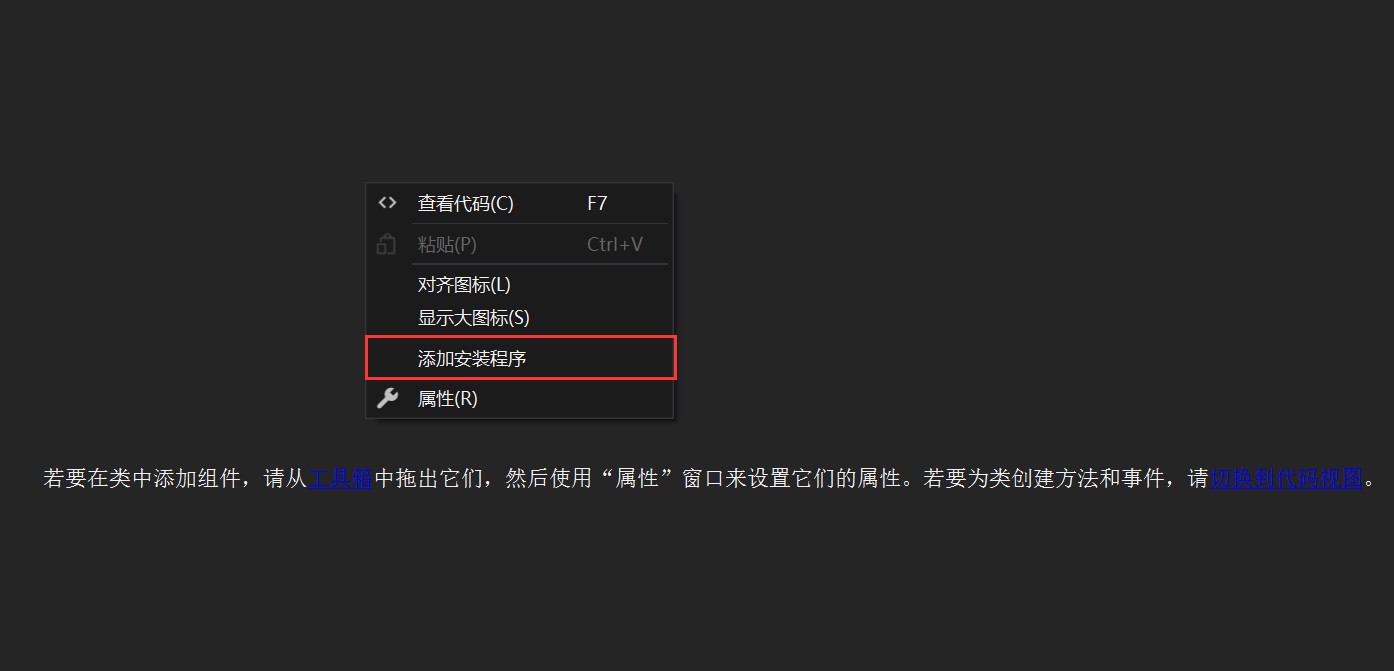
当我们写完了该服务的执行代码之后, 下一步我们要为其添加一个安装程序。
双击Service1.cs, 然后右键添加安装程序,如下所示:
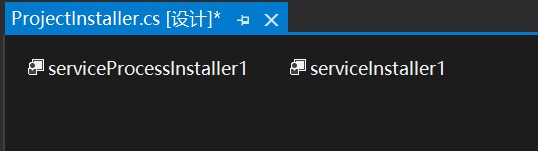
此时, 项目结构当中新增了一个默认名:ProjectInstaller.cs类, 而对应的设计页面如下所示:
serviceProcessInstaller1:
查看该类的属性,如下所示:
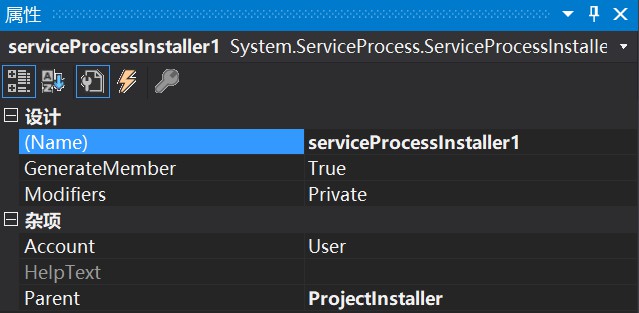
说明:
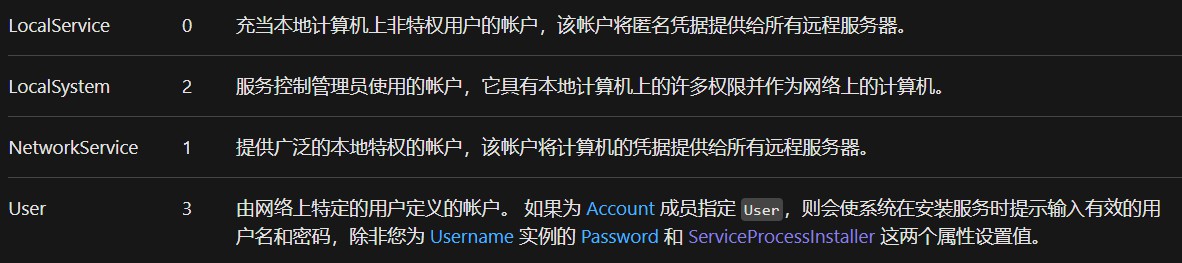
Account: 默认设置为User, 当 Account 属性为时 User , Username 和 Password 属性用于定义用于运行服务应用程序的帐户。
Username和 Password 对允许服务在除系统帐户之外的其他帐户下运行。 例如,如果没有用户登录,则可以允许服务在重新启动时自动启动。 如果保留 Username 或 Password 为空,并且将设置 Account 为 User ,则在安装时系统将提示您输入有效的用户名和密码。
还可以指定服务在本地系统帐户下运行,或以本地或网络服务运行。 ServiceAccount有关帐户类型的详细信息,请参阅枚举:
serviceInstaller1:
查看该类的属性,如下所示:
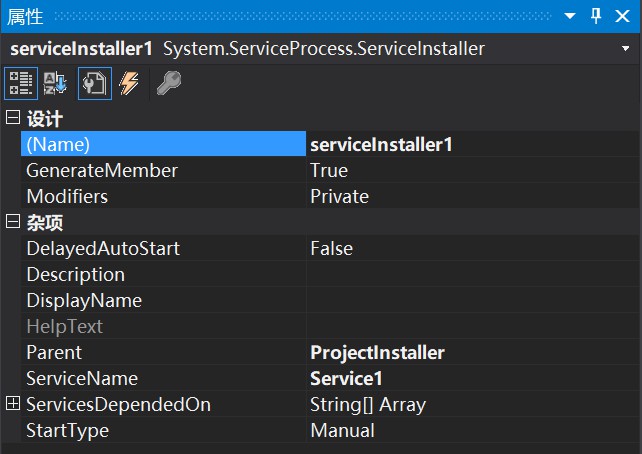
注: 该类扩展 ServiceBase 来实现服务。 在安装服务应用程序时由安装实用工具调用该类。
说明:
DelayedAutoStart : 若要延迟该服务的自动启动,则为 true;否则为 false。 默认值为 false。
Description : 服务的说明。 默认值为空字符串("")。
DisplayName : 与服务关联的名称,常用于交互工具。
ServiceName: 要安装的服务的名称。 该值必须在安装实用工具尝试安装服务以前进行设置。
ServicesDependedOn : 在与该安装程序关联的服务运行以前必须运行的一组服务。
StartType : 表示服务的启动方式。 默认值为 Manual,指定在计算机重新启动后服务将不会自动启动。
控制WindowsService
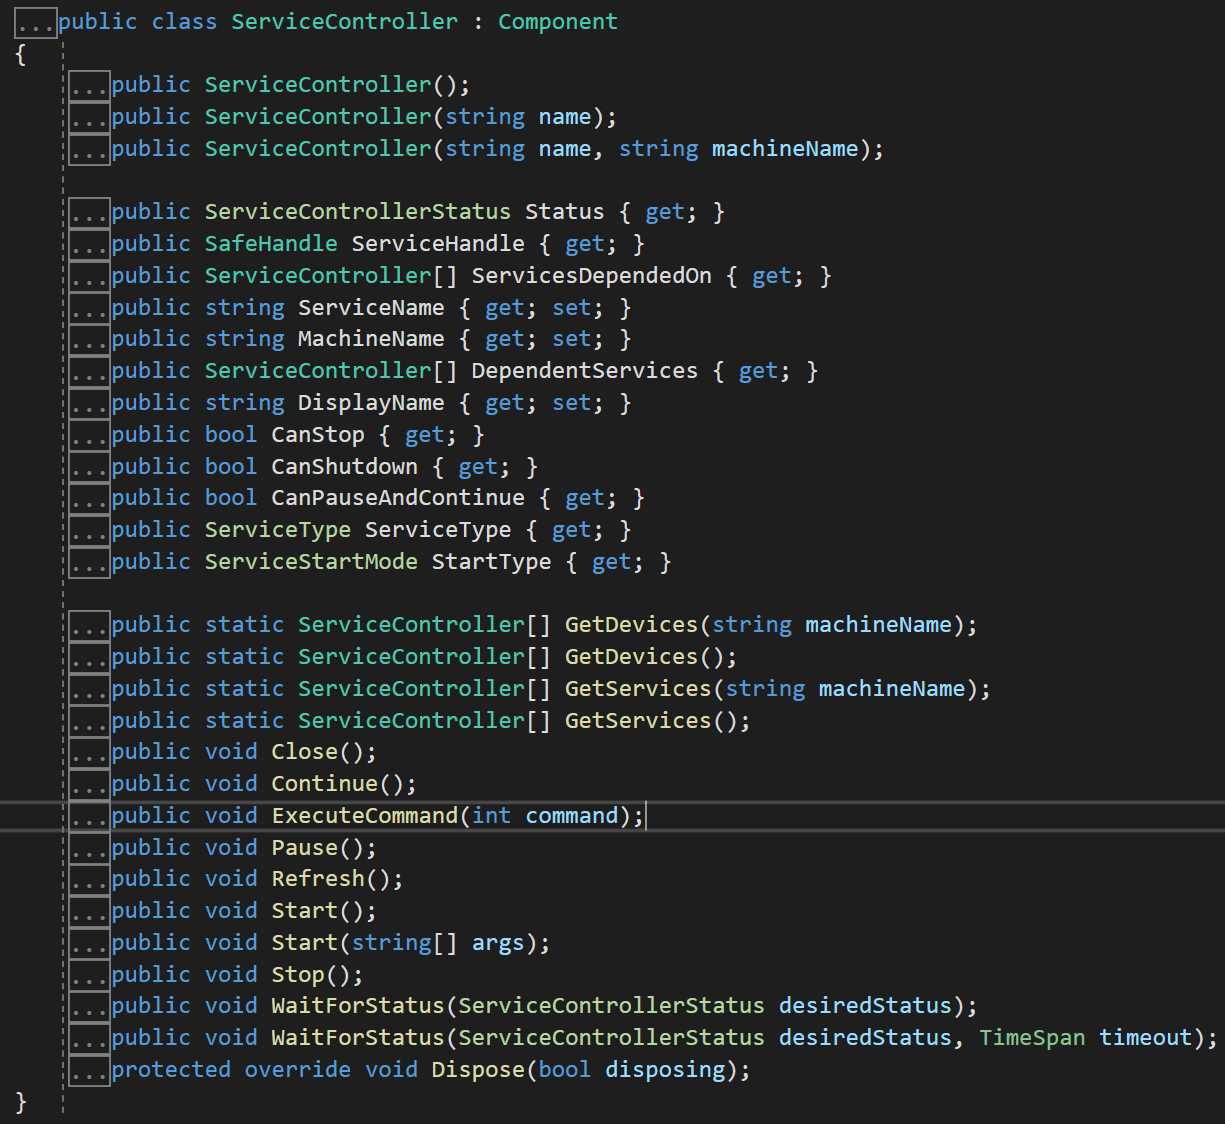
创建完成服务之后, 接下来就是针对服务进行控制, 现在,可以使用 ServiceController 类来连接和控制现有服务的行为。
ServiceController: 表示 Windows 服务并允许连接到正在运行或者已停止的服务、对其进行操作或获取有关它的信息。
通过ServiceController,我们可以获取本机的Service服务,以及启动、暂停、延续、挂起、关闭、刷新等动作, 如下所示:
下面的示例演示如何使用 ServiceController 类来控制 Service1 服务示例。
usingSystem;usingSystem.ServiceProcess;usingSystem.Diagnostics;usingSystem.Threading;namespaceServiceControllerSample{classProgram{publicenumSimpleServiceCustomCommands{StopWorker=128,RestartWorker,CheckWorker};staticvoidMain(string[]args){ServiceController[]scServices;scServices=ServiceController.GetServices();foreach(ServiceControllerscTempinscServices){if(scTemp.ServiceName=="Service1"){//DisplaypropertiesfortheSimpleServicesample//fromtheServiceBaseexample.ServiceControllersc=newServiceController("SimpleService");Console.WriteLine("Status="+sc.Status);Console.WriteLine("CanPauseandContinue="+sc.CanPauseAndContinue);Console.WriteLine("CanShutDown="+sc.CanShutdown);Console.WriteLine("CanStop="+sc.CanStop);if(sc.Status==ServiceControllerStatus.Stopped){sc.Start();while(sc.Status==ServiceControllerStatus.Stopped){Thread.Sleep(1000);sc.Refresh();}}//Issuecustomcommandstotheservice//enumSimpleServiceCustomCommands//{StopWorker=128,RestartWorker,CheckWorker};sc.ExecuteCommand((int)SimpleServiceCustomCommands.StopWorker);sc.ExecuteCommand((int)SimpleServiceCustomCommands.RestartWorker);sc.Pause();while(sc.Status!=ServiceControllerStatus.Paused){Thread.Sleep(1000);sc.Refresh();}Console.WriteLine("Status="+sc.Status);sc.Continue();while(sc.Status==ServiceControllerStatus.Paused){Thread.Sleep(1000);sc.Refresh();}Console.WriteLine("Status="+sc.Status);sc.Stop();while(sc.Status!=ServiceControllerStatus.Stopped){Thread.Sleep(1000);sc.Refresh();}Console.WriteLine("Status="+sc.Status);String[]argArray=newstring[]{"ServiceControllerarg1","ServiceControllerarg2"};sc.Start(argArray);while(sc.Status==ServiceControllerStatus.Stopped){Thread.Sleep(1000);sc.Refresh();}Console.WriteLine("Status="+sc.Status);//Displaytheeventlogentriesforthecustomcommands//andthestartarguments.EventLogel=newEventLog("Application");EventLogEntryCollectionelec=el.Entries;foreach(EventLogEntryeleinelec){if(ele.Source.IndexOf("Service1.OnCustomCommand")>=0|ele.Source.IndexOf("Service1.Arguments")>=0)Console.WriteLine(ele.Message);}}}}}}//ThissampledisplaysthefollowingoutputiftheSimpleService//sampleisrunning://Status=Running//CanPauseandContinue=True//CanShutDown=True//CanStop=True//Status=Paused//Status=Running//Status=Stopped//Status=Running//4:14:49PM-Customcommandreceived:128//4:14:49PM-Customcommandreceived:129//ServiceControllerarg1//ServiceControllerarg2安装WindowsService
能够控制我们创建的服务的前提是, 该服务已安装在我们调试的设备上, 我们可以通过AssemblyInstaller 类来进行安装。
安装示例
在下面的示例中, AssemblyInstaller 通过调用 AssemblyInstaller 构造函数来创建。 设置此对象的属性,并 Install Commit 调用和方法以安装 MyAssembly.exe 程序集。
usingSystem;usingSystem.Configuration.Install;usingSystem.Collections;usingSystem.Collections.Specialized;classAssemblyInstaller_Example{staticvoidMain(){IDictionarymySavedState=newHashtable();Console.WriteLine("");try{//Setthecommandlineargumentarrayfor'logfile'.string[]commandLineOptions=newstring[1]{"/LogFile=example.log"};//Createanobjectofthe'AssemblyInstaller'class.AssemblyInstallermyAssemblyInstaller=newAssemblyInstaller("MyAssembly.exe",commandLineOptions);myAssemblyInstaller.UseNewContext=true;//Installthe'MyAssembly'assembly.myAssemblyInstaller.Install(mySavedState);//Committhe'MyAssembly'assembly.myAssemblyInstaller.Commit(mySavedState);}catch(Exceptione){Console.WriteLine(e.Message);}}}卸载示例
下面的示例演示的 Uninstall 方法 Installer 。 Uninstall方法在的派生类中被重写 Installer 。
//Override'Uninstall'methodofInstallerclass.publicoverridevoidUninstall(IDictionarymySavedState){if(mySavedState==null){Console.WriteLine("UninstallationError!");}else{base.Uninstall(mySavedState);Console.WriteLine("TheUninstallmethodof'MyInstallerSample'hasbeencalled");}} </div> <div class="zixun-tj-product adv-bottom"></div> </div> </div> <div class="prve-next-news">C#中怎么创建控制Windows服务的详细内容,希望对您有所帮助,信息来源于网络。