Vue中如何进行网页预渲染
导读:本文共3825字符,通常情况下阅读需要13分钟。同时您也可以点击右侧朗读,来听本文内容。按键盘←(左) →(右) 方向键可以翻页。
摘要: 预渲染通常情况下,Vue项目是单页项目,也就是渲染出来的项目,只有一个index.html。这样的缺点很明显:部署到Nginx,需要做try_files $uri $uri/ /index.html内部重定向,才可以用通过路由访问页面。SEO不友好,搜索引擎收录效果不佳。而预渲染,就是把原来的单index.html,渲染成多个目录,每个目录又有一个index.h... ...
目录
(为您整理了一些要点),点击可以直达。预渲染
通常情况下,Vue项目是单页项目,也就是渲染出来的项目,只有一个index.html。
这样的缺点很明显:
部署到Nginx,需要做
try_files $uri $uri/ /index.html内部重定向,才可以用通过路由访问页面。SEO不友好,搜索引擎收录效果不佳。
而预渲染,就是把原来的单index.html,渲染成多个目录,每个目录又有一个index.html。这样就不需要内部重定向访问路由,也更利于搜索引擎收录。
prerender-spa-plugin
本次预渲染使用prerender-spa-plugin进行预渲染。
它的主要原理是启动浏览器,渲染完成后抓取HTML,然后再创建目录,保存为index.html。
注意:
官网目前只有Vue2.x的Demo,实际上是支持Vue3的(本次演示也是使用Vue3)
虽然最近的一个发布版本是2023年(最近应该会发布新版本),但是一直有维护,可以使用。
安装
首先,我们用npm进行安装:
npmiprerender-spa-plugin
需要注意,因为
prerender-spa-plugin会安装一个Chromium,所以安装会比较久。

当然,这种依赖,只有在打包时候才使用。所以,更好的安装方式,应该是:
npmiprerender-spa-plugin-D
项目引用
现在,我们就来项目引用,使用方法很简单,方便在两个地方追加:
App.vue
vue.config.js
App.vue
首先,我们在App.vue内追加触发器事件:
mounted(){document.dispatchEvent(newEvent('render-event'))}添加这个触发器,是后续打包时候,会自动触发,并完成渲染。
vue.config.js
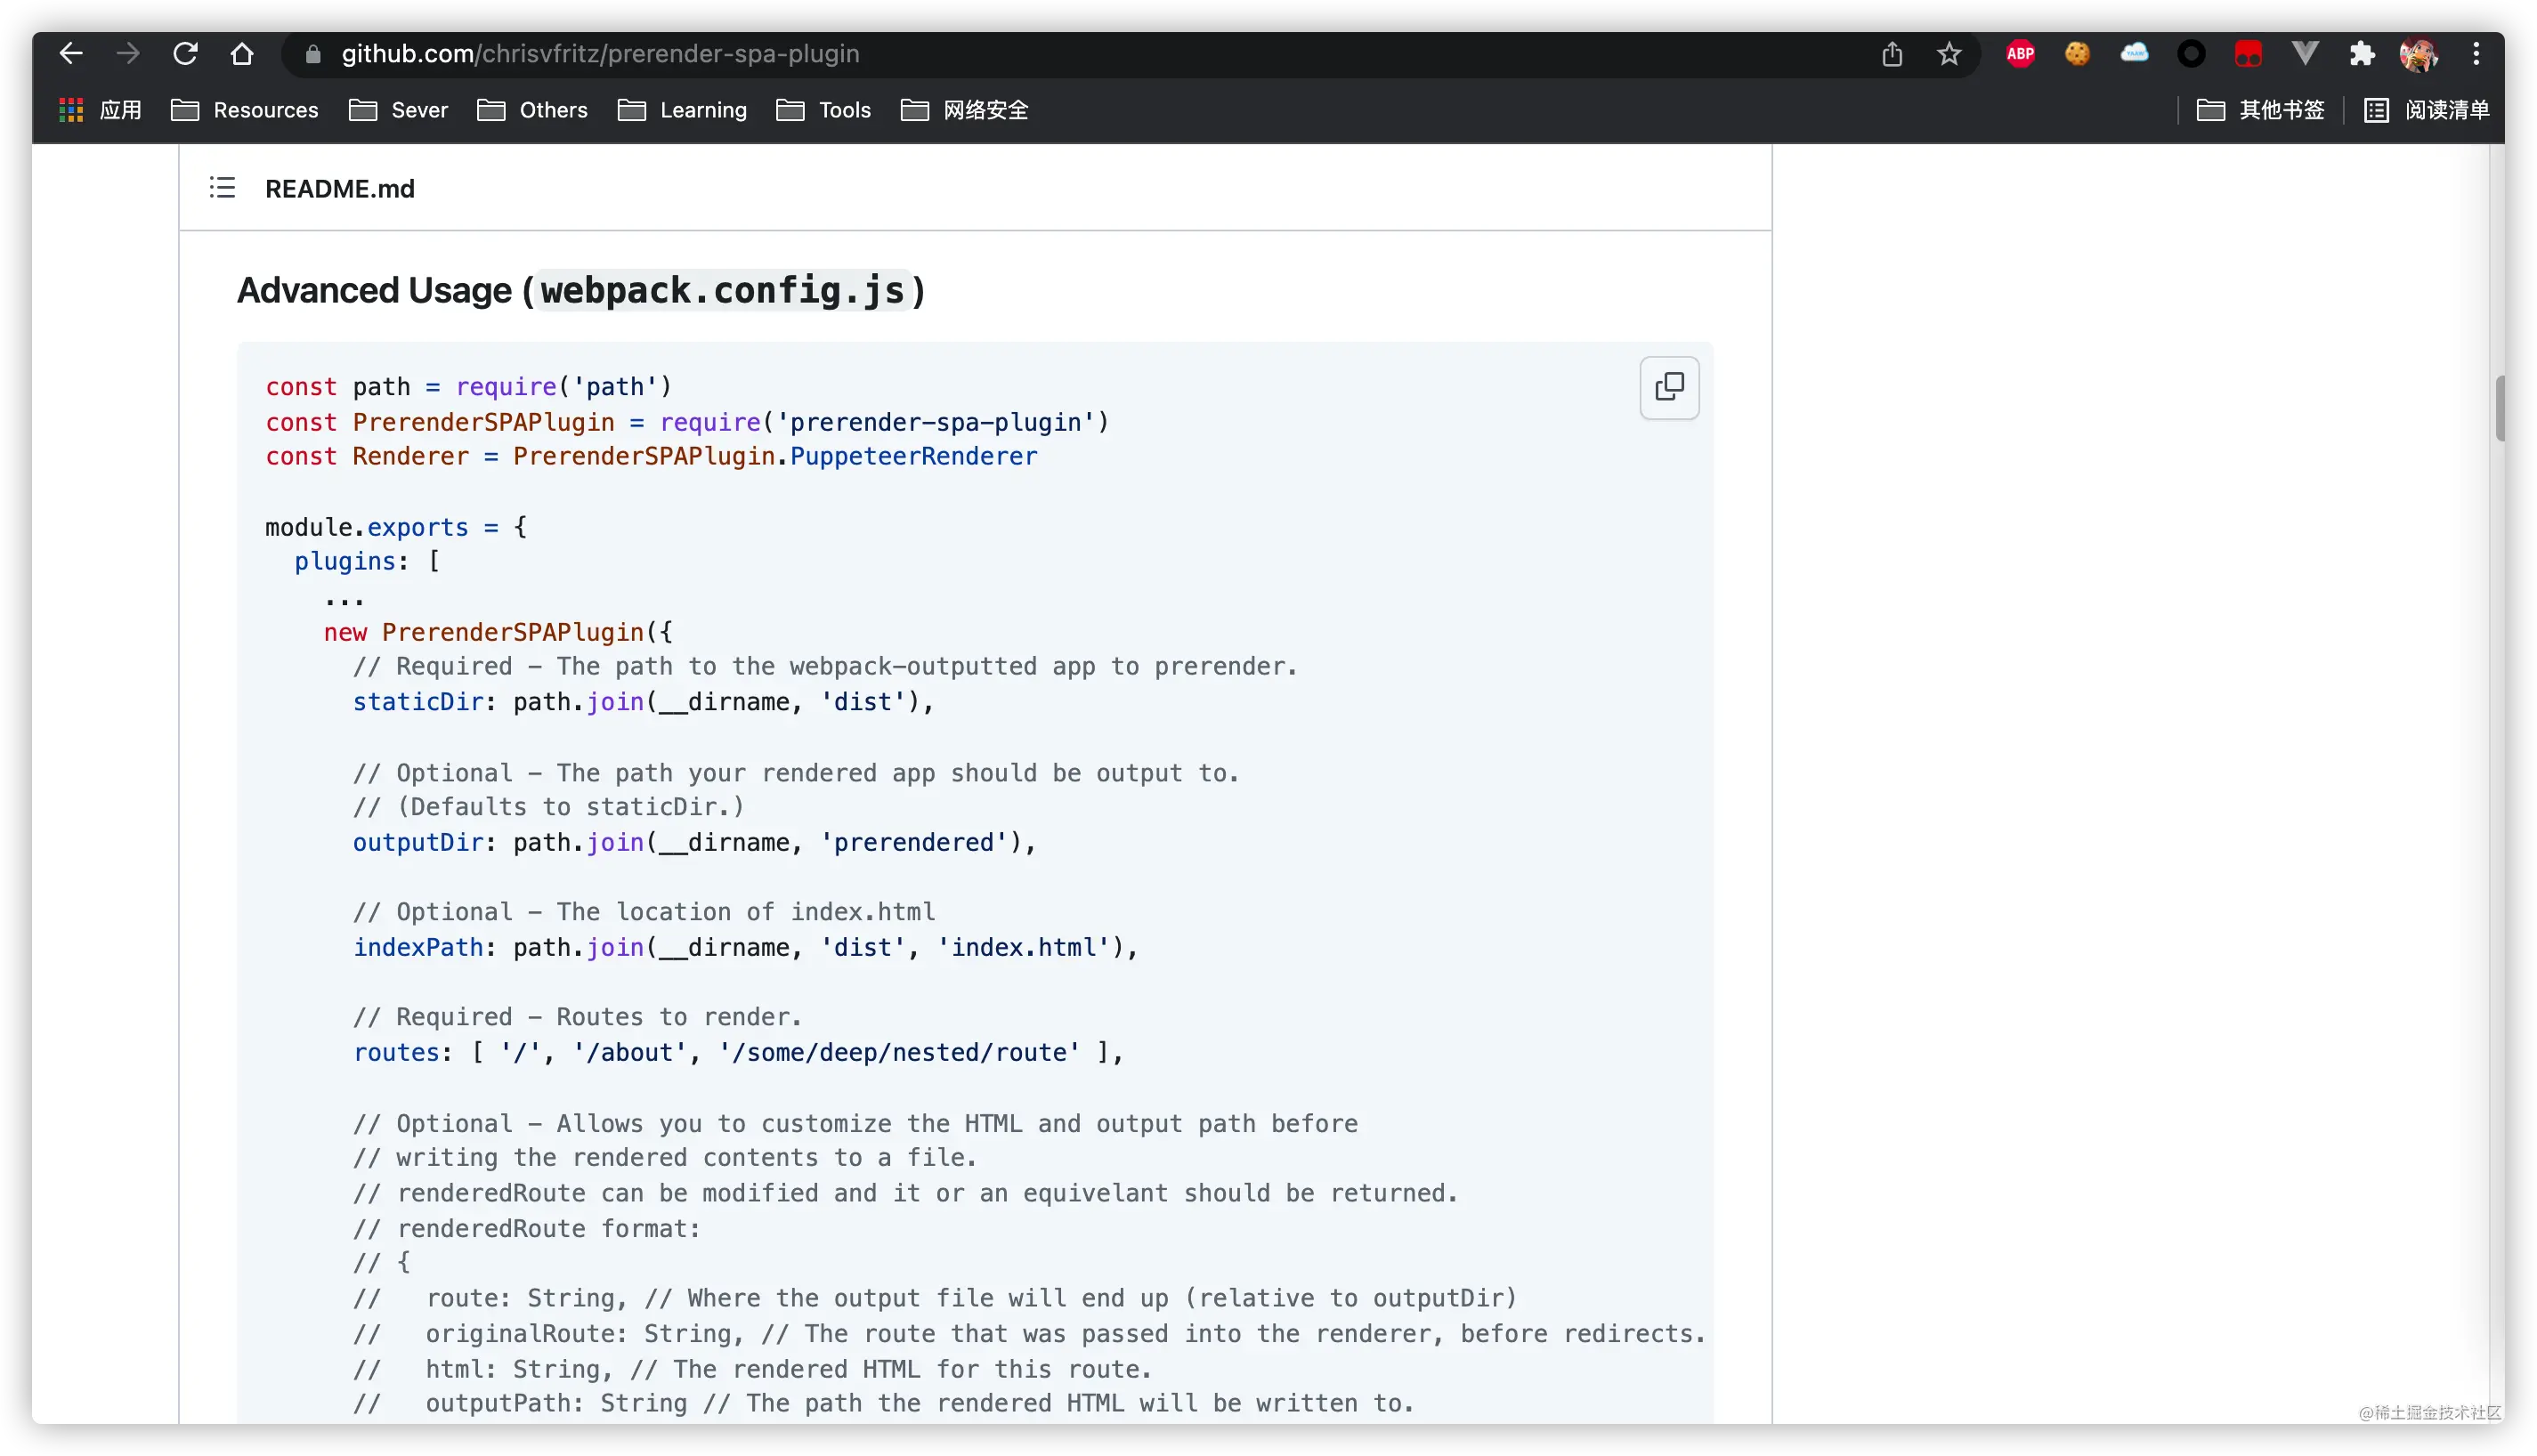
根据prerender-spa-plugin项目文档:
constpath=require('path')constPrerenderSPAPlugin=require('prerender-spa-plugin')module.exports={plugins:[...newPrerenderSPAPlugin({//Required-Thepathtothewebpack-outputtedapptoprerender.staticDir:path.join(__dirname,'dist'),//Required-Routestorender.routes:['/','/about','/some/deep/nested/route'],})]}同时一些高级使用需要引入PuppeteerRenderer进行自定义。所以,我自己的vue.config.js配置:
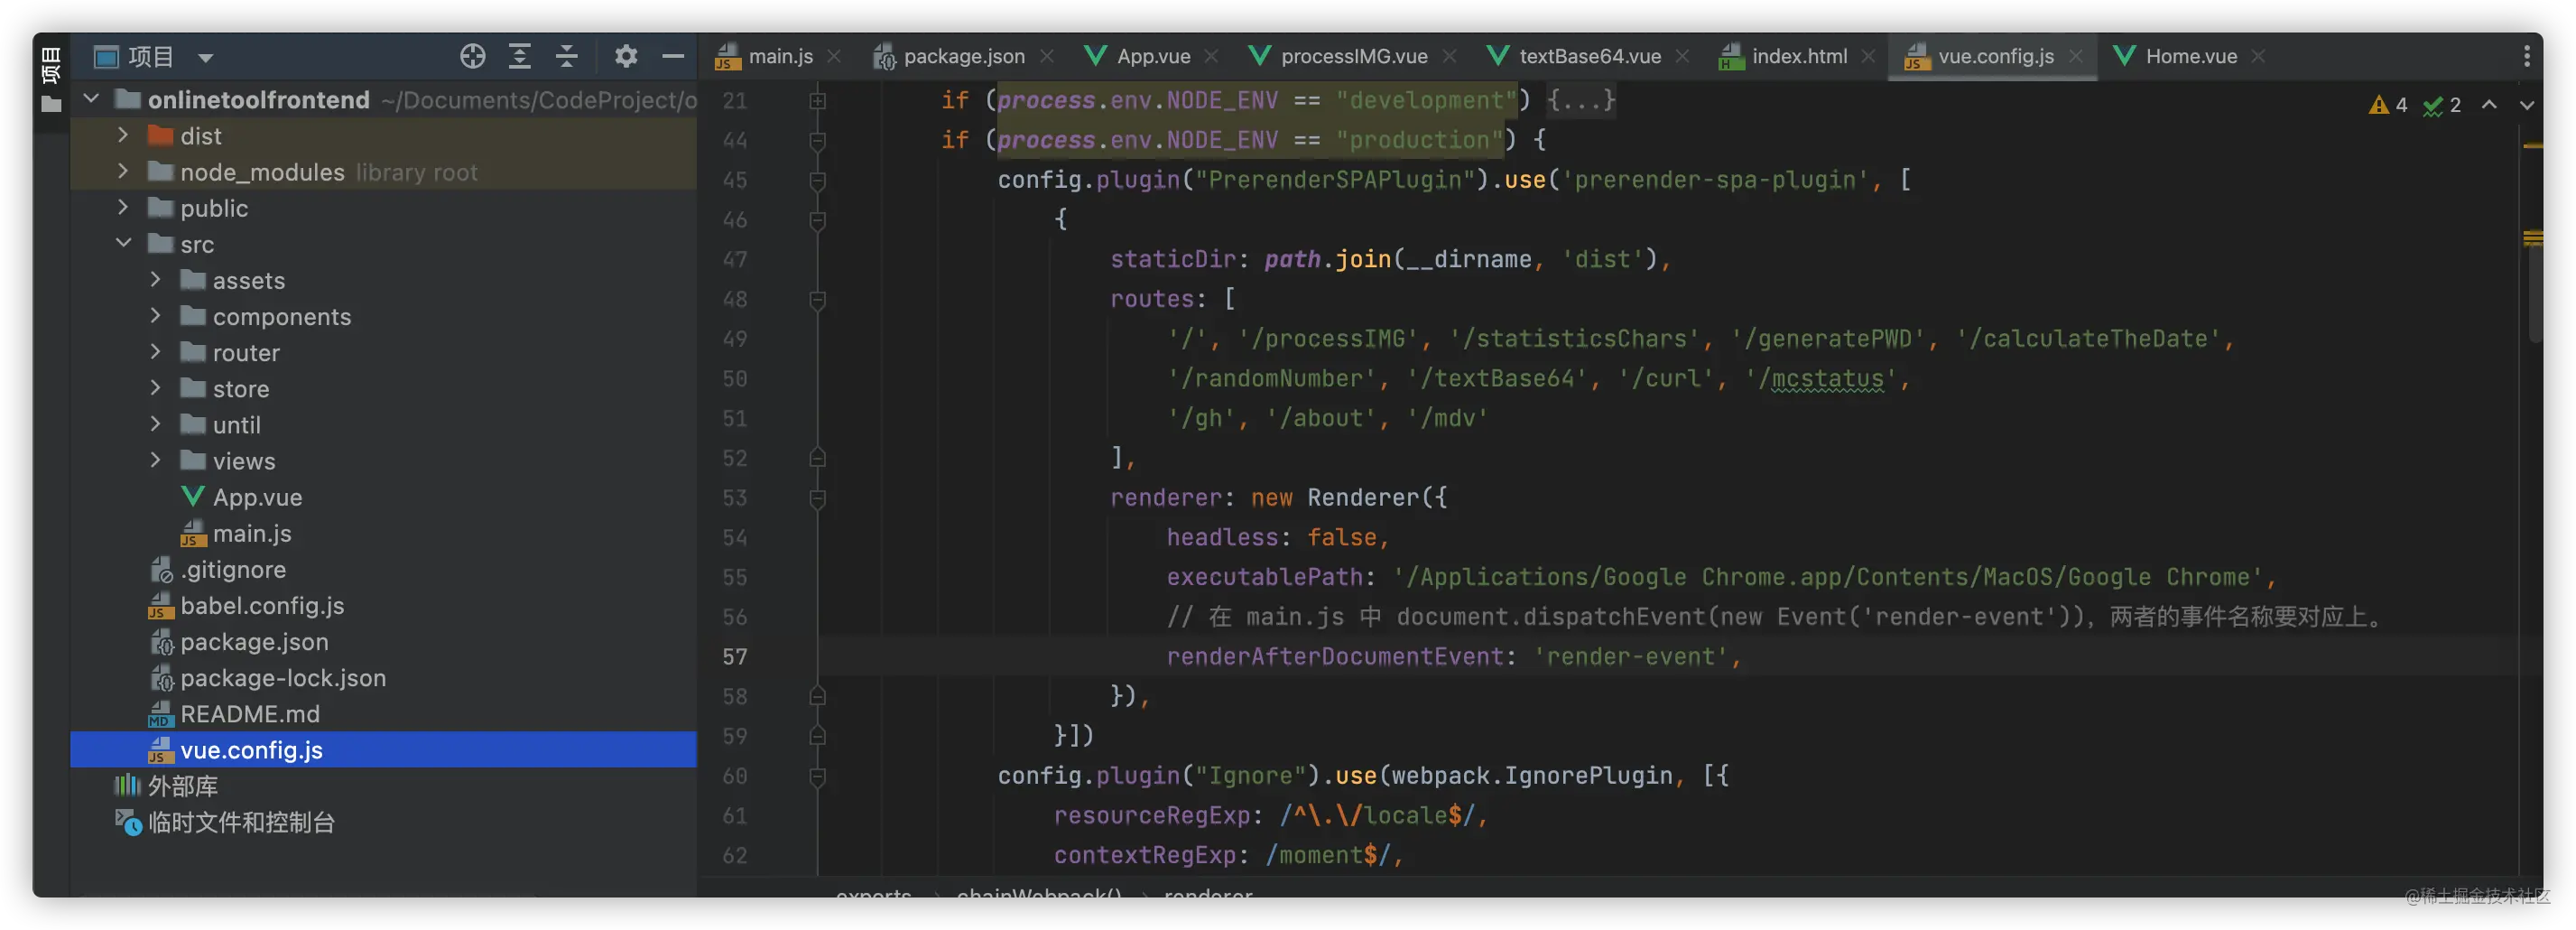
module.exports={……chainWebpack:config=>{if(process.env.NODE_ENV=="development"){……}if(process.env.NODE_ENV=="production"){config.plugin("PrerenderSPAPlugin").use('prerender-spa-plugin',[{staticDir:path.join(__dirname,'dist'),routes:['/','/processIMG','/statisticsChars','/generatePWD','/calculateTheDate','/randomNumber','/textBase64','/curl','/mcstatus','/gh','/about','/mdv'],renderer:newPuppeteerRenderer({headless:false,executablePath:'/Applications/GoogleChrome.app/Contents/MacOS/GoogleChrome',//对应App.vuerenderAfterDocumentEvent:'render-event',}),}])])}}我使用的是链式函数。这样的好处,是方便我进行if-else等函数式判断。其中,renderer属性:
headless:这个就是Chrome的headless属性,常用于Debug。更多可以参考:Google ChromeexecutablePath:重定向浏览器地址;我这里重定向使用我电脑自带的Chrome浏览器了。(可选,可以直接不加,默认调用Chromium)renderAfterDocumentEvent:需要同App.vue中 document.dispatchEvent(new Event('render-event'))的事件名称要对应上。
而routes数组,里面就是需要预渲染的路由地址。
当然,更多的可选参数,你也可以参考官方的文档:
staticDir需要指向编译后的输出文件夹。
打包项目
之后,我们就可以打包项目了:
npmrunbuild
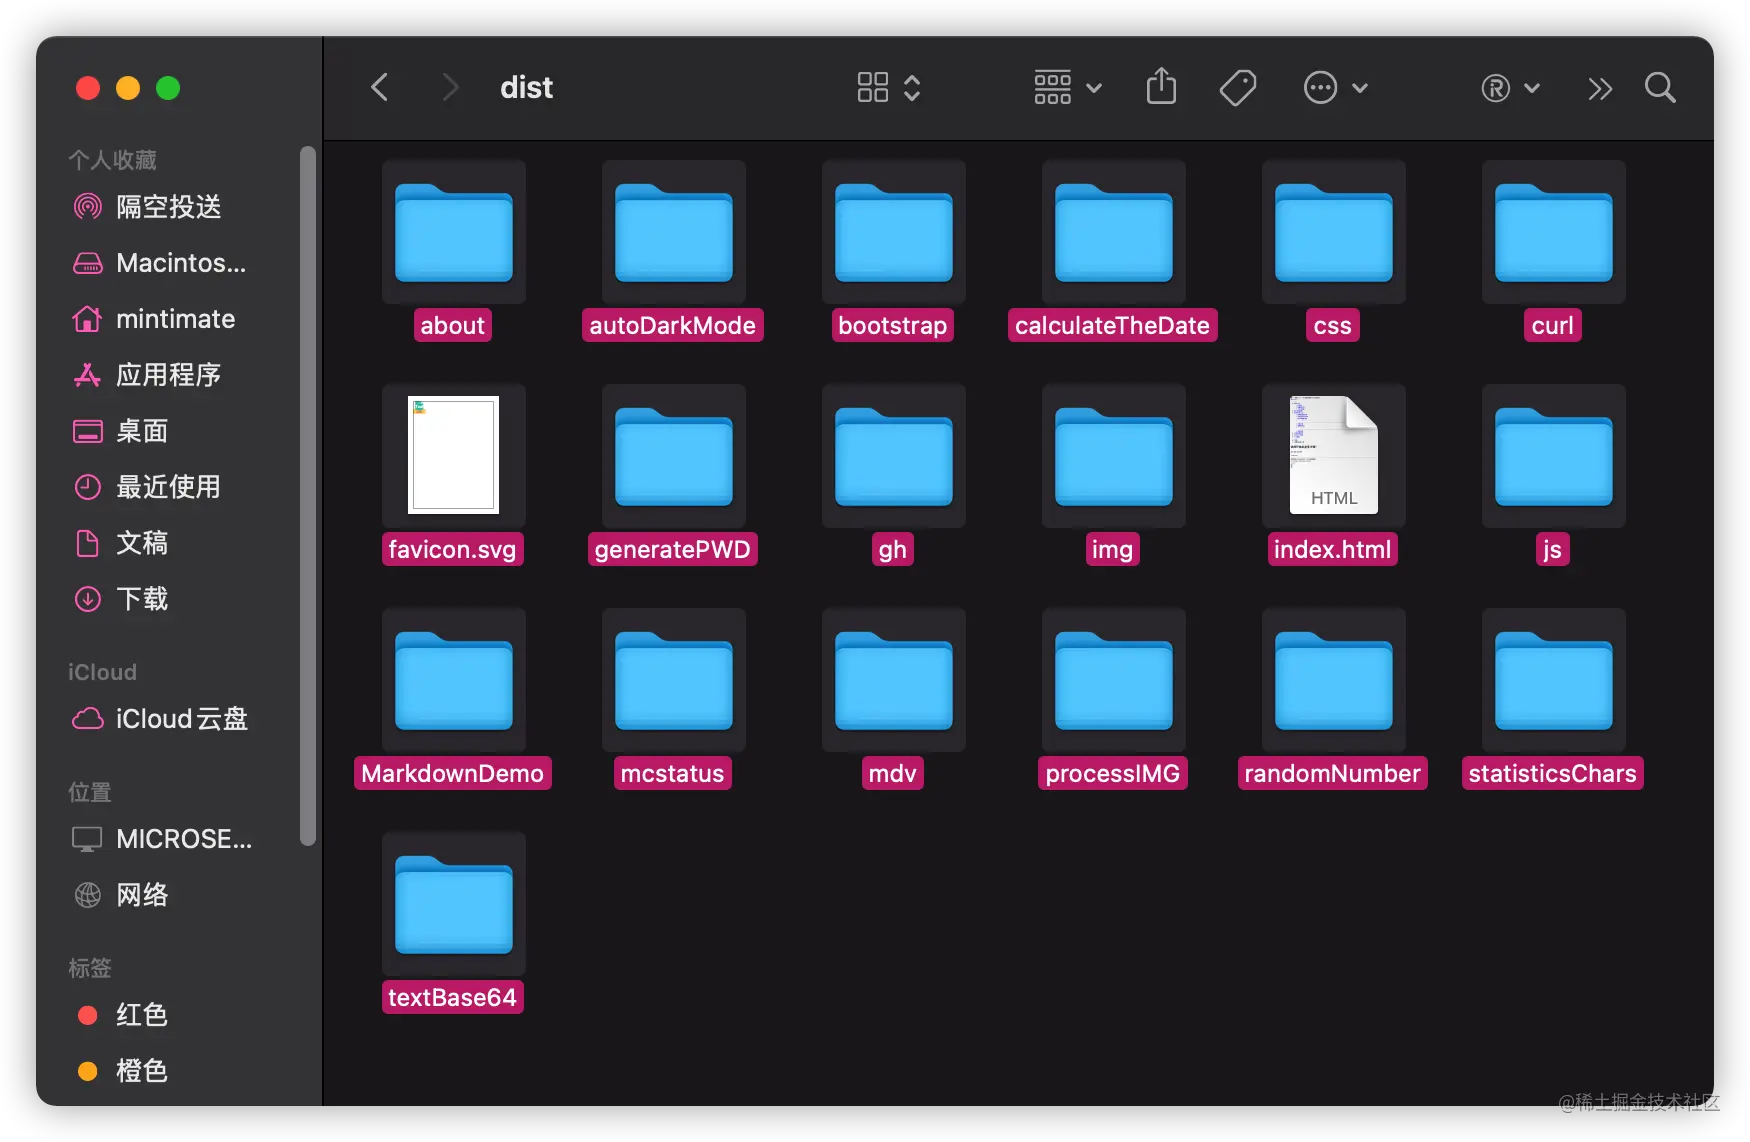
打包后的效果:
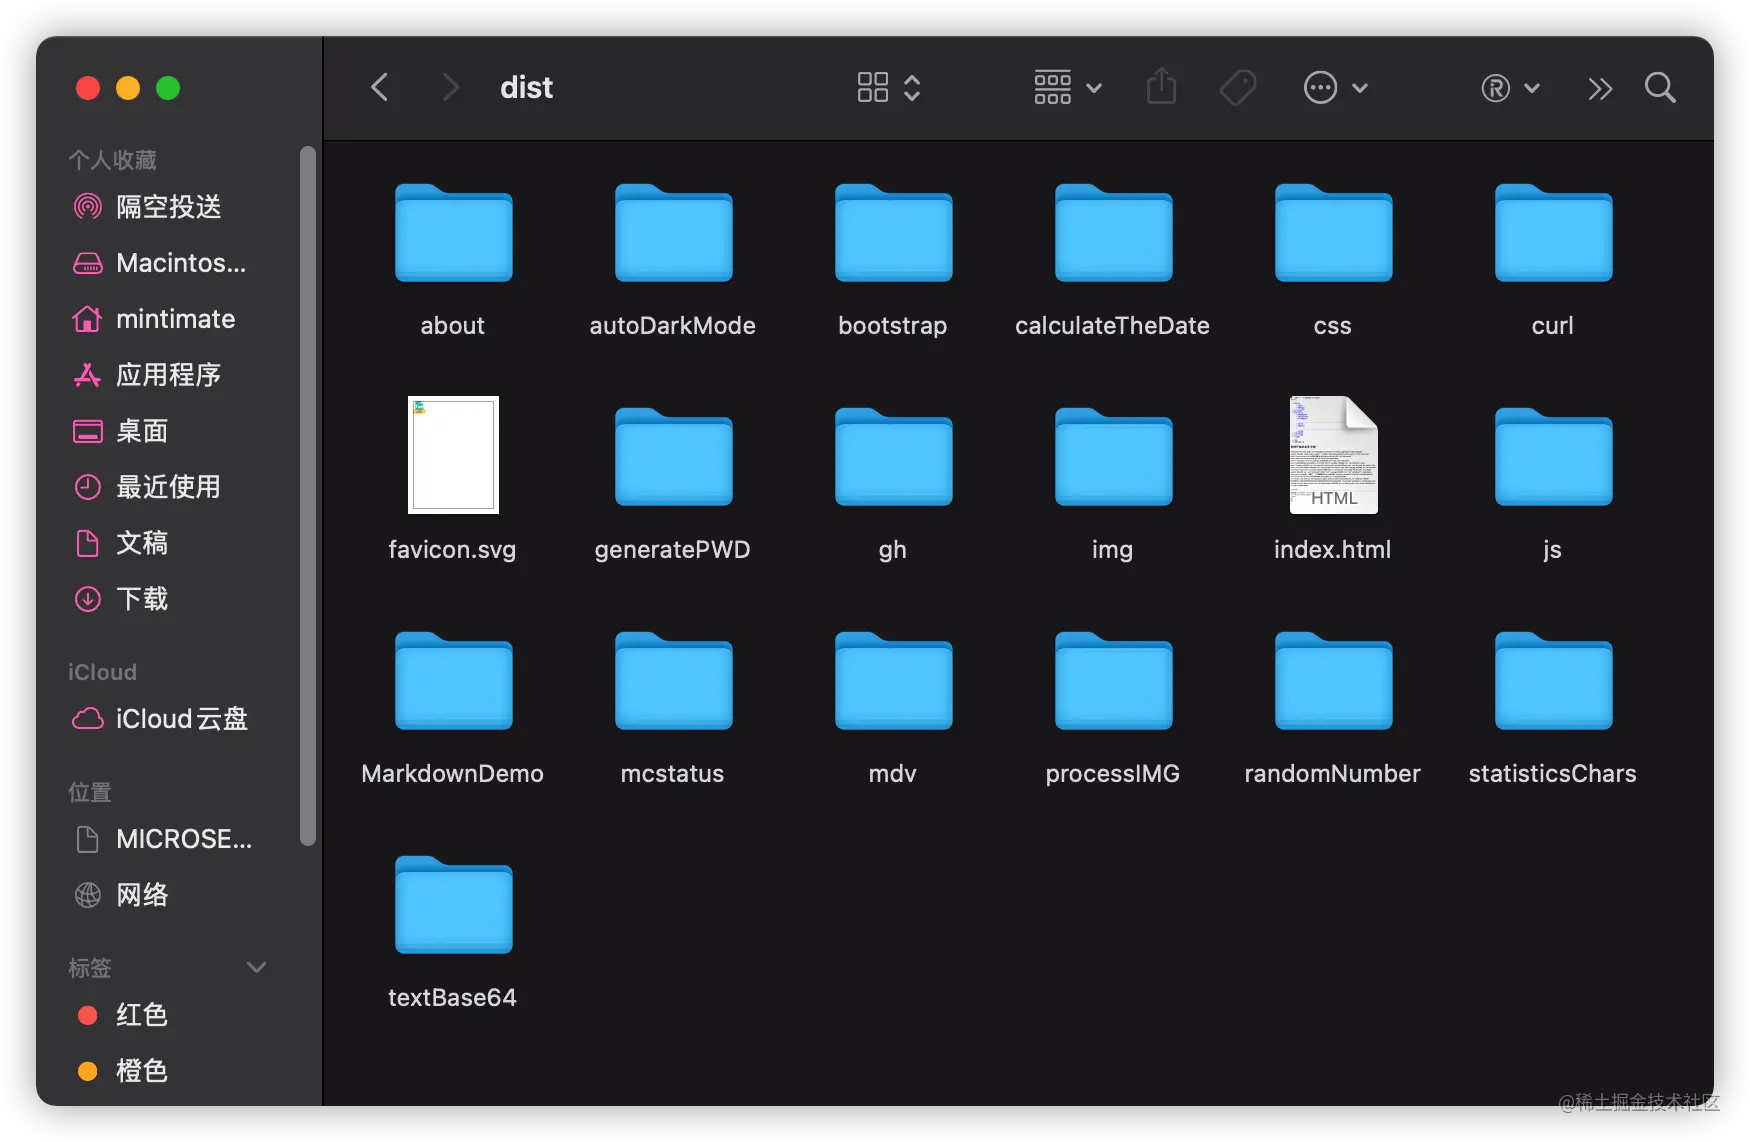
看看预渲染的页面:
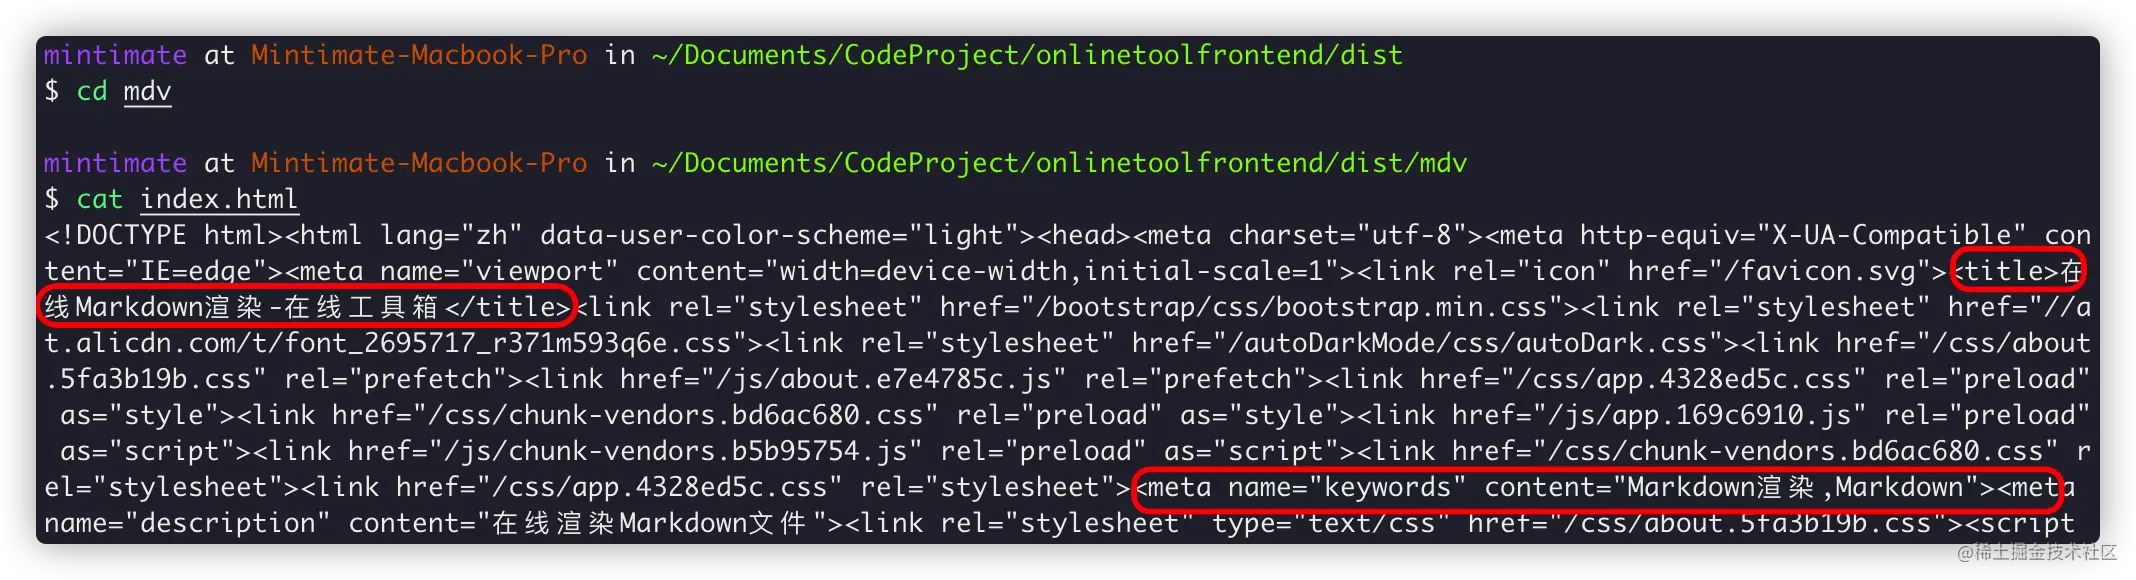
因为我有使用Vue-meta的组件,所以预渲染的文件也就有meta属性了。
如果你也想用Vue-meta组件配合
prerender-spa-plugin,可以参考文章:https://juejin.cn/post/7056972997894094861
需要注意,如果出现什么错误,可以尝试:
#删除项目node_modulesrm-rfnode_modules#重新安装npminstall
这样的文件,就可以进行部署了。
部署效果
我们使用Nginx进行部署,上次到Nginx Web文件夹内,修改config文件,就不需要:
location/{try_files$uri$uri//index.html;}来实现内部重定向了。因为有真实的目录,可以去掉。
但是,数据代理,最好使用Nginx来实现。比如,开发环境,数据代理:
config.devServer.proxy({'/dataApiJava':{target:JavaBaseURL,pathRewrite:{'^/dataApiJava':""},ws:true,changeOrigin:true},'/dataApiPython':{target:PythonBaseURL,pathRewrite:{'^/dataApiPython':""},ws:true,changeOrigin:true},'/ghs':{target:GithubSpeedURL,pathRewrite:{'^/ghs':""},ws:true,changeOrigin:true}})对应的Nginx配置,可以这样写:
location/dataApiPython/{proxy_passhttp://127.0.0.1:8099/;proxy_set_headerHost$host;proxy_set_headerX-Real-IP$remote_addr;proxy_set_headerX-Forwarded-For$proxy_add_x_forwarded_for;proxy_set_headerREMOTE-HOST$remote_addr;add_headerX-Cache$upstream_cache_status;}location/dataApiJava/{proxy_ssl_server_nameon;proxy_passhttps://…….cn/;}location/ghs/{proxy_ssl_server_nameon;proxy_passhttps://……/gh/;}给大家展示三种配置,按需设置哦。
</div> <div class="zixun-tj-product adv-bottom"></div> </div> </div> <div class="prve-next-news">Vue中如何进行网页预渲染的详细内容,希望对您有所帮助,信息来源于网络。