如何在Python3.5中使用shelve模块和xml模块
导读:本文共4493.5字符,通常情况下阅读需要15分钟。同时您也可以点击右侧朗读,来听本文内容。按键盘←(左) →(右) 方向键可以翻页。
摘要: 1、shelve模块shelve类似于一个key-value数据库,可以很方便的用来保存Python的内存对象,其内部使用pickle来序列化数据,简单来说,使用者可以将一个列表、字典、或者用户自定义的类实例保存到shelve中,下次需要用的时候直接取出来,就是一个Python内存对象,不需要像传统数据库一样,先取出数据,然后用这些数据重新构造一遍所需要的对象。... ...
目录
(为您整理了一些要点),点击可以直达。1、shelve模块
shelve类似于一个key-value数据库,可以很方便的用来保存Python的内存对象,其内部使用pickle来序列化数据,
简单来说,使用者可以将一个列表、字典、或者用户自定义的类实例保存到shelve中,下次需要用的时候直接取出来,
就是一个Python内存对象,不需要像传统数据库一样,先取出数据,然后用这些数据重新构造一遍所需要的对象。
#!/usr/bin/envpython#-*-coding:utf-8-*-#Author:ZhengzhengLiuimportshelveimportdatetimed=shelve.open('shelve_test')#打开一个文件info={"age":23,"job":"IT"}name=["alex","rain","test"]d["name"]=name#持久化列表d["info"]=info#持久化字典d["data"]=datetime.datetime.now()d.close()运行结果:产生3个文件

从shelve中数据读取:get方法
#!/usr/bin/envpython#-*-coding:utf-8-*-#Author:ZhengzhengLiuimportshelveimportdatetimed=shelve.open('shelve_test')#打开一个文件print(d.get("name"))print(d.get("info"))print(d.get("data"))运行结果:
['alex', 'rain', 'test']
{'job': 'IT', 'age': 23}
2017-09-29 18:31:12.013709
2、xml模块
xml是实现不同语言或程序之间进行数据交换的协议,跟json差不多,但json使用起来更简单,在json还没诞生时,
大家只能选择用xml,至今很多传统公司如金融行业的很多系统的接口还主要是xml。xml的格式如下,就是通过<>节点来区别数据结构的。
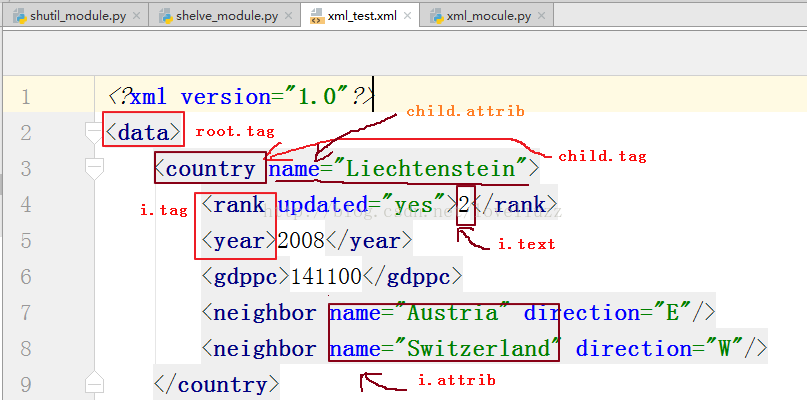
(1)xml文件示例代码如下:文件名为:xml_test.xml
<?xmlversion="1.0"?><data><countryname="Liechtenstein"><rankupdated="yes">2</rank><year>2008</year><gdppc>141100</gdppc><neighborname="Austria"direction="E"/><neighborname="Switzerland"direction="W"/></country><countryname="Singapore"><rankupdated="yes">5</rank><year>2011</year><gdppc>59900</gdppc><neighborname="Malaysia"direction="N"/></country><countryname="Panama"><rankupdated="yes">69</rank><year>2011</year><gdppc>13600</gdppc><neighborname="CostaRica"direction="W"/><neighborname="Colombia"direction="E"/></country></data>
(2)Python中操作xml模块
xml协议在各种语言里的都是支持的,在python中可以用以下模块操作xml 。
#!/usr/bin/envpython#-*-coding:utf-8-*-#Author:ZhengzhengLiu#python中操作xml模块importxml.etree.ElementTreeasETtree=ET.parse("xml_test.xml")#要处理的xml文件名root=tree.getroot()#root是一个内存对象print(root)print(root.tag)#打印标签名#print(ET.parse("xml_test.xml").getroot().tag)#遍历xml文档forchildinroot:print(child.tag,child.attrib)#打印下一级的标签名和属性foriinchild:print(i.tag,i.attrib,i.text)
运行结果:
<Element 'data' at 0x0062E8A0>
data
country {'name': 'Liechtenstein'}
rank {'updated': 'yes'} 2
year {} 2008
gdppc {} 141100
neighbor {'direction': 'E', 'name': 'Austria'} None
neighbor {'direction': 'W', 'name': 'Switzerland'} None
country {'name': 'Singapore'}
rank {'updated': 'yes'} 5
year {} 2011
gdppc {} 59900
neighbor {'direction': 'N', 'name': 'Malaysia'} None
country {'name': 'Panama'}
rank {'updated': 'yes'} 69
year {} 2011
gdppc {} 13600
neighbor {'direction': 'W', 'name': 'Costa Rica'} None
neighbor {'direction': 'E', 'name': 'Colombia'} None
只遍历节点year,代码如下:
#!/usr/bin/envpython#-*-coding:utf-8-*-#Author:ZhengzhengLiu#python中操作xml模块importxml.etree.ElementTreeasETtree=ET.parse("xml_test.xml")#要处理的xml文件名root=tree.getroot()#root是一个内存对象print(root)print(root.tag)#打印标签名#只遍历year节点fornodeinroot.iter('year'):print(node.tag,node.text)运行结果:
<Element 'data' at 0x0050E8D0>
data
year 2008
year 2011
year 2011
3、configparser模块
用于生成和修改常见配置文档,常见文档格式如下:
[DEFAULT]ServerAliveInterval=45Compression=yesCompressionLevel=9ForwardX11=yes[bitbucket.org]User=hg[topsecret.server.com]Port=50022ForwardX11=no
Python生成配置文档:
#!/usr/bin/envpython#-*-coding:utf-8-*-#Author:ZhengzhengLiu#python生成配置文档importconfigparserconfig=configparser.ConfigParser()config["DEFAULT"]={'ServerAliveInterval':'45','Compression':'yes','CompressionLevel':'9'}config['bitbucket.org']={}config['bitbucket.org']['User']='hg'config['topsecret.server.com']={}topsecret=config['topsecret.server.com']topsecret['HostPort']='50022'#mutatestheparsertopsecret['ForwardX11']='no'#samehereconfig['DEFAULT']['ForwardX11']='yes'withopen('example.ini','w')asconfigfile:config.write(configfile)4、hashlib模块
做一个映射关系,将字符串转成数字,用于加密相关的操作。
3.x里主要提供SHA1, SHA224, SHA256, SHA384, SHA512 ,MD5 算法。
#!/usr/bin/envpython#-*-coding:utf-8-*-#Author:ZhengzhengLiuimporthashlibm=hashlib.md5()#生成对象m.update(b"Hello")m.update(b"It'sme")print(m.digest())m.update(b"It'sbeenalongtimesincelasttimewe...")print(m.digest())#2进制格式hashprint(len(m.hexdigest()))#16进制格式hashprint(m.hexdigest())#########md5########hash=hashlib.md5()hash.update(b'admin')print("md5:",hash.hexdigest())#########sha1########hash=hashlib.sha1()hash.update(b'admin')print("sha1:",hash.hexdigest())#########sha256########hash=hashlib.sha256()hash.update(b'admin')print("sha256:",hash.hexdigest())运行结果:
b']\xde\xb4{/\x92Z\xd0\xbf$\x9cR\xe3Br\x8a'
b'\xa0\xe9\x89E\x03\xcb\x9f\x1a\x14\xaa\x07?<\xae\xfa\xa5'
32
a0e9894503cb9f1a14aa073f3caefaa5
md5: 21232f297a57a5a743894a0e4a801fc3
sha1: d033e22ae348aeb5660fc2140aec35850c4da997
sha256: 8c6976e5b5410415bde908bd4dee15dfb167a9c873fc4bb8a81f6f2ab448a918
5、hmac 模块
它内部对我们创建 key 和 内容 再进行处理然后再加密。
散列消息鉴别码,简称HMAC,是一种基于消息鉴别码MAC(Message Authentication Code)的鉴别机制。
使用HMAC时,消息通讯的双方,通过验证消息中加入的鉴别密钥K来鉴别消息的真伪;一般用于网络通信中消息加密。
前提是双方先要约定好key,就像接头暗号一样,然后消息发送把用key把消息加密,接收方用key + 消息明文再加密,
拿加密后的值 跟 发送者的相对比是否相等,这样就能验证消息的真实性,及发送者的合法性了。
importhmach=hmac.new(b'zxc','cvb你好'.encode(encoding="utf-8"))print(h.digest())print(h.hexdigest())#运行结果:#b'\xc1\x89\t#VQ\xa4\x00\xbf\xed\xb2_\xc1s\xfa\xd2'#c18909235651a400bfedb25fc173fad2
</div> <div class="zixun-tj-product adv-bottom"></div> </div> </div> <div class="prve-next-news">如何在Python3.5中使用shelve模块和xml模块的详细内容,希望对您有所帮助,信息来源于网络。