SpringBoot嵌入式web容器的启动原理是什么
导读:本文共6267字符,通常情况下阅读需要21分钟。同时您也可以点击右侧朗读,来听本文内容。按键盘←(左) →(右) 方向键可以翻页。
摘要: SpringBoot应用启动run方法SpringApplication.java 中执行的代码@SpringBootApplication@EnableAsync//使用异步注解@Async需要在这里加上@EnableAsync@MapperScan("springboot.dao")//不可或缺作用是扫描dao包下面的所有mapper... ...
目录
(为您整理了一些要点),点击可以直达。SpringBoot应用启动run方法
SpringApplication.java 中执行的代码
@SpringBootApplication@EnableAsync//使用异步注解@Async需要在这里加上@EnableAsync@MapperScan("springboot.dao")//不可或缺作用是扫描dao包下面的所有mapper装配publicclassHelloApplication{publicstaticvoidmain(String[]args){SpringApplication.run(HelloApplication.class,args);}}publicstaticConfigurableApplicationContextrun(Class<?>primarySource,String...args){returnrun(newClass[]{primarySource},args);}publicstaticConfigurableApplicationContextrun(Class<?>[]primarySources,String[]args){return(newSpringApplication(primarySources)).run(args);}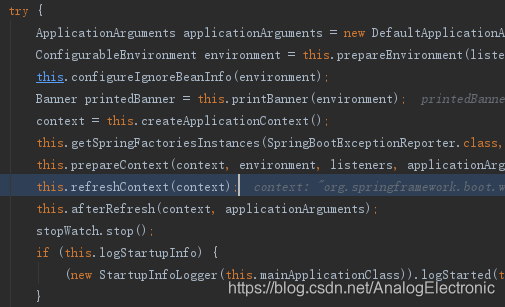
privatevoidrefreshContext(ConfigurableApplicationContextcontext){this.refresh(context);if(this.registerShutdownHook){try{context.registerShutdownHook();}catch(AccessControlExceptionvar3){}}protectedvoidrefresh(ApplicationContextapplicationContext){Assert.isInstanceOf(AbstractApplicationContext.class,applicationContext);((AbstractApplicationContext)applicationContext).refresh();}ServletWebServerApplicationContext.java执行的方法
publicfinalvoidrefresh()throwsBeansException,IllegalStateException{try{super.refresh();}catch(RuntimeExceptionvar2){this.stopAndReleaseWebServer();throwvar2;}}protectedvoidonRefresh(){super.onRefresh();try{this.createWebServer();}catch(Throwablevar2){thrownewApplicationContextException("Unabletostartwebserver",var2);}}privatevoidcreateWebServer(){WebServerwebServer=this.webServer;ServletContextservletContext=this.getServletContext();if(webServer==null&&servletContext==null){ServletWebServerFactoryfactory=this.getWebServerFactory();this.webServer=factory.getWebServer(newServletContextInitializer[]{this.getSelfInitializer()});}elseif(servletContext!=null){try{this.getSelfInitializer().onStartup(servletContext);}catch(ServletExceptionvar4){thrownewApplicationContextException("Cannotinitializeservletcontext",var4);}}this.initPropertySources();}protectedServletWebServerFactorygetWebServerFactory(){String[]beanNames=this.getBeanFactory().getBeanNamesForType(ServletWebServerFactory.class);if(beanNames.length==0){thrownewApplicationContextException("UnabletostartServletWebServerApplicationContextduetomissingServletWebServerFactorybean.");}elseif(beanNames.length>1){thrownewApplicationContextException("UnabletostartServletWebServerApplicationContextduetomultipleServletWebServerFactorybeans:"+StringUtils.arrayToCommaDelimitedString(beanNames));}else{return(ServletWebServerFactory)this.getBeanFactory().getBean(beanNames[0],ServletWebServerFactory.class);}}//配置嵌入式的servlet容器@BeanpublicWebServerFactoryCustomizer<ConfigurableWebServerFactory>MyCustomizer(){returnnewWebServerFactoryCustomizer<ConfigurableWebServerFactory>(){@Overridepublicvoidcustomize(ConfigurableWebServerFactoryfactory){factory.setPort(8081);}};}SpringBoot 2.x 版本
嵌入式Servlet容器自动配置原理以及启动原理
一、版本说明
Spring Boot 2.x 版本的嵌入式Servlet容器自动配置是通过 WebServerFactoryCustomizer定制器 来定制的,而在Spring Boot 1.x 版本中我们是通过 EmbeddedServletContainerCustomizer 嵌入式的Servlet容器定制器来定制的。由于之前看的资料都是1.x的版本,但是我使用的是2.x,所以在这里记录一下2.x版本的嵌入式Servlet容器自动配置原理以及启动原理。
二、总结
嵌入式Servlet容器自动配置原理以及启动原理有三大步:
步骤:
SpringBoot 根据导入的依赖信息,自动创建对应的 WebServerFactoryCustomizer(web服务工厂定制器);
WebServerFactoryCustomizerBeanPostProcessor(web服务工厂定制器组件的后置处理器)获取所有类型为web服务工厂定制器的组件(包含实现WebServerFactoryCustomizer接口,自定义的定制器组件),依次调用customize()定制接口,定制Servlet容器配置;
嵌入式的Servlet容器工厂创建tomcat容器,初始化并启动容器。
三、嵌入式Servlet容器自动配置原理(以Tomcat为例)
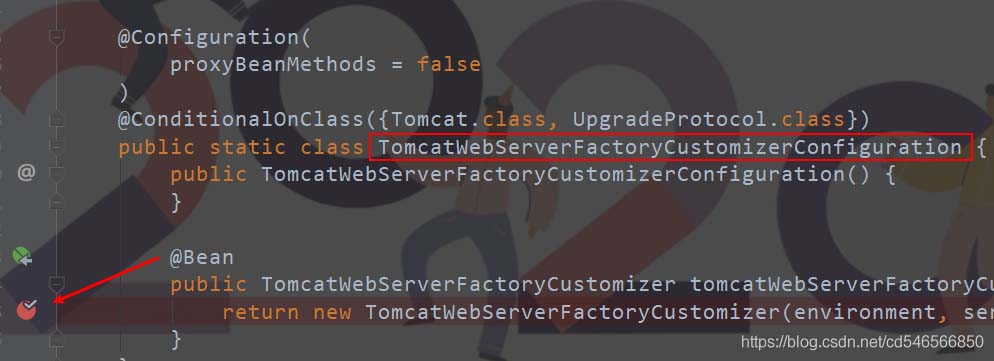
1、首先找到 EmbeddedWebServerFactoryCustomizerAutoConfiguration ,在里面我们可以看到SpringBoot支持的 servlet容器
//SprinBoot支持的servlet容器有三个Tomcat、Jetty、Undertow,但是默认配置的是Tomcat//嵌入式的Undertow@Configuration(proxyBeanMethods=false)@ConditionalOnClass({Undertow.class,SslClientAuthMode.class})publicstaticclassUndertowWebServerFactoryCustomizerConfiguration{publicUndertowWebServerFactoryCustomizerConfiguration(){}@BeanpublicUndertowWebServerFactoryCustomizerundertowWebServerFactoryCustomizer(Environmentenvironment,ServerPropertiesserverProperties){returnnewUndertowWebServerFactoryCustomizer(environment,serverProperties);}}//嵌入式的Jetty@Configuration(proxyBeanMethods=false)@ConditionalOnClass({Server.class,Loader.class,WebAppContext.class})publicstaticclassJettyWebServerFactoryCustomizerConfiguration{publicJettyWebServerFactoryCustomizerConfiguration(){}@BeanpublicJettyWebServerFactoryCustomizerjettyWebServerFactoryCustomizer(Environmentenvironment,ServerPropertiesserverProperties){returnnewJettyWebServerFactoryCustomizer(environment,serverProperties);}}//嵌入式的Tomcat@Configuration(proxyBeanMethods=false)@ConditionalOnClass({Tomcat.class,UpgradeProtocol.class})publicstaticclassTomcatWebServerFactoryCustomizerConfiguration{publicTomcatWebServerFactoryCustomizerConfiguration(){}@BeanpublicTomcatWebServerFactoryCustomizertomcatWebServerFactoryCustomizer(Environmentenvironment,ServerPropertiesserverProperties){returnnewTomcatWebServerFactoryCustomizer(environment,serverProperties);}}2、准备环节
1)在以下位置打一个断点
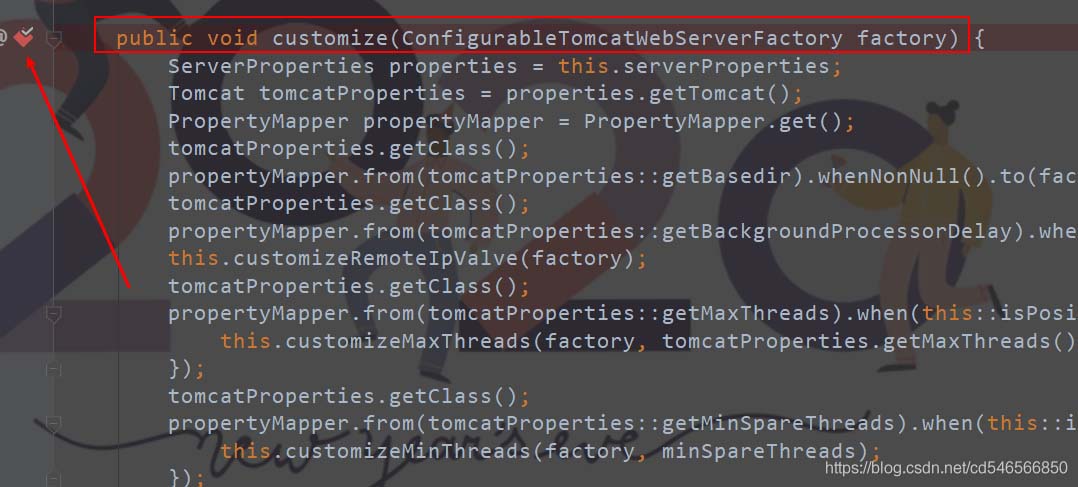
2)、点进 TomcatWebServerFactoryCustomizer 也就是上图 return 的,然后在里面的如下位置打一个断点
3)、然后在里面debug程序,我们在控制台就可以看到如下信息
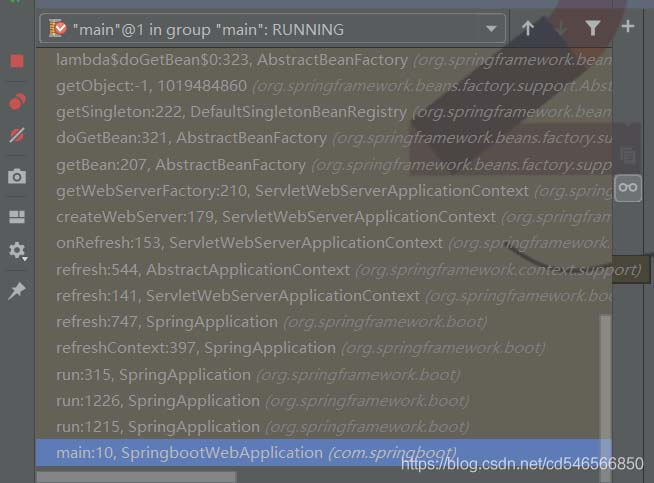
3、按照上图从下往上分析。我们启动springboot应用时,都是直接运行主程序的main方法,然后调用里面的run方法,如下图

4、调用完run方法,回来到 refreshContext 方法,这个方法是帮我们创建IOC容器对象,并且初始化容器,创建容器中的每一个组件

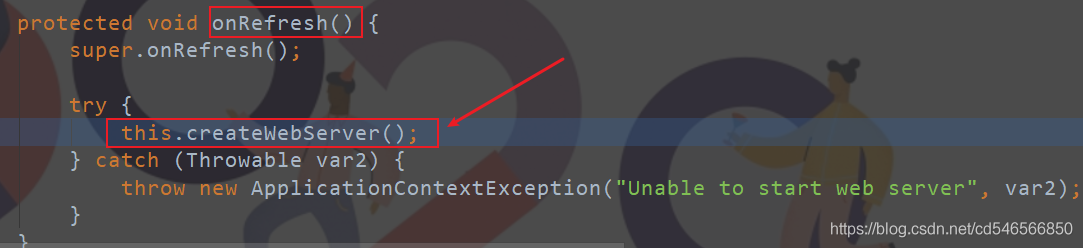
5、在调用了 reflesh 方法刷新刚才的IOC容器后,来到 onreflesh 方法,调用createWebServer()方法,创建WebServer
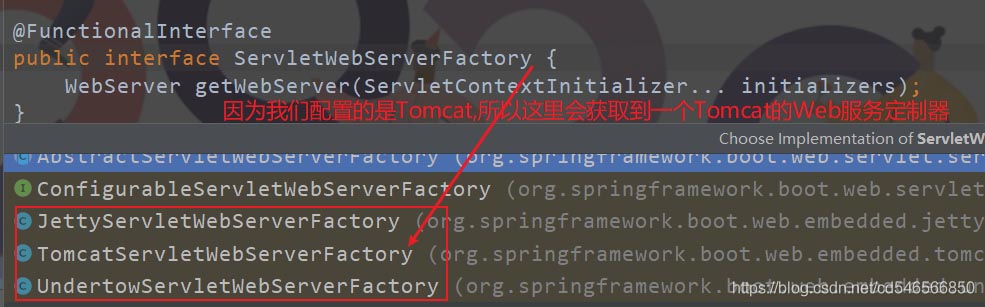
6、来到createWebServer()方法,该方法最终能够获取到一个与当前应用(也就是总结里说的第一步,根据我们导入的依赖来获取)所导入的Servlet类型相匹配的web服务工厂,通过工厂就可以获取到相应的 WebServerFactoryCustomizer (Web服务工厂定制器)
注:createWebServer()执行后,我们其实来到了 EmbeddedWebServerFactoryCustomizerAutoConfiguration,然后根据条件(配置的依赖)配置哪一个Web服务器

我们通过查看 ServletWebServerFactory 的子类,可以看到其中三个就是Tomcat、Jetty和Undertow,根据我们的配置,所以这里获取到的是 TomcatWebServerFactoryCustomizer
至此,TomcatWebServerFactoryCustomizer组件创建完成,对应的服务配置类也已添加到IOC容器。
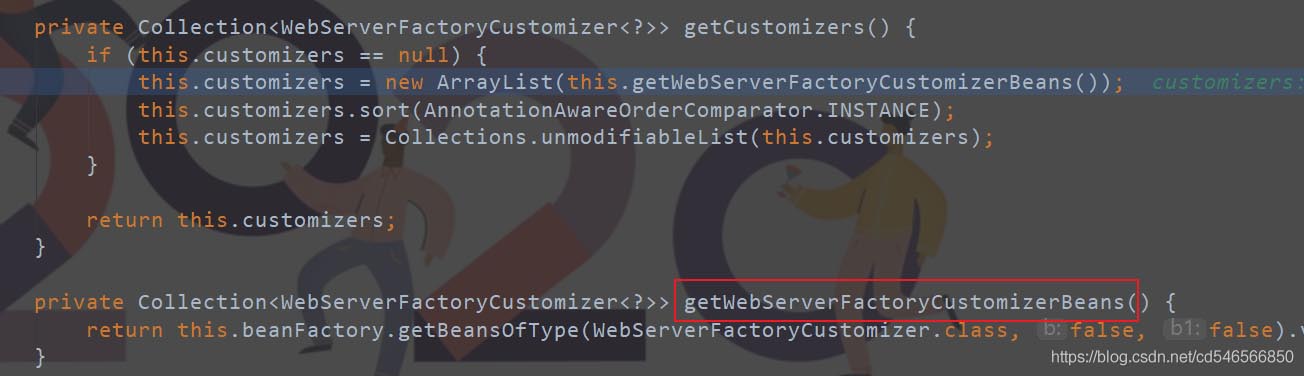
7、因为容器中某个组件要创建对象就会惊动后置处理器 然后就到 WebServerFactoryCustomizerBeanPostProcessor(web服务工厂定制器组件的后置处理器),该类负责在bean组件初始化之前执行初始化工作。它先从IOC容器中获取所有类型为WebServerFactoryCustomizerBeans(web服务工厂定制器的组件)
通过后置处理器获取到的TomcatWebServerFactoryCustomizer调用customize()定制方法,获取到Servlet容器相关配置类ServerProperties,进行自动配置

至此,嵌入式Servlet容器的自动配置完成。
注:从源码分析可以得出配置嵌入式Servlet容器的两种解决方案:
1、在全局配置文件中,通过server.xxx来修改和server有关的配置:
server.port=8081server.tomcat.xxx...
2、实现WebServerFactoryCustomizer接口,重写它的customize()方法,对容器进行定制配置:
@FunctionalInterfacepublicinterfaceWebServerFactoryCustomizer<TextendsWebServerFactory>{voidcustomize(Tfactory);}四、嵌入式Servlet容器启动原理(以Tomcat为例)
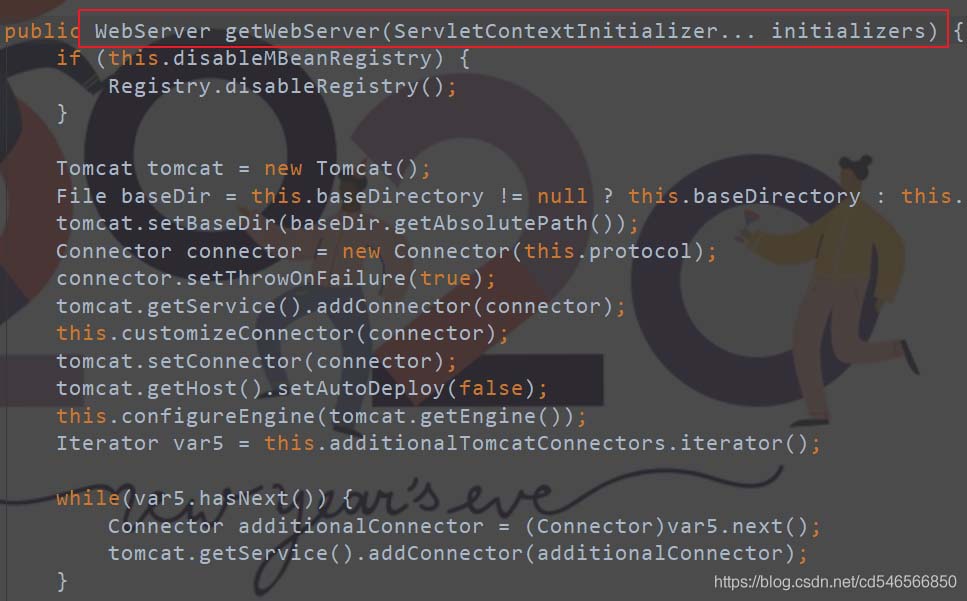
1、应用启动后,根据导入的依赖信息,创建了相应的Servlet容器工厂,创建了TomcatServletWebServerFactory,调用getWebServer()方法创建Tomcat容器:(其实就是重写了ServletWebServerFactory里面的getWebServer方法)
找到下面的getTomcatWebServer方法

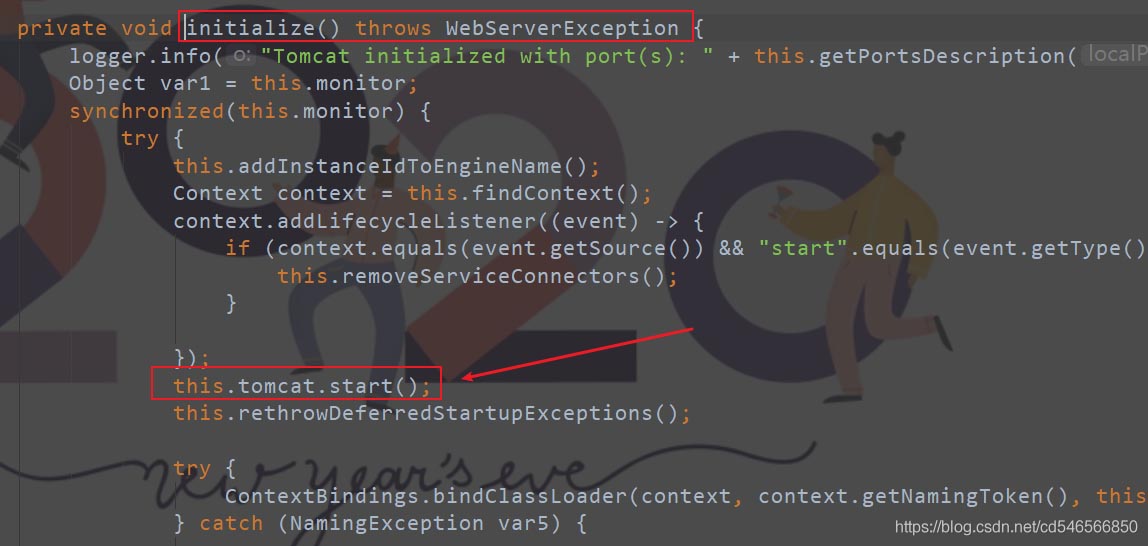
2、然后点进去分析TomcatWebServer的有参构造器,执行 initialize() 方法

3、点进去就可以发现,里面通过调用start方法来启动Tomcat
</div> <div class="zixun-tj-product adv-bottom"></div> </div> </div> <div class="prve-next-news">SpringBoot嵌入式web容器的启动原理是什么的详细内容,希望对您有所帮助,信息来源于网络。