基于多网卡环境下Eureka服务注册IP怎么选择
导读:本文共3858.5字符,通常情况下阅读需要13分钟。同时您也可以点击右侧朗读,来听本文内容。按键盘←(左) →(右) 方向键可以翻页。
摘要: 多网卡环境下Eureka服务注册IP选择问题场景服务器上分别配置了eth0和eth2两块网卡,只有eth2的地址可供其它机器访问,在这种情况下,服务注册时Eureka Client会自动选择eth0作为服务ip, 导致其它服务无法调用。问题原因由于官方并没有写明Eureka Client探测本机IP的逻辑,所以只能翻阅源代码。Eureka Client的源码在e... ...
目录
(为您整理了一些要点),点击可以直达。多网卡环境下Eureka服务注册IP选择
问题场景
服务器上分别配置了eth0和eth2两块网卡,只有eth2的地址可供其它机器访问,在这种情况下,服务注册时Eureka Client会自动选择eth0作为服务ip, 导致其它服务无法调用。
问题原因
由于官方并没有写明Eureka Client探测本机IP的逻辑,所以只能翻阅源代码。Eureka Client的源码在eureka-client模块下,com.netflix.appinfo包下的InstanceInfo类封装了本机信息,其中就包括了IP地址。在
Spring Cloud 环境下,Eureka Client并没有自己实现探测本机IP的逻辑,而是交给Spring的InetUtils工具类的findFirstNonLoopbackAddress()方法完成的:
publicInetAddressfindFirstNonLoopbackAddress(){InetAddressresult=null;try{//记录网卡最小索引intlowest=Integer.MAX_VALUE;//获取所有网卡for(Enumeration<NetworkInterface>nics=NetworkInterface.getNetworkInterfaces();nics.hasMoreElements();){NetworkInterfaceifc=nics.nextElement();if(ifc.isUp()){log.trace("Testinginterface:"+ifc.getDisplayName());if(ifc.getIndex()<lowest||result==null){lowest=ifc.getIndex();//记录索引}elseif(result!=null){continue;}//@formatter:offif(!ignoreInterface(ifc.getDisplayName())){//是否是被忽略的网卡for(Enumeration<InetAddress>addrs=ifc.getInetAddresses();addrs.hasMoreElements();){InetAddressaddress=addrs.nextElement();if(addressinstanceofInet4Address&&!address.isLoopbackAddress()&&!ignoreAddress(address)){log.trace("Foundnon-loopbackinterface:"+ifc.getDisplayName());result=address;}}}//@formatter:on}}}catch(IOExceptionex){log.error("Cannotgetfirstnon-loopbackaddress",ex);}if(result!=null){returnresult;}try{returnInetAddress.getLocalHost();//如果以上逻辑都没有找到合适的网卡,则使用JDK的InetAddress.getLocalhost()}catch(UnknownHostExceptione){log.warn("Unabletoretrievelocalhost");}returnnull;}通过源码可以看出,该工具类会获取所有网卡,依次进行遍历,取ip地址合理、索引值最小、已经启动且不在忽略列表的网卡的ip地址作为结果。如果仍然没有找到合适的IP, 那么就将InetAddress.getLocalHost()做为最后的fallback方案。
解决方案
A.忽略指定网卡
spring.cloud.inetutils.gnored-interfaces[0]=eth0#忽略eth0,支持正则表达式
因通过配置application.properties让应用忽略无效的网卡。
B.配置host
当网查遍历逻辑都没有找到合适ip时会走JDK的InetAddress.getLocalHost()。该方法会返回当前主机的hostname, 然后会根据hostname解析出对应的ip。因此第二种方案就是配置本机的hostname和/etc/hosts文件,直接将本机的主机名映射到有效IP地址。
C.手工指定IP
#指定此实例的ipeureka.instance.ip-address=#注册时使用ip而不是主机名eureka.instance.prefer-ip-address=true
D.启动时指定IP
java-jar-Dspring.cloud.inetutils.preferred-networks=192.168.20.123
E.禁用eth0
查看网卡的连接信息
[root@localhost~]#nmcliconshNAMEUUIDTYPEDEVICESystemeth05fb06bd0-0bb0-7ffb-45f1-d6edd65f3e03802-3-etherneteth0
禁用eth0
[root@localhost~]#ifdowneth0Device'eth0'successfullydisconnected.
启用eth0
[root@localhost~]#ifupeth0
在Eureka中使用IP注册服务
在将微服务放入docker部署在多个云服务器上的时候,发现eureka里显示的是机器名,然后弄了个spring boot admin监控平台,发现它就找不到各个微服务对应的主机了。
在网上查得eureka.instance.prefer-ip-address=true,使用这条配置eureka里显示的就是ip地址了,但是依然不够的,在监控平台里面还是连接不上。
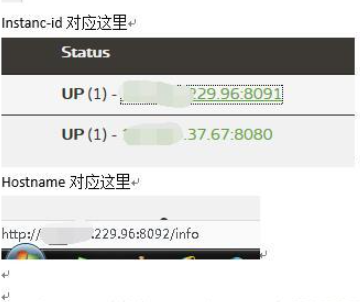
还需要配置instance-和hostname才能使客户端访问到实例
效果应该是这样,点击ip后能访问到相应内容
eureka服务端配置
server.port=8666spring.application.name=eureka-server#服务注册中心实例的主机名eureka.instance.hostname=xxx.xxx.xxx.67#留存的服务示例低于多少比例进入保护模式eureka.server.renewal-percent-threshold=0.5#是否开启保护模式eureka.server.enable-self-preservation=true#是否向服务注册中心注册自己eureka.client.register-with-eureka=false#是否启用获取服务注册信息,因为这是一个单点的EurekaServer,不需要同步其他的EurekaServer节点的数据,故而设为falseeureka.client.fetch-registry=false#注册和查询都需要依赖该地址,多个以逗号分隔eureka.client.serviceUrl.defaultZone=http://admin:password@xxx.xxx.xxx.67:8666/eureka/#使用ip替代实例名eureka.instance.prefer-ip-address=true#设置实例的ID为ip:porteureka.instance.instance-id=xxx.xxx.xxx.67:${server.port}#这里使用springsecurity对注册中心做一个基础的用户名密码登录security.basic.enabled=truesecurity.user.name=adminsecurity.user.password=password注意到:
eureka.instance.hostname=xxx.xxx.xxx.67eureka.instance.instance-id=xxx.xxx.xxx.67:${server.port}这里我直接手工指定了ip,而不是通过${spring.cloud.client.ipAddress}来获取本机的ip,因为使用docker后,发现获取的ip是docker0这张网卡上分配的ip,以172.16.xxx.xxx开头的ip,要使docker绑定外网ip网上也有很多资料,这里先简化操作,就直接手工指定ip了哈。。
客户端配置
eureka.client.service-url.defaultZone=http://admin:password@xxx.xxx.xxx.67:8666/eureka/eureka.instance.lease-renewal-interval-in-seconds=5eureka.instance.lease-expiration-duration-in-seconds=10eureka.client.healthcheck.enable=trueeureka.instance.hostname=xxx.xxx.xxx.67#设置实例的ID为ip:porteureka.instance.instance-id=xxx.xxx.xxx.67:${server.port}注意客户端也要写上eureka.instance.instance-id和eureka.instance.hostname
这样在eureka上就显示的是ip地址了
要使spring boot admin正常工作,还需在spring boot admin上配置
admin服务端配置
spring.application.name=admin-monitorserver.port=7001#为了安全,以后可以把管理端口设置一下#management.port=7002#现在测试环境就关闭了身份认证,真实环境还是需要它的management.security.enabled=false
客户端配置
#关闭身份认证,以免发生401错误management.security.enabled=false#admin监控配置,连接到服务端spring.boot.admin.url=http://xxx.xxx.xxx.96:7001#在springbootadmin里以ip的形式注册显示spring.boot.admin.client.prefer-ip=true
这里比较关键的一步就是在客户端里配置spring.boot.admin.client.prefer-ip=true,这样spring boot admin就能通过ip来访问各个微服务端点,然后收集它们的信息,从而来监控各个微服务了
</div> <div class="zixun-tj-product adv-bottom"></div> </div> </div> <div class="prve-next-news">基于多网卡环境下Eureka服务注册IP怎么选择的详细内容,希望对您有所帮助,信息来源于网络。