Python OpenCV如何使用dlib进行多目标跟踪
导读:本文共20434.5字符,通常情况下阅读需要68分钟。同时您也可以点击右侧朗读,来听本文内容。按键盘←(左) →(右) 方向键可以翻页。
摘要: 1.使用 dlib 进行多目标跟踪在本指南的第一部分,我将演示如何实现一个简单、朴素的 dlib 多对象跟踪脚本。该程序将跟踪视频中的多个对象;但是,我们会注意到脚本运行速度有点慢。 为了提高我们的 FPS,我将向您展示一个更快、更高效的 dlib 多对象跟踪器实现。 最后,我将讨论一些改进和建议,以增强我们的多对象跟踪实现。2.项目结构你可以使用tree命令查... ...
目录
(为您整理了一些要点),点击可以直达。1.使用 dlib 进行多目标跟踪
在本指南的第一部分,我将演示如何实现一个简单、朴素的 dlib 多对象跟踪脚本。该程序将跟踪视频中的多个对象;但是,我们会注意到脚本运行速度有点慢。 为了提高我们的 FPS,我将向您展示一个更快、更高效的 dlib 多对象跟踪器实现。 最后,我将讨论一些改进和建议,以增强我们的多对象跟踪实现。
2.项目结构
你可以使用tree命令查看我们的项目结构:
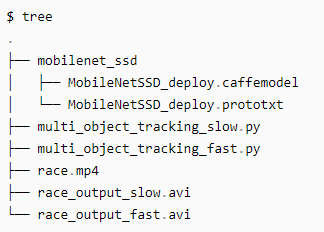
mobilenet_ssd/ 目录包含我们的 MobileNet + SSD Caffe 模型文件,它允许我们检测人(以及其他对象)。 今天我们将回顾两个 Python 脚本:
multi_object_tracking_slow.py:dlib 多对象跟踪的简单“朴素”方法。
multi_object_tracking_fast.py:利用多处理的先进、快速的方法。
3.dlib 多对象跟踪的简单“朴素”方法
我们今天要介绍的第一个 dlib 多对象跟踪实现是“朴素的”,因为它将:
1.使用一个简单的跟踪器对象列表。
2.仅使用我们处理器的单个内核按顺序更新每个跟踪器。
对于某些对象跟踪任务,此实现将绰绰有余;然而,为了优化我们的 FPS,我们应该将对象跟踪器分布在多个进程中。
我们将从本节中的简单实现开始,然后在下一节中转到更快的方法。 首先,打开multi_object_tracking_slow.py 脚本并插入以下代码:
#importthenecessarypackagesfromimutils.videoimportFPSimportnumpyasnpimportargparseimportimutilsimportdlibimportcv2
让我们解析我们的命令行参数:
#constructtheargumentparserandparsetheargumentsap=argparse.ArgumentParser()ap.add_argument("-p","--prototxt",required=True,help="pathtoCaffe'deploy'prototxtfile")ap.add_argument("-m","--model",required=True,help="pathtoCaffepre-trainedmodel")ap.add_argument("-v","--video",required=True,help="pathtoinputvideofile")ap.add_argument("-o","--output",type=str,help="pathtooptionaloutputvideofile")ap.add_argument("-c","--confidence",type=float,default=0.2,help="minimumprobabilitytofilterweakdetections")args=vars(ap.parse_args())我们的脚本在运行时处理以下命令行参数:
--prototxt :Caffe 部署 prototxt 文件的路径。
--model : prototxt 附带的模型文件的路径。
--video : 输入视频文件的路径。我们将在此视频中使用 dlib 执行多对象跟踪。
--output :输出视频文件的可选路径。如果未指定路径,则不会将视频输出到磁盘。我建议输出到 .avi 或 .mp4 文件。
--confidence :对象检测置信度阈值 ,默认是0.2 ,该值表示从对象检测器过滤弱检测的最小概率。
让我们定义这个模型支持的类列表,并从磁盘加载我们的模型:
#initializethelistofclasslabelsMobileNetSSDwastrainedto#detectCLASSES=["background","aeroplane","bicycle","bird","boat","bottle","bus","car","cat","chair","cow","diningtable","dog","horse","motorbike","person","pottedplant","sheep","sofa","train","tvmonitor"]#loadourserializedmodelfromdiskprint("[INFO]loadingmodel...")net=cv2.dnn.readNetFromCaffe(args["prototxt"],args["model"])我们只关心今天的赛跑示例中的“人”类,但您可以轻松修改以跟踪其他类。 我们加载了预训练的对象检测器模型。我们将使用我们预训练的 SSD 来检测视频中物体的存在。我们将创建一个 dlib 对象跟踪器来跟踪每个检测到的对象。
我们还有一些初始化要执行:
#initializethevideostreamandoutputvideowriterprint("[INFO]startingvideostream...")vs=cv2.VideoCapture(args["video"])writer=None#initializethelistofobjecttrackersandcorrespondingclass#labelstrackers=[]labels=[]#starttheframespersecondthroughputestimatorfps=FPS().start()我们初始化我们的视频流——我们将从输入视频中一次读取一个帧。 随后,我们的视频writer被初始化为 None 。在即将到来的 while 循环中,我们将与视频writer进行更多合作。 现在初始化我们的跟踪器和标签列表。 最后,开始我们的每秒帧数计数器。 我们都准备好开始处理视频了:
#loopoverframesfromthevideofilestreamwhileTrue:#grabthenextframefromthevideofile(grabbed,frame)=vs.read()#checktoseeifwehavereachedtheendofthevideofileifframeisNone:break#resizetheframeforfasterprocessingandthenconvertthe#framefromBGRtoRGBordering(dlibneedsRGBordering)frame=imutils.resize(frame,width=600)rgb=cv2.cvtColor(frame,cv2.COLOR_BGR2RGB)#ifwearesupposedtobewritingavideotodisk,initialize#thewriterifargs["output"]isnotNoneandwriterisNone:fourcc=cv2.VideoWriter_fourcc(*"MJPG")writer=cv2.VideoWriter(args["output"],fourcc,30,(frame.shape[1],frame.shape[0]),True)
将帧调整为600像素宽,保持高宽比。然后,为了dlib兼容性,帧被转换为RGB颜色通道排序(OpenCV的默认值是BGR,而dlib的默认值是RGB)。
让我们开始对象检测阶段:
#iftherearenoobjecttrackerswefirstneedtodetectobjects#andthencreateatrackerforeachobjectiflen(trackers)==0:#grabtheframedimensionsandconverttheframetoablob(h,w)=frame.shape[:2]blob=cv2.dnn.blobFromImage(frame,0.007843,(w,h),127.5)#passtheblobthroughthenetworkandobtainthedetections#andpredictionsnet.setInput(blob)detections=net.forward()
为了执行对象跟踪,我们必须首先执行对象检测
手动,通过停止视频流并手动选择每个对象的边界框。
以编程方式,使用经过训练的对象检测器来检测对象的存在(这就是我们在这里所做的)。
如果没有对象跟踪器,那么我们知道我们还没有执行对象检测。
我们创建并通过 SSD 网络传递一个 blob 以检测对象。
接下来,我们继续循环检测以查找属于person类的对象,因为我们的输入视频是人类的赛跑:
#loopoverthedetectionsforiinnp.arange(0,detections.shape[2]):#extracttheconfidence(i.e.,probability)associated#withthepredictionconfidence=detections[0,0,i,2]#filteroutweakdetectionsbyrequiringaminimum#confidenceifconfidence>args["confidence"]:#extracttheindexoftheclasslabelfromthe#detectionslistidx=int(detections[0,0,i,1])label=CLASSES[idx]#iftheclasslabelisnotaperson,ignoreitifCLASSES[idx]!="person":continue
我们开始循环检测,其中我们:
过滤掉弱检测。
确保每个检测都是一个person。当然,您可以删除这行代码或根据您自己的过滤需求对其进行自定义。
现在我们已经在框架中定位了每个person,让我们实例化我们的跟踪器并绘制我们的初始边界框 + 类标签:
#computethe(x,y)-coordinatesoftheboundingbox#fortheobjectbox=detections[0,0,i,3:7]*np.array([w,h,w,h])(startX,startY,endX,endY)=box.astype("int")#constructadlibrectangleobjectfromthebounding#boxcoordinatesandstartthecorrelationtrackert=dlib.correlation_tracker()rect=dlib.rectangle(startX,startY,endX,endY)t.start_track(rgb,rect)#updateoursetoftrackersandcorrespondingclass#labelslabels.append(label)trackers.append(t)#grabthecorrespondingclasslabelforthedetection#anddrawtheboundingboxcv2.rectangle(frame,(startX,startY),(endX,endY),(0,255,0),2)cv2.putText(frame,label,(startX,startY-15),cv2.FONT_HERSHEY_SIMPLEX,0.45,(0,255,0),2)要开始跟踪对象,我们:
计算每个检测到的对象的边界框。
实例化边界框坐标并将其传递给跟踪器。边界框在这里尤为重要。我们需要为边界框创建一个 dlib.rectangle 并将其传递给 start_track 方法。然后,dlib 可以开始跟踪对象。
最后,我们用单个跟踪器填充trackers列表。
因此,在下一个代码块中,我们将处理已经建立跟踪器并且只需要更新位置的情况。 我们在初始检测步骤中执行了两个额外的任务:
将类标签附加到标签列表。如果您要跟踪多种类型的对象(例如dog+person),您可能希望知道每个对象的类型。
在对象周围绘制每个边界框矩形和类标签。
如果我们的检测列表的长度大于0,我们就知道我们处于目标跟踪阶段:
#otherwise,we'vealreadyperformeddetectionsolet'strack#multipleobjectselse:#loopovereachofthetrackersfor(t,l)inzip(trackers,labels):#updatethetrackerandgrabthepositionofthetracked#objectt.update(rgb)pos=t.get_position()#unpackthepositionobjectstartX=int(pos.left())startY=int(pos.top())endX=int(pos.right())endY=int(pos.bottom())#drawtheboundingboxfromthecorrelationobjecttrackercv2.rectangle(frame,(startX,startY),(endX,endY),(0,255,0),2)cv2.putText(frame,l,(startX,startY-15),cv2.FONT_HERSHEY_SIMPLEX,0.45,(0,255,0),2)
在目标跟踪阶段,我们遍历所有trackers和相应的labels。然后我们继续update每个对象的位置。为了更新位置,我们只需传递 rgb 图像。
提取边界框坐标后,我们可以为每个被跟踪对象绘制一个边界框rectangle和label。
帧处理循环中的其余步骤涉及写入输出视频(如有必要)并显示结果:
#checktoseeifweshouldwritetheframetodiskifwriterisnotNone:writer.write(frame)#showtheoutputframecv2.imshow("Frame",frame)key=cv2.waitKey(1)&0xFF#ifthe`q`keywaspressed,breakfromtheloopifkey==ord("q"):break#updatetheFPScounterfps.update()在这里,我们:
如有必要,将frame写入视频。
显示输出帧并捕获按键。如果按下q键(退出),我们就会跳出循环。 最后,我们更新我们的每秒帧数信息以进行基准测试。
剩下的步骤是在终端打印FPS信息并释放指针:
#stopthetimeranddisplayFPSinformationfps.stop()print("[INFO]elapsedtime:{:.2f}".format(fps.elapsed()))print("[INFO]approx.FPS:{:.2f}".format(fps.fps()))#checktoseeifweneedtoreleasethevideowriterpointerifwriterisnotNone:writer.release()#doabitofcleanupcv2.destroyAllWindows()vs.release()让我们评估准确性和性能。打开终端并执行以下命令:
$pythonmulti_object_tracking_slow.py--prototxtmobilenet_ssd/MobileNetSSD_deploy.prototxt\--modelmobilenet_ssd/MobileNetSSD_deploy.caffemodel\--videorace.mp4--outputrace_output_slow.avi[INFO]loadingmodel...[INFO]startingvideostream...[INFO]elapsedtime:24.51[INFO]approx.FPS:13.87
看来我们的多目标跟踪器起作用了!
但正如你所看到的,我们只获得了约13帧/秒。
对于某些应用程序来说,这个FPS可能已经足够了——然而,如果你需要更快的FPS,我建议你看看下面我们更高效的dlib多对象跟踪器。其次,要明白跟踪的准确性并不完美。
4.快速、高效的 dlib 多对象跟踪实现
如果您运行上一节中的 dlib 多对象跟踪脚本并同时打开系统的监视器,您会注意到只使用了处理器的一个内核。
如果您运行上一节中的 dlib 多对象跟踪脚本并同时打开系统的活动监视器,您会注意到只使用了处理器的一个内核。
利用进程使我们的操作系统能够执行更好的进程调度,将进程映射到我们机器上的特定处理器内核(大多数现代操作系统能够以并行方式有效地调度使用大量 CPU 的进程)。
继续打开 mutli_object_tracking_fast.py 并插入以下代码:
#importthenecessarypackagesfromimutils.videoimportFPSimportmultiprocessingimportnumpyasnpimportargparseimportimutilsimportdlibimportcv2
我们将使用 Python Process 类来生成一个新进程——每个新进程都独立于原始进程。
为了生成这个进程,我们需要提供一个 Python 可以调用的函数,然后 Python 将使用该函数并创建一个全新的进程并执行它:
defstart_tracker(box,label,rgb,inputQueue,outputQueue):#constructadlibrectangleobjectfromtheboundingbox#coordinatesandthenstartthecorrelationtrackert=dlib.correlation_tracker()rect=dlib.rectangle(box[0],box[1],box[2],box[3])t.start_track(rgb,rect)
start_tracker 的前三个参数包括:
box :我们要跟踪的对象的边界框坐标,可能是由某种对象检测器返回的,无论是手动的还是编程的。
label :对象的人类可读标签。
rgb :我们将用于启动初始 dlib 对象跟踪器的 RGB 图像。
请记住Python多处理是如何工作的——Python将调用这个函数,然后创建一个全新的解释器来执行其中的代码。因此,每个生成的start_tracker进程都将独立于它的父进程。为了与Python驱动程序脚本通信,我们需要利用管道或队列(Pipes and Queues)。这两种类型的对象都是线程/进程安全的,使用锁和信号量来完成。
本质上,我们正在创建一个简单的生产者/消费者关系:
我们的父进程将生成新帧并将它们添加到特定对象跟踪器的队列中。
然后子进程将消耗帧,应用对象跟踪,然后返回更新的边界框坐标。
我决定在这篇文章中使用 Queue 对象;但是,请记住,如果您愿意,也可以使用Pipe
现在让我们开始一个无限循环,它将在进程中运行:
#loopindefinitely--thisfunctionwillbecalledasadaemon#processsowedon'tneedtoworryaboutjoiningitwhileTrue:#attempttograbthenextframefromtheinputqueuergb=inputQueue.get()#iftherewasanentryinourqueue,processitifrgbisnotNone:#updatethetrackerandgrabthepositionofthetracked#objectt.update(rgb)pos=t.get_position()#unpackthepositionobjectstartX=int(pos.left())startY=int(pos.top())endX=int(pos.right())endY=int(pos.bottom())#addthelabel+boundingboxcoordinatestotheoutput#queueoutputQueue.put((label,(startX,startY,endX,endY)))
我们在这里无限循环——这个函数将作为守护进程调用,所以我们不需要担心加入它。
首先,我们将尝试从 inputQueue 中抓取一个新帧。如果帧不为空,我们将抓取帧,然后更新对象跟踪器,让我们获得更新后的边界框坐标。
最后,我们将标签和边界框写入 outputQueue,以便父进程可以在脚本的主循环中使用它们。
回到父进程,我们将解析命令行参数:
#constructtheargumentparserandparsetheargumentsap=argparse.ArgumentParser()ap.add_argument("-p","--prototxt",required=True,help="pathtoCaffe'deploy'prototxtfile")ap.add_argument("-m","--model",required=True,help="pathtoCaffepre-trainedmodel")ap.add_argument("-v","--video",required=True,help="pathtoinputvideofile")ap.add_argument("-o","--output",type=str,help="pathtooptionaloutputvideofile")ap.add_argument("-c","--confidence",type=float,default=0.2,help="minimumprobabilitytofilterweakdetections")args=vars(ap.parse_args())此脚本的命令行参数与我们较慢的非多处理脚本完全相同。
让我们初始化我们的输入和输出队列:
#initializeourlistsofqueues--bothinputqueueandoutputqueue#for*every*objectthatwewillbetrackinginputQueues=[]outputQueues=[]
这些队列将保存我们正在跟踪的对象。生成的每个进程都需要两个 Queue 对象:
一个从其中读取输入帧
另一个将结果写入
下一个代码块与我们之前的脚本相同:
#initializethelistofclasslabelsMobileNetSSDwastrainedto#detectCLASSES=["background","aeroplane","bicycle","bird","boat","bottle","bus","car","cat","chair","cow","diningtable","dog","horse","motorbike","person","pottedplant","sheep","sofa","train","tvmonitor"]#loadourserializedmodelfromdiskprint("[INFO]loadingmodel...")net=cv2.dnn.readNetFromCaffe(args["prototxt"],args["model"])#initializethevideostreamandoutputvideowriterprint("[INFO]startingvideostream...")vs=cv2.VideoCapture(args["video"])writer=None#starttheframespersecondthroughputestimatorfps=FPS().start()我们定义模型的 CLASSES 并加载模型本身。
现在让我们开始循环视频流中的帧:
#loopoverframesfromthevideofilestreamwhileTrue:#grabthenextframefromthevideofile(grabbed,frame)=vs.read()#checktoseeifwehavereachedtheendofthevideofileifframeisNone:break#resizetheframeforfasterprocessingandthenconvertthe#framefromBGRtoRGBordering(dlibneedsRGBordering)frame=imutils.resize(frame,width=600)rgb=cv2.cvtColor(frame,cv2.COLOR_BGR2RGB)#ifwearesupposedtobewritingavideotodisk,initialize#thewriterifargs["output"]isnotNoneandwriterisNone:fourcc=cv2.VideoWriter_fourcc(*"MJPG")writer=cv2.VideoWriter(args["output"],fourcc,30,(frame.shape[1],frame.shape[0]),True)
现在让我们处理没有 inputQueues 的情况:
#ifourlistofqueuesisemptythenweknowwehaveyetto#createourfirstobjecttrackeriflen(inputQueues)==0:#grabtheframedimensionsandconverttheframetoablob(h,w)=frame.shape[:2]blob=cv2.dnn.blobFromImage(frame,0.007843,(w,h),127.5)#passtheblobthroughthenetworkandobtainthedetections#andpredictionsnet.setInput(blob)detections=net.forward()#loopoverthedetectionsforiinnp.arange(0,detections.shape[2]):#extracttheconfidence(i.e.,probability)associated#withthepredictionconfidence=detections[0,0,i,2]#filteroutweakdetectionsbyrequiringaminimum#confidenceifconfidence>args["confidence"]:#extracttheindexoftheclasslabelfromthe#detectionslistidx=int(detections[0,0,i,1])label=CLASSES[idx]#iftheclasslabelisnotaperson,ignoreitifCLASSES[idx]!="person":continue
如果没有 inputQueues,那么我们需要在对象跟踪之前应用对象检测。 我们应用对象检测,然后继续循环。我们获取置信度值并过滤掉弱检测。 如果我们的置信度满足我们的命令行参数建立的阈值,我们会考虑检测,但我们会通过类标签进一步过滤掉它。在这种情况下,我们只寻找person对象。 假设我们找到了一个person,我们将创建队列和生成跟踪进程:
#computethe(x,y)-coordinatesoftheboundingbox#fortheobjectbox=detections[0,0,i,3:7]*np.array([w,h,w,h])(startX,startY,endX,endY)=box.astype("int")bb=(startX,startY,endX,endY)#createtwobrandnewinputandoutputqueues,#respectivelyiq=multiprocessing.Queue()oq=multiprocessing.Queue()inputQueues.append(iq)outputQueues.append(oq)#spawnadaemonprocessforanewobjecttrackerp=multiprocessing.Process(target=start_tracker,args=(bb,label,rgb,iq,oq))p.daemon=Truep.start()#grabthecorrespondingclasslabelforthedetection#anddrawtheboundingboxcv2.rectangle(frame,(startX,startY),(endX,endY),(0,255,0),2)cv2.putText(frame,label,(startX,startY-15),cv2.FONT_HERSHEY_SIMPLEX,0.45,(0,255,0),2)我们首先计算边界框坐标。从那里我们创建两个新队列 iq 和 oq,分别将它们附加到 inputQueues 和 outputQueues。我们生成一个新的 start_tracker 进程,传递边界框、标签、rgb 图像和 iq + oq。
我们还绘制了检测到的对象的边界框rectangle和类标签label。
否则,我们已经执行了对象检测,因此我们需要将每个 dlib 对象跟踪器应用于帧:
#otherwise,we'vealreadyperformeddetectionsolet'strack#multipleobjectselse:#loopovereachofourinputquesandaddtheinputRGB#frametoit,enablingustoupdateeachoftherespective#objecttrackersrunninginseparateprocessesforiqininputQueues:iq.put(rgb)#loopovereachoftheoutputqueuesforoqinoutputQueues:#grabtheupdatedboundingboxcoordinatesforthe#object--the.getmethodisablockingoperationso#thiswillpauseourexecutionuntiltherespective#processfinishesthetrackingupdate(label,(startX,startY,endX,endY))=oq.get()#drawtheboundingboxfromthecorrelationobject#trackercv2.rectangle(frame,(startX,startY),(endX,endY),(0,255,0),2)cv2.putText(frame,label,(startX,startY-15),cv2.FONT_HERSHEY_SIMPLEX,0.45,(0,255,0),2)
遍历每个 inputQueues ,我们将 rgb 图像添加到它们。然后我们遍历每个outputQueues,从每个独立的对象跟踪器获取边界框坐标。最后,我们绘制边界框+关联的类标签label。
#checktoseeifweshouldwritetheframetodiskifwriterisnotNone:writer.write(frame)#showtheoutputframecv2.imshow("Frame",frame)key=cv2.waitKey(1)&0xFF#ifthe`q`keywaspressed,breakfromtheloopifkey==ord("q"):break#updatetheFPScounterfps.update()#stopthetimeranddisplayFPSinformationfps.stop()print("[INFO]elapsedtime:{:.2f}".format(fps.elapsed()))print("[INFO]approx.FPS:{:.2f}".format(fps.fps()))#checktoseeifweneedtoreleasethevideowriterpointerifwriterisnotNone:writer.release()#doabitofcleanupcv2.destroyAllWindows()vs.release()如有必要,我们将帧写入输出视频,并将帧显示到屏幕。 如果按下q键,我们退出,跳出循环。 如果我们继续处理帧,我们的 FPS 计算器会更新,然后我们再次在 while 循环的开头开始处理。 否则,我们处理完帧,我们显示 FPS 信息 + 释放指针并关闭窗口。
打开终端并执行以下命令:
$pythonmulti_object_tracking_fast.py--prototxtmobilenet_ssd/MobileNetSSD_deploy.prototxt\--modelmobilenet_ssd/MobileNetSSD_deploy.caffemodel\--videorace.mp4--outputrace_output_fast.avi[INFO]loadingmodel...[INFO]startingvideostream...[INFO]elapsedtime:14.01[INFO]approx.FPS:24.26
如您所见,我们更快、更高效的多对象跟踪器以 24 FPS 运行,比我们之前的实现提高了 45% 以上?! 此外,如果您在此脚本运行时打开活动监视器,您将看到更多系统的CPU 正在被使用。 这种加速是通过允许每个 dlib 对象跟踪器在单独的进程中运行来获得的,这反过来又使您的操作系统能够执行更有效的 CPU 资源调度。
5.完整代码
multi_object_tracking_slow.py
#USAGE#pythonmulti_object_tracking_slow.py--prototxtmobilenet_ssd/MobileNetSSD_deploy.prototxt\# --modelmobilenet_ssd/MobileNetSSD_deploy.caffemodel--videorace.mp4#importthenecessarypackagesfromimutils.videoimportFPSimportnumpyasnpimportargparseimportimutilsimportdlibimportcv2#constructtheargumentparserandparsetheargumentsap=argparse.ArgumentParser()ap.add_argument("-p","--prototxt",required=True, help="pathtoCaffe'deploy'prototxtfile")ap.add_argument("-m","--model",required=True, help="pathtoCaffepre-trainedmodel")#ap.add_argument("-v","--video",required=True,# help="pathtoinputvideofile")ap.add_argument("-v","--video", help="pathtoinputvideofile")ap.add_argument("-o","--output",type=str, help="pathtooptionaloutputvideofile")ap.add_argument("-c","--confidence",type=float,default=0.2, help="minimumprobabilitytofilterweakdetections")args=vars(ap.parse_args())#initializethelistofclasslabelsMobileNetSSDwastrainedto#detectCLASSES=["background","aeroplane","bicycle","bird","boat", "bottle","bus","car","cat","chair","cow","diningtable", "dog","horse","motorbike","person","pottedplant","sheep", "sofa","train","tvmonitor"]#loadourserializedmodelfromdiskprint("[INFO]loadingmodel...")net=cv2.dnn.readNetFromCaffe(args["prototxt"],args["model"])#initializethevideostreamandoutputvideowriterprint("[INFO]startingvideostream...")#vs=cv2.VideoCapture(args["video"])vs=cv2.VideoCapture(0)writer=None#initializethelistofobjecttrackersandcorrespondingclass#labelstrackers=[]labels=[]#starttheframespersecondthroughputestimatorfps=FPS().start()#loopoverframesfromthevideofilestreamwhileTrue: #grabthenextframefromthevideofile (grabbed,frame)=vs.read() #checktoseeifwehavereachedtheendofthevideofile ifframeisNone: break #resizetheframeforfasterprocessingandthenconvertthe #framefromBGRtoRGBordering(dlibneedsRGBordering) frame=imutils.resize(frame,width=600) rgb=cv2.cvtColor(frame,cv2.COLOR_BGR2RGB) #ifwearesupposedtobewritingavideotodisk,initialize #thewriter ifargs["output"]isnotNoneandwriterisNone: fourcc=cv2.VideoWriter_fourcc(*"MJPG") writer=cv2.VideoWriter(args["output"],fourcc,30, (frame.shape[1],frame.shape[0]),True) #iftherearenoobjecttrackerswefirstneedtodetectobjects #andthencreateatrackerforeachobject iflen(trackers)==0: #grabtheframedimensionsandconverttheframetoablob (h,w)=frame.shape[:2] blob=cv2.dnn.blobFromImage(frame,0.007843,(w,h),127.5) #passtheblobthroughthenetworkandobtainthedetections #andpredictions net.setInput(blob) detections=net.forward() #loopoverthedetections foriinnp.arange(0,detections.shape[2]): #extracttheconfidence(i.e.,probability)associated #withtheprediction confidence=detections[0,0,i,2] #filteroutweakdetectionsbyrequiringaminimum #confidence ifconfidence>args["confidence"]: #extracttheindexoftheclasslabelfromthe #detectionslist idx=int(detections[0,0,i,1]) label=CLASSES[idx] #iftheclasslabelisnotaperson,ignoreit ifCLASSES[idx]!="person": continue #computethe(x,y)-coordinatesoftheboundingbox #fortheobject box=detections[0,0,i,3:7]*np.array([w,h,w,h]) (startX,startY,endX,endY)=box.astype("int") #constructadlibrectangleobjectfromthebounding #boxcoordinatesandstartthecorrelationtracker t=dlib.correlation_tracker() rect=dlib.rectangle(startX,startY,endX,endY) t.start_track(rgb,rect) #updateoursetoftrackersandcorrespondingclass #labels labels.append(label) trackers.append(t) #grabthecorrespondingclasslabelforthedetection #anddrawtheboundingbox cv2.rectangle(frame,(startX,startY),(endX,endY), (0,255,0),2) cv2.putText(frame,label,(startX,startY-15), cv2.FONT_HERSHEY_SIMPLEX,0.45,(0,255,0),2) #otherwise,we'vealreadyperformeddetectionsolet'strack #multipleobjects else: #loopovereachofthetrackers for(t,l)inzip(trackers,labels): #updatethetrackerandgrabthepositionofthetracked #object t.update(rgb) pos=t.get_position() #unpackthepositionobject startX=int(pos.left()) startY=int(pos.top()) endX=int(pos.right()) endY=int(pos.bottom()) #drawtheboundingboxfromthecorrelationobjecttracker cv2.rectangle(frame,(startX,startY),(endX,endY), (0,255,0),2) cv2.putText(frame,l,(startX,startY-15), cv2.FONT_HERSHEY_SIMPLEX,0.45,(0,255,0),2) #checktoseeifweshouldwritetheframetodisk ifwriterisnotNone: writer.write(frame) #showtheoutputframe cv2.imshow("Frame",frame) key=cv2.waitKey(1)&0xFF #ifthe`q`keywaspressed,breakfromtheloop ifkey==ord("q"): break #updatetheFPScounter fps.update()#stopthetimeranddisplayFPSinformationfps.stop()print("[INFO]elapsedtime:{:.2f}".format(fps.elapsed()))print("[INFO]approx.FPS:{:.2f}".format(fps.fps()))#checktoseeifweneedtoreleasethevideowriterpointerifwriterisnotNone: writer.release()#doabitofcleanupcv2.destroyAllWindows()vs.release()multi_object_tracking_fast.py
#USAGE#pythonmulti_object_tracking_fast.py--prototxtmobilenet_ssd/MobileNetSSD_deploy.prototxt\# --modelmobilenet_ssd/MobileNetSSD_deploy.caffemodel--videorace.mp4#importthenecessarypackagesfromimutils.videoimportFPSimportmultiprocessingimportnumpyasnpimportargparseimportimutilsimportdlibimportcv2defstart_tracker(box,label,rgb,inputQueue,outputQueue): #constructadlibrectangleobjectfromtheboundingbox #coordinatesandthenstartthecorrelationtracker t=dlib.correlation_tracker() rect=dlib.rectangle(box[0],box[1],box[2],box[3]) t.start_track(rgb,rect) #loopindefinitely--thisfunctionwillbecalledasadaemon #processsowedon'tneedtoworryaboutjoiningit whileTrue: #attempttograbthenextframefromtheinputqueue rgb=inputQueue.get() #iftherewasanentryinourqueue,processit ifrgbisnotNone: #updatethetrackerandgrabthepositionofthetracked #object t.update(rgb) pos=t.get_position() #unpackthepositionobject startX=int(pos.left()) startY=int(pos.top()) endX=int(pos.right()) endY=int(pos.bottom()) #addthelabel+boundingboxcoordinatestotheoutput #queue outputQueue.put((label,(startX,startY,endX,endY)))#constructtheargumentparserandparsetheargumentsap=argparse.ArgumentParser()ap.add_argument("-p","--prototxt",required=True, help="pathtoCaffe'deploy'prototxtfile")ap.add_argument("-m","--model",required=True, help="pathtoCaffepre-trainedmodel")ap.add_argument("-v","--video",required=True, help="pathtoinputvideofile")ap.add_argument("-o","--output",type=str, help="pathtooptionaloutputvideofile")ap.add_argument("-c","--confidence",type=float,default=0.2, help="minimumprobabilitytofilterweakdetections")args=vars(ap.parse_args())#initializeourlistofqueues--bothinputqueueandoutputqueue#for*every*objectthatwewillbetrackinginputQueues=[]outputQueues=[]#initializethelistofclasslabelsMobileNetSSDwastrainedto#detectCLASSES=["background","aeroplane","bicycle","bird","boat", "bottle","bus","car","cat","chair","cow","diningtable", "dog","horse","motorbike","person","pottedplant","sheep", "sofa","train","tvmonitor"]#loadourserializedmodelfromdiskprint("[INFO]loadingmodel...")net=cv2.dnn.readNetFromCaffe(args["prototxt"],args["model"])#initializethevideostreamandoutputvideowriterprint("[INFO]startingvideostream...")vs=cv2.VideoCapture(args["video"])writer=None#starttheframespersecondthroughputestimatorfps=FPS().start()#loopoverframesfromthevideofilestreamwhileTrue: #grabthenextframefromthevideofile (grabbed,frame)=vs.read() #checktoseeifwehavereachedtheendofthevideofile ifframeisNone: break #resizetheframeforfasterprocessingandthenconvertthe #framefromBGRtoRGBordering(dlibneedsRGBordering) frame=imutils.resize(frame,width=600) rgb=cv2.cvtColor(frame,cv2.COLOR_BGR2RGB) #ifwearesupposedtobewritingavideotodisk,initialize #thewriter ifargs["output"]isnotNoneandwriterisNone: fourcc=cv2.VideoWriter_fourcc(*"MJPG") writer=cv2.VideoWriter(args["output"],fourcc,30, (frame.shape[1],frame.shape[0]),True) #ifourlistofqueuesisemptythenweknowwehaveyetto #createourfirstobjecttracker iflen(inputQueues)==0: #grabtheframedimensionsandconverttheframetoablob (h,w)=frame.shape[:2] blob=cv2.dnn.blobFromImage(frame,0.007843,(w,h),127.5) #passtheblobthroughthenetworkandobtainthedetections #andpredictions net.setInput(blob) detections=net.forward() #loopoverthedetections foriinnp.arange(0,detections.shape[2]): #extracttheconfidence(i.e.,probability)associated #withtheprediction confidence=detections[0,0,i,2] #filteroutweakdetectionsbyrequiringaminimum #confidence ifconfidence>args["confidence"]: #extracttheindexoftheclasslabelfromthe #detectionslist idx=int(detections[0,0,i,1]) label=CLASSES[idx] #iftheclasslabelisnotaperson,ignoreit ifCLASSES[idx]!="person": continue #computethe(x,y)-coordinatesoftheboundingbox #fortheobject box=detections[0,0,i,3:7]*np.array([w,h,w,h]) (startX,startY,endX,endY)=box.astype("int") bb=(startX,startY,endX,endY) #createtwobrandnewinputandoutputqueues, #respectively iq=multiprocessing.Queue() oq=multiprocessing.Queue() inputQueues.append(iq) outputQueues.append(oq) #spawnadaemonprocessforanewobjecttracker p=multiprocessing.Process( target=start_tracker, args=(bb,label,rgb,iq,oq)) p.daemon=True p.start() #grabthecorrespondingclasslabelforthedetection #anddrawtheboundingbox cv2.rectangle(frame,(startX,startY),(endX,endY), (0,255,0),2) cv2.putText(frame,label,(startX,startY-15), cv2.FONT_HERSHEY_SIMPLEX,0.45,(0,255,0),2) #otherwise,we'vealreadyperformeddetectionsolet'strack #multipleobjects else: #loopovereachofourinputquesandaddtheinputRGB #frametoit,enablingustoupdateeachoftherespective #objecttrackersrunninginseparateprocesses foriqininputQueues: iq.put(rgb) #loopovereachoftheoutputqueues foroqinoutputQueues: #grabtheupdatedboundingboxcoordinatesforthe #object--the.getmethodisablockingoperationso #thiswillpauseourexecutionuntiltherespective #processfinishesthetrackingupdate (label,(startX,startY,endX,endY))=oq.get() #drawtheboundingboxfromthecorrelationobject #tracker cv2.rectangle(frame,(startX,startY),(endX,endY), (0,255,0),2) cv2.putText(frame,label,(startX,startY-15), cv2.FONT_HERSHEY_SIMPLEX,0.45,(0,255,0),2) #checktoseeifweshouldwritetheframetodisk ifwriterisnotNone: writer.write(frame) #showtheoutputframe cv2.imshow("Frame",frame) key=cv2.waitKey(1)&0xFF #ifthe`q`keywaspressed,breakfromtheloop ifkey==ord("q"): break #updatetheFPScounter fps.update()#stopthetimeranddisplayFPSinformationfps.stop()print("[INFO]elapsedtime:{:.2f}".format(fps.elapsed()))print("[INFO]approx.FPS:{:.2f}".format(fps.fps()))#checktoseeifweneedtoreleasethevideowriterpointerifwriterisnotNone: writer.release()#doabitofcleanupcv2.destroyAllWindows()vs.release()6.改进和建议
我今天与大家分享的 dlib 多对象跟踪 Python 脚本可以很好地处理较短的视频流;但是,如果您打算将此实现用于长时间运行的生产环境(大约数小时到数天的视频),我建议您进行两项主要改进:
第一个改进是利用进程池,而不是为每个要跟踪的对象生成一个全新的进程。今天在这里介绍的实现为我们需要跟踪的每个对象构建了一个全新的队列Queue和进程Process。
对于今天的目的来说这很好,但考虑一下如果您想跟踪视频中的 50 个对象——这意味着您将生成 50 个进程,每个对象一个。那时,系统管理所有这些进程的开销将破坏 FPS 的任何增加。相反,您可能希望利用进程池。
如果您的系统有 N 个处理器内核,那么您需要创建一个包含 N – 1 个进程的池,将一个内核留给您的操作系统来执行系统操作。这些进程中的每一个都应该执行多个对象跟踪,维护一个对象跟踪器列表,类似于我们今天介绍的第一个多对象跟踪。
这种改进将允许您利用处理器的所有内核,而无需产生许多独立进程的开销。
我要做的第二个改进是清理进程和队列。如果 dlib 将对象报告为“丢失”或“消失”,我们不会从 start_tracker 函数返回,这意味着该进程将在父脚本的生命周期内存活,并且仅在父脚本退出时被终止。
同样,这对于我们今天的目的来说很好,但是如果您打算在生产环境中使用此代码,您应该:
更新 start_tracker 函数以在 dlib 报告对象丢失后返回。
同时删除对应进程的 inputQueue 和 outputQueue。
未能执行此清理将导致长时间运行作业的不必要的计算消耗和内存开销。
第三个改进是通过每 N 帧运行一次对象检测器(而不是在开始时只运行一次)来提高跟踪精度。
实际上,我在使用 OpenCV 计数的文章中演示了这一点。它需要更多的逻辑和思考,但会产生更准确的跟踪器。 我选择放弃这个脚本的实现,这样我就可以简明地教你多处理方法。 理想情况下,除了多处理之外,您还可以使用第三个改进。
</div> <div class="zixun-tj-product adv-bottom"></div> </div> </div> <div class="prve-next-news">Python OpenCV如何使用dlib进行多目标跟踪的详细内容,希望对您有所帮助,信息来源于网络。