SkyWalking实现告警功能
导读:本文共5473字符,通常情况下阅读需要18分钟。同时您也可以点击右侧朗读,来听本文内容。按键盘←(左) →(右) 方向键可以翻页。
摘要: 这篇文章将为大家详细讲解有关SkyWalking实现告警功能,小编觉得挺实用的,因此分享给大家做个参考,希望大家阅读完这篇文章后可以有所收获。SkyWalking 告警功能SkyWalking 告警功能是在6.x版本新增的,其核心由一组规则驱动,这些规则定义在config/alarm-settings.yml文件中。 告警规则的定义分为两部分:告警规则SkyWa... ...
目录
(为您整理了一些要点),点击可以直达。这篇文章将为大家详细讲解有关SkyWalking实现告警功能,小编觉得挺实用的,因此分享给大家做个参考,希望大家阅读完这篇文章后可以有所收获。
SkyWalking 告警功能
SkyWalking 告警功能是在6.x版本新增的,其核心由一组规则驱动,这些规则定义在config/alarm-settings.yml文件中。 告警规则的定义分为两部分:
告警规则
SkyWalking 的发行版都会默认提供config/alarm-settings.yml文件,里面预先定义了一些常用的告警规则。如下:
这些预定义的告警规则,打开config/alarm-settings.yml文件即可看到。其具体内容如下:
rules: # Rule unique name, must be ended with `_rule`. service_resp_time_rule: metrics-name: service_resp_time op: ">" threshold: 1000 period: 10 count: 3 silence-period: 5 message: Response time of service {name} is more than 1000ms in 3 minutes of last 10 minutes. service_sla_rule: # Metrics value need to be long, double or int metrics-name: service_sla op: "<" threshold: 8000 # The length of time to evaluate the metrics period: 10 # How many times after the metrics match the condition, will trigger alarm count: 2 # How many times of checks, the alarm keeps silence after alarm triggered, default as same as period. silence-period: 3 message: Successful rate of service {name} is lower than 80% in 2 minutes of last 10 minutes service_p90_sla_rule: # Metrics value need to be long, double or int metrics-name: service_p90 op: ">" threshold: 1000 period: 10 count: 3 silence-period: 5 message: 90% response time of service {name} is more than 1000ms in 3 minutes of last 10 minutes service_instance_resp_time_rule: metrics-name: service_instance_resp_time op: ">" threshold: 1000 period: 10 count: 2 silence-period: 5 message: Response time of service instance {name} is more than 1000ms in 2 minutes of last 10 minutes除此之外,官方还提供了一个config/alarm-settings-sample.yml文件,该文件是一个告警规则的示例文件,里面展示了目前支持的所有告警规则配置项:
# Sample alarm rules.rules: # Rule unique name, must be ended with `_rule`. endpoint_percent_rule: # Metrics value need to be long, double or int metrics-name: endpoint_percent threshold: 75 op: < # The length of time to evaluate the metrics period: 10 # How many times after the metrics match the condition, will trigger alarm count: 3 # How many times of checks, the alarm keeps silence after alarm triggered, default as same as period. silence-period: 10 message: Successful rate of endpoint {name} is lower than 75% service_percent_rule: metrics-name: service_percent # [Optional] Default, match all services in this metrics include-names: - service_a - service_b exclude-names: - service_c threshold: 85 op: < period: 10 count: 4告警规则配置项的说明:
Webhook(网络钩子)
Webhook可以简单理解为是一种Web层面的回调机制,通常由一些事件触发,与代码中的事件回调类似,只不过是Web层面的。由于是Web层面的,所以当事件发生时,回调的不再是代码中的方法或函数,而是服务接口。例如,在告警这个场景,告警就是一个事件。当该事件发生时,SkyWalking就会主动去调用一个配置好的接口,该接口就是所谓的Webhook。
SkyWalking的告警消息会通过 HTTP 请求进行发送,请求方法为 POST,Content-Type 为 application/json,其JSON 数据实基于List<org.apache.skywalking.oap.server.core.alarm.AlarmMessage进行序列化的。JSON数据示例:
[{ "scopeId": 1, "scope": "SERVICE", "name": "serviceA", "id0": 12, "id1": 0, "ruleName": "service_resp_time_rule", "alarmMessage": "alarmMessage xxxx", "startTime": 1560524171000}, { "scopeId": 1, "scope": "SERVICE", "name": "serviceB", "id0": 23, "id1": 0, "ruleName": "service_resp_time_rule", "alarmMessage": "alarmMessage yyy", "startTime": 1560524171000}]字段说明:
邮件告警功能实践
根据以上两个小节的介绍,可以得知:SkyWalking是不支持直接向邮箱、短信等服务发送告警信息的,SkyWalking只会在发生告警时将告警信息发送至配置好的Webhook接口。
但我们总不能人工盯着该接口的日志信息来得知服务是否发生了告警,因此我们需要在该接口里实现发送邮件或短信等功能,从而达到个性化的告警通知。
接下来开始动手实践,这里基于Spring Boot进行实现。首先是添加依赖:
<dependency> <groupId>org.springframework.boot</groupId> <artifactId>spring-boot-starter-mail</artifactId></dependency>配置邮箱服务:
server: port: 9134#邮箱配置spring: mail: host: smtp.163.com #发送者邮箱账号 username: 你的邮箱@163.com #发送者密钥 password: 你的邮箱服务密钥 default-encoding: utf-8 port: 465 #端口号465或587 protocol: smtp properties: mail: debug: false smtp: socketFactory: class: javax.net.ssl.SSLSocketFactory根据SkyWalking发送的JSON数据定义一个DTO,用于接口接收数据:
@Datapublic class SwAlarmDTO { private Integer scopeId; private String scope; private String name; private Integer id0; private Integer id1; private String ruleName; private String alarmMessage; private Long startTime;}接着定义一个接口,实现接收SkyWalking的告警通知,并将数据发送至邮箱:
package com.example.alarmdemo.controller;import com.example.alarmdemo.dto.SwAlarmDTO;import lombok.RequiredArgsConstructor;import lombok.extern.slf4j.Slf4j;import org.springframework.beans.factory.annotation.Value;import org.springframework.mail.SimpleMailMessage;import org.springframework.mail.javamail.JavaMailSender;import org.springframework.web.bind.annotation.PostMapping;import org.springframework.web.bind.annotation.RequestBody;import org.springframework.web.bind.annotation.RequestMapping;import org.springframework.web.bind.annotation.RestController;import java.util.List;@Slf4j@RestController@RequiredArgsConstructor@RequestMapping("/alarm")public class SwAlarmController { private final JavaMailSender sender; @Value("${spring.mail.username}") private String from; /** * 接收skywalking服务的告警通知并发送至邮箱 */ @PostMapping("/receive") public void receive(@RequestBody List<SwAlarmDTO> alarmList) { SimpleMailMessage message = new SimpleMailMessage(); // 发送者邮箱 message.setFrom(from); // 接收者邮箱 message.setTo(from); // 主题 message.setSubject("告警邮件"); String content = getContent(alarmList); // 邮件内容 message.setText(content); sender.send(message); log.info("告警邮件已发送..."); } private String getContent(List<SwAlarmDTO> alarmList) { StringBuilder sb = new StringBuilder(); for (SwAlarmDTO dto : alarmList) { sb.append("scopeId: ").append(dto.getScopeId()) .append("\nscope: ").append(dto.getScope()) .append("\n目标 Scope 的实体名称: ").append(dto.getName()) .append("\nScope 实体的 ID: ").append(dto.getId0()) .append("\nid1: ").append(dto.getId1()) .append("\n告警规则名称: ").append(dto.getRuleName()) .append("\n告警消息内容: ").append(dto.getAlarmMessage()) .append("\n告警时间: ").append(dto.getStartTime()) .append("\n\n---------------\n\n"); } return sb.toString(); }}最后将该接口配置到SkyWalking中,Webhook的配置位于config/alarm-settings.yml文件的末尾,格式为http://{ip}:{port}/{uri}。如下示例:
[root@localhost skywalking]# vim config/alarm-settings.ymlwebhooks: - http://127.0.0.1:9134/alarm/receive测试告警功能
完成告警接口的开发及配置后,我们来进行一个简单的测试。这里有一条调用链路如下: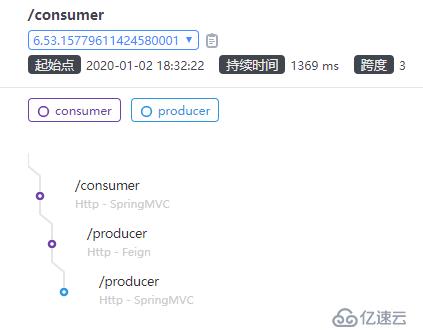
我在/producer接口中增加了一行会导致异常的代码,故意使该接口不可用:
@GetMappingpublic String producer() { log.info("received a request"); int i = 1 / 0; return "this message from producer";}接下来编写一段测试代码,让其服务成功率满足在过去2分钟内低于80%这条默认的告警规则:
public static void main(String[] args) { RestTemplate restTemplate = new RestTemplate(); for (int i = 0; i < 100; i++) { String result = restTemplate.getForObject("http://127.0.0.1:8936/consumer", String.class); log.info(result); }}执行完测试代码,等待约两分钟后,告警接口的控制台输出了一段日志信息:
此时,邮箱正常收到了告警邮件: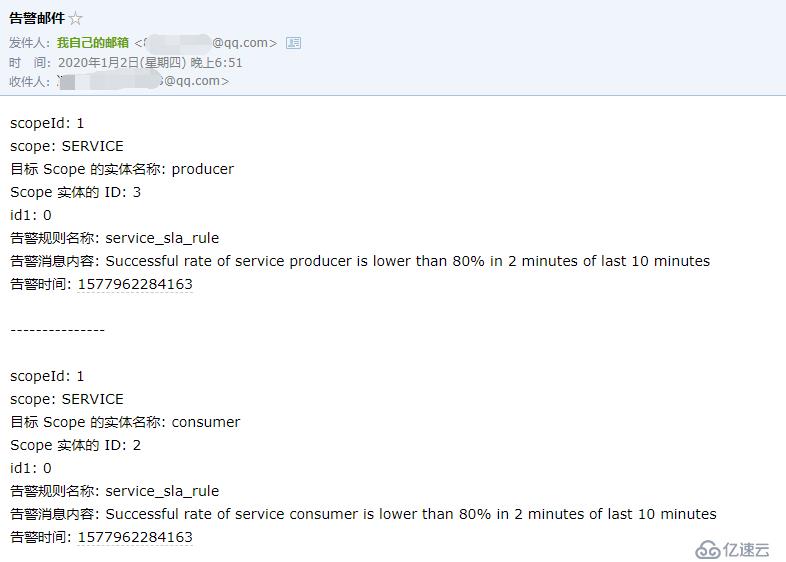
以上便是SkyWalking实现告警功能的介绍,虽然从篇幅上看很复杂,但是示例代码非常详细且容易理解,如果想了解更多相关内容,请关注行业资讯。
</div> <div class="zixun-tj-product adv-bottom"></div> </div> </div> <div class="prve-next-news">SkyWalking实现告警功能的详细内容,希望对您有所帮助,信息来源于网络。