Springboot中如何整合Activemq
导读:本文共2082.5字符,通常情况下阅读需要7分钟。同时您也可以点击右侧朗读,来听本文内容。按键盘←(左) →(右) 方向键可以翻页。
摘要: 1 导入整合所需要的依赖:<dependency><groupId>org.springframework.boot</groupId><artifactId>spring-boot-starter-activemq</artifactId></dependency>2 创建appli... ...
音频解说
目录
(为您整理了一些要点),点击可以直达。1 导入整合所需要的依赖:
<dependency><groupId>org.springframework.boot</groupId><artifactId>spring-boot-starter-activemq</artifactId></dependency>
2 创建application.properties文件
spring.activemq.broker-url=tcp://127.0.0.1:61616spring.activemq.user=adminspring.activemq.password=adminserver.port=8080queue=myqueue
3.自定义配置文件QueueConfig 读取配置文件的队列名,根据队列名字创建一个Queue
packagecom.example.demo;importjavax.jms.Queue;importorg.apache.activemq.ActiveMQConnectionFactory;importorg.apache.activemq.command.ActiveMQQueue;importorg.springframework.beans.factory.annotation.Value;importorg.springframework.context.annotation.Bean;importorg.springframework.context.annotation.Configuration;importorg.springframework.jms.config.DefaultJmsListenerContainerFactory;importorg.springframework.jms.core.JmsTemplate;@ConfigurationpublicclassQueueConfig{@Value("${queue}")privateStringqueue;@BeanpublicQueuelogQueue(){returnnewActiveMQQueue(queue);}}4.创建生产者,可以直接使用提供的模板JmsMessagingTemplate 进行消息的发送:
packagecom.example.demo.producter;importjavax.jms.Queue;importorg.slf4j.Logger;importorg.slf4j.LoggerFactory;importorg.springframework.beans.factory.annotation.Autowired;importorg.springframework.jms.core.JmsMessagingTemplate;importorg.springframework.stereotype.Component;importcom.example.demo.SpringbootActivemqApplication;@ComponentpublicclassProducter{@AutowiredprivateJmsMessagingTemplatejmsMessagingTemplate;@AutowiredprivateQueuequeue;privatestaticLoggerlogger=LoggerFactory.getLogger(Producter.class);publicvoidsend(){Stringstr="生产者生产数据:"+System.currentTimeMillis();jmsMessagingTemplate.convertAndSend(queue,str);logger.info("生产者数据:{}",str);}}5.启动类:
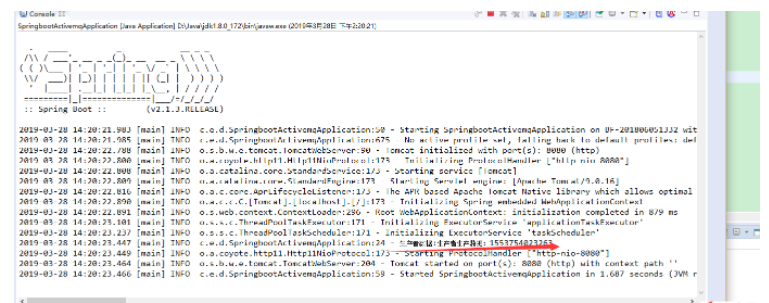
packagecom.example.demo;importorg.springframework.beans.factory.annotation.Autowired;importorg.springframework.boot.SpringApplication;importorg.springframework.boot.autoconfigure.SpringBootApplication;importorg.springframework.context.ApplicationListener;importorg.springframework.context.event.ContextRefreshedEvent;importorg.springframework.scheduling.annotation.EnableScheduling;importcom.example.demo.producter.Producter;importcom.example.demo.producter.consumer.Consumer;@SpringBootApplication@EnableSchedulingpublicclassSpringbootActivemqApplicationimplementsApplicationListener<ContextRefreshedEvent>{@AutowiredpublicProducterproducter;@AutowiredpublicConsumerconsumer;publicstaticvoidmain(String[]args){SpringApplication.run(SpringbootActivemqApplication.class,args);//onApplicationEvent方法在启动springboot的时候会运行该方法,可根据项目实际情况选择合适调用消息发送方法}@OverridepublicvoidonApplicationEvent(ContextRefreshedEventevent){producter.send();}}6.启动项目,控制台输出内容:

7.创建消费者,创建消费者比较容易,只需要监听队列就可以:
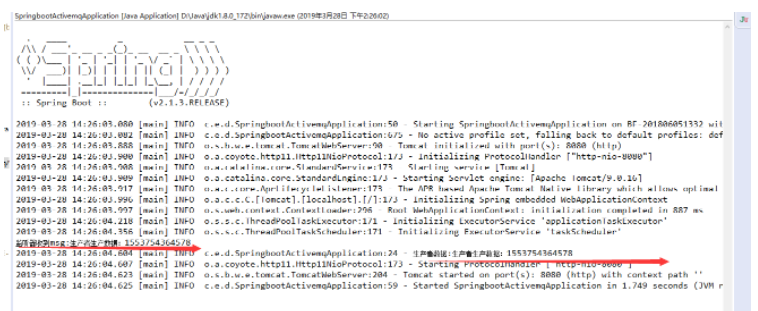
packagecom.example.demo.producter.consumer;importorg.springframework.jms.annotation.JmsListener;importorg.springframework.stereotype.Component;@ComponentpublicclassConsumer{@JmsListener(destination="${queue}")publicvoidreceive(Stringmsg){System.out.println("监听器收到msg:"+msg);}}8.最后结果:
</div> <div class="zixun-tj-product adv-bottom"></div> </div> </div> <div class="prve-next-news">本文:
Springboot中如何整合Activemq的详细内容,希望对您有所帮助,信息来源于网络。