CentOS6.5中怎么利用yum搭建LNMP环境
导读:本文共1580字符,通常情况下阅读需要5分钟。同时您也可以点击右侧朗读,来听本文内容。按键盘←(左) →(右) 方向键可以翻页。
摘要: 一、安装php71.更新yum源(默认yum源中php版本为5.3.3)#rpm-uvhhttp://mirror.webtatic.com/yum/el6/latest.rpm2.安装php7及常用的拓展模块#yum-yinstallphp70wphp70w-mysqlphp70w-mbstringphp70w-mcryptphp70w-gdphp70w-im... ...
音频解说
目录
(为您整理了一些要点),点击可以直达。一、安装php7
1.更新yum源(默认yum源中php版本为5.3.3)
#rpm-uvhhttp://mirror.webtatic.com/yum/el6/latest.rpm
2.安装php7及常用的拓展模块
#yum-yinstallphp70wphp70w-mysqlphp70w-mbstringphp70w-mcryptphp70w-gdphp70w-imapphp70w-ldapphp70w-odbcphp70w-pearphp70w-xmlphp70w-xmlrpcphp70w-pdophp70w-fpmphp70w-devel
注:安装其他拓展模块可使用命令yum -y install php70w-xxx
3.测试是否安装成功
#php-v
4.配置php.ini文件,在末尾添加cgi.fix_pathinfo = 1
#vim/etc/php.ini
二、安装mysql5.5
1.卸载mysql-libs的5.1版本
#rpm-qa|grepmysql#rpm-emysql-libs--nodeps
2.增加新源
#rpm-uvhhttp://mirror.steadfast.net/epel/6/i386/epel-release-6-8.noarch.rpm#rpm-uvhhttp://rpms.famillecollet.com/enterprise/remi-release-6.rpm
3.安装
#yum-y--enablerepo=remi,remi-testinstallmysqlmysql-server
4.启动
#servicemysqldstart
5.设置开机启动
#chkconfig--levels345mysqldon
6.修改默认密码
#mysqlmysql>selectuser,host,passwordfrommysql.user;mysql>dropuser''@localhost;mysql>updatemysql.usersetpassword=password('新的密码')whereuser='root';mysql>flushprivileges;mysql>exit三、安装nginx
1.安装
#yuminstallnginx
2.配置conf文件
#vim/etc/nginx/conf.d/default.conf
将下面一行干掉
listen[::]:80default_server;
并添加fastcgi支持
indexindex.phpindex.htmlindex.htm;location~\.php${root/usr/share/nginx/html;fastcgi_pass127.0.0.1:9000;fastcgi_indexindex.php;fastcgi_paramscript_filename/usr/share/nginx/html$fastcgi_script_name;includefastcgi_params;}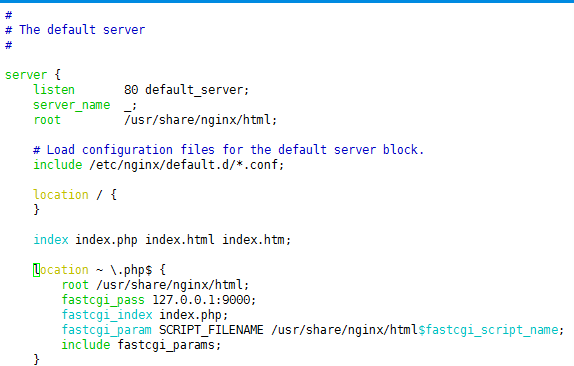
3.设置开机启动
#chkconfig--levels345nginxon
4.启动nginx和php-fpm
#servicenginxstart#servicephp-fpmstart
四、测试
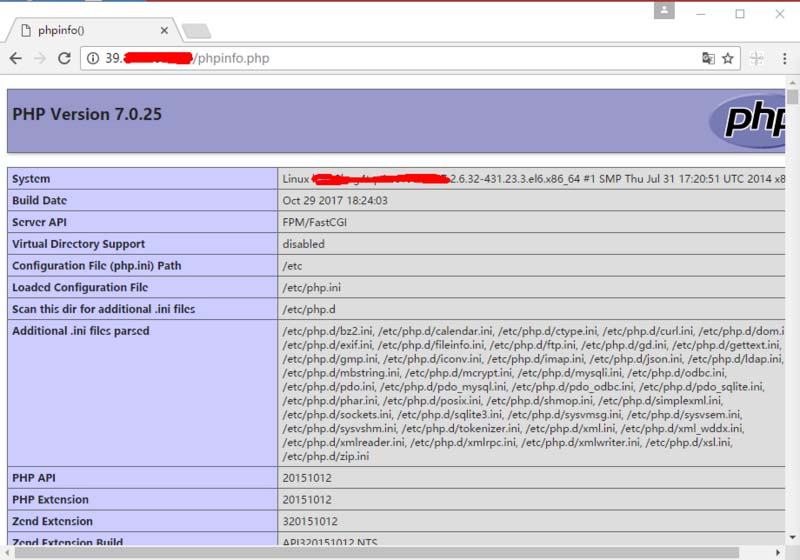
#vim/usr/share/nginx/html/phpinfo.php<?phpphpinfo();
浏览器输入:你的服务器ip/phpinfo.php ,返回php信息页面的话,收工!
</div> <div class="zixun-tj-product adv-bottom"></div> </div> </div> <div class="prve-next-news">本文:
CentOS6.5中怎么利用yum搭建LNMP环境的详细内容,希望对您有所帮助,信息来源于网络。