CentOS7下怎么部署php7.1和开启MySQL扩展
导读:本文共4673字符,通常情况下阅读需要16分钟。同时您也可以点击右侧朗读,来听本文内容。按键盘←(左) →(右) 方向键可以翻页。
摘要: 简单安装(yum方式)安装软件源添加epel源[root@opstrip.comopt]#rpm--import/etc/pki/rpm-gpg/rpm-gpg-key*[root@opstrip.comopt]#rpm-uvhhttp://mirrors.rit.edu/fedora/epel//7/x86_64/e/epel-release-7-9.noa... ...
目录
(为您整理了一些要点),点击可以直达。简单安装(yum方式)
安装软件源
添加epel源
[root@opstrip.comopt]#rpm--import/etc/pki/rpm-gpg/rpm-gpg-key*[root@opstrip.comopt]#rpm-uvhhttp://mirrors.rit.edu/fedora/epel//7/x86_64/e/epel-release-7-9.noarch.rpm
添加remi源
[root@opstrip.comopt]#rpm-uvhhttp://rpms.remirepo.net/enterprise/remi-release-7.rpm
安装并更新软件
安装yum-config-manager实用程序
[root@opstrip.comopt]#yum-yinstallyum-utils
更新系统当前软件版本
[root@opstrip.comopt]#yum-yupdate
更新完成后,就可以安装所需要的php版本了。
安装php
以上准备工作完成后,就可以安装所需的php版本了。
对于php5.4
[root@opstrip.comopt]#yum-yinstallphp
安装前可尝试yum search php54搜索可安装的软件包。
对于php7.0
[root@opstrip.comopt]#yum-config-manager--enableremi-php70[root@opstrip.comopt]#yum-yinstallphpphp-opcache
安装前可尝试yum search php70搜索可安装的软件包。
对于php7.1
[root@opstrip.comopt]#yum-config-manager--enableremi-php71[root@opstrip.comopt]#yum-yinstallphpphp-opcache
安装前可尝试yum search php71搜索可安装的软件包。
完成后还需要添加php常用扩展:
[root@opstrip.comopt]#yum-yinstallphp-mysqlphp-gdphp-ldapphp-odbcphp-pearphp-xmlphp-xmlrpcphp-mbstringphp-soapcurlcurl-devel
对于nginx
[root@opstrip.comopt]#yum-yinstallnginxnginx-mod-http-perlnginx-mod-streamnginx-filesystemnginx-mod-mailnginx-mod-http-image-filternginx-all-modulesnginx-mod-http-geoipnginx-mod-http-xslt-filter
安装前仍建议尝试yum search nginx搜索可安装的软件包。
安装完成后配置php及nginx并启动用以测试phpinfo页面,这时候应该能正常显示。
源码编译安装
安装前的准备
下载php安装包
[root@opstrip.comopt]#wget-ophp-7.1.5.tar.gzhttp://cn2.php.net/distributions/php-7.1.5.tar.gz
解压
[root@opstrip.comopt]#tarxfphp-7.1.5.tar.gz
安装依赖包
[root@opstrip.comphp-7.1.5]#yuminstall-ylibxml2libxml2-developensslopenssl-develbzip2bzip2-devellibcurllibcurl-devellibjpeglibjpeg-devellibpnglibpng-develfreetypefreetype-develgmpgmp-devellibmcryptlibmcrypt-develreadlinereadline-devellibxsltlibxslt-devel
配置安装
编译配置
[root@opstrip.comopt]#cdphp-7.1.5[root@opstrip.comphp-7.1.5]#./configure\--prefix=/usr/local/php\--with-config-file-path=/etc\--enable-fpm\--with-fpm-user=nginx\--with-fpm-group=nginx\--enable-inline-optimization\--disable-debug\--disable-rpath\--enable-shared\--enable-soap\--with-libxml-dir\--with-xmlrpc\--with-openssl\--with-mcrypt\--with-mhash\--with-pcre-regex\--with-sqlite3\--with-zlib\--enable-bcmath\--with-iconv\--with-bz2\--enable-calendar\--with-curl\--with-cdb\--enable-dom\--enable-exif\--enable-fileinfo\--enable-filter\--with-pcre-dir\--enable-ftp\--with-gd\--with-openssl-dir\--with-jpeg-dir\--with-png-dir\--with-zlib-dir\--with-freetype-dir\--enable-gd-native-ttf\--enable-gd-jis-conv\--with-gettext\--with-gmp\--with-mhash\--enable-json\--enable-mbstring\--enable-mbregex\--enable-mbregex-backtrack\--with-libmbfl\--with-onig\--enable-pdo\--with-mysqli=mysqlnd\--with-pdo-mysql=mysqlnd\--with-zlib-dir\--with-pdo-sqlite\--with-readline\--enable-session\--enable-shmop\--enable-simplexml\--enable-sockets\--enable-sysvmsg\--enable-sysvsem\--enable-sysvshm\--enable-wddx\--with-libxml-dir\--with-xsl\--enable-zip\--enable-mysqlnd-compression-support\--with-pear\--enable-opcache
具体可以参考php官方安装说明文档:
编译安装
[root@opstrip.comphp-7.1.5]#make&&makeinstall
配置环境变量:
在/etc/profile末尾追加export path=$path:/usr/local/php/bin,然后执行source /etc/profile生效后查看php版本:
[root@opstrip.comphp-7.1.5]#php-vphp7.1.5(cli)(built:may31201716:12:38)(nts)copyright(c)1997-2017thephpgroupzendenginev3.1.0,copyright(c)1998-2017zendtechnologies
安装后的配置
配置php-fpm
安装完成后可以通过sapi/fpm/php-fpm.server来启动php-fpm了。不过为了以后管理方便,通常需要将配置文件统一放到/etc目录下,并将php-fpm.server添加至systemctl服务。如下:
[root@opstrip.comphp-7.1.5]#mkdir-p/etc/php-fpm.d[root@opstrip.comphp-7.1.5]#cpphp.ini-production/etc/php.ini[root@opstrip.comphp-7.1.5]#cpsapi/fpm/php-fpm.service/usr/lib/systemd/system/[root@opstrip.comphp-7.1.5]#cpsapi/fpm/www.conf/etc/php-fpm.d/
然后更改/usr/lib/systemd/system/php-fpm.service文件使其执行正确的路径,如下:
[root@opstrip.comphp-7.1.5]#vi/usr/lib/systemd/system/php-fpm.service#it'snotrecommendedtomodifythisfilein-place,becauseit#willbeoverwrittenduringupgrades.ifyouwanttocustomize,#thebestwayistousethe"systemctledit"command.[unit]description=thephpfastcgiprocessmanagerafter=network.target[service]type=simplepidfile=/var/run/php-fpm.pidexecstart=/usr/local/php/sbin/php-fpm--nodaemonize--fpm-config/etc/php-fpm.confexecreload=/bin/kill-usr2$mainpidprivatetmp=true[install]wantedby=multi-user.target
启动php-fpm
第一次通过systemctl启动php服务时需要先将php-fpm服务enable:
[root@opstrip.comphp-7.1.5]#systemctlenablephp-fpm.service[root@opstrip.comphp-7.1.5]#systemctlstartphp-fpm.service
编译安装nginx
详见,并根据需要配置并启动nginx。这里就不在写了。
开启mysql扩展(仅编译安装)
由于php7已经完全移除了mysql的扩展支持(由mysqli与mysqlnd取代),因此一些老的软件在升级php版本后会报类似mysql_connect()函数未定义的错误,一般建议使用新的phpmysqli或者pdo扩展进行替换。当然也可以检出遗留版本的支持mysql扩展的php7代码自行编译安装了,不过需要注意的就是mysql扩展可是完全没有后续更新的了。
安装前准备
查看当前扩展
查看当前php7.1自带扩展:
[root@opstrip.comphp-7.1.5]#lsextbcmathdomgdjsonoci8pdo_firebirdposixskeletonsysvsemxmlwriterbz2enchantgettextldapodbcpdo_mysqlpspellsnmpsysvshmxslcalendarexifgmplibxmlopcachepdo_ocireadlinesoaptidyzipcom_dotnetext_skelhashmbstringopensslpdo_odbcrecodesocketstokenizerzlibctypeext_skel_win32.phpiconvmcryptpcntlpdo_pgsqlreflectionsplwddxcurlfileinfoimapmysqlpcrepdo_sqlitesessionsqlite3xmldatefilterinterbasemysqlipdopgsqlshmopstandardxmlreaderdbaftpintlmysqlndpdo_dblibpharsimplexmlsysvmsgxmlrpc
可以看到mysql扩展确实已经被移除了,我们可以直接在ext目录下检出老的php mysql扩展代码。
获取php mysql扩展源码
[root@opstrip.comext]#gitclonehttps://github.com/php/pecl-database-mysqlmysql--recursivecloninginto'mysql'...remote:countingobjects:145,done.remote:total145(delta0),reused0(delta0),pack-reused145receivingobjects:100%(145/145),88.41kib|0bytes/s,done.resolvingdeltas:100%(65/65),done.checkingconnectivity...done.
编译安装mysql扩展
使用phpize编译
[root@opstrip.comext]#cdmysql[root@opstrip.commysql]#lsconfig.m4config.w32creditslicensemysql.makmysql_mysqlnd.hpackage.xmlphp_mysql.cphp_mysql.hphp_mysql_structs.hreadme.mdtests[root@opstrip.commysql]#/usr/local/php/bin/phpizeconfiguringfor:phpapiversion:20151012zendmoduleapino:20151012zendextensionapino:320151012[root@opstrip.commysql]#./configure--with-php-config=/usr/local/php/bin/php-config
安装
[root@opstrip.commysql]#make&&makeinstall[root@opstrip.commysql]#ls/usr/local/php/lib/php/extensions/no-debug-non-zts-20160303/mysql.soopcache.aopcache.so
安装完成后需确认mysql扩展安装是否正确。
最后修改php.ini配置文件,增加一行:
extension="mysql.so"
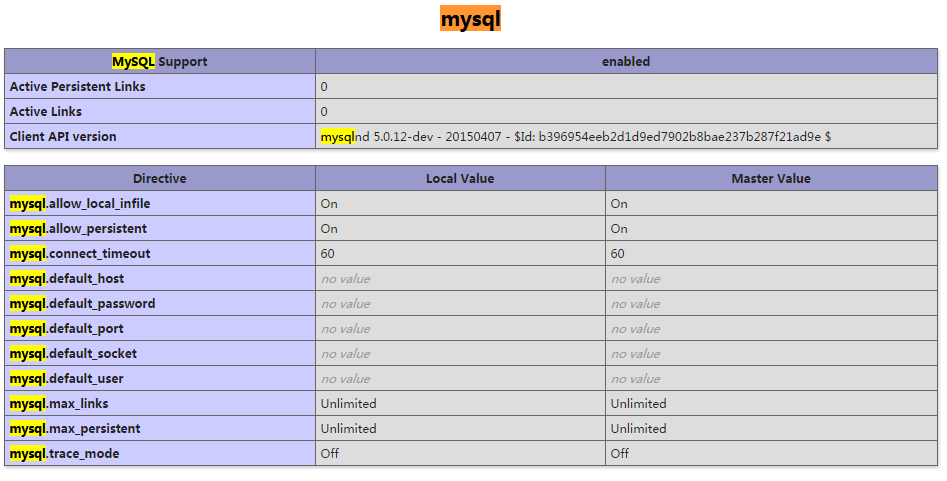
重新启动php-fpm服务就能在phpinfo里看到mysql扩展了:
</div> <div class="zixun-tj-product adv-bottom"></div> </div> </div> <div class="prve-next-news">CentOS7下怎么部署php7.1和开启MySQL扩展的详细内容,希望对您有所帮助,信息来源于网络。