Python+Pillow+Pytesseract怎么实现验证码识别
导读:本文共2413字符,通常情况下阅读需要8分钟。同时您也可以点击右侧朗读,来听本文内容。按键盘←(左) →(右) 方向键可以翻页。
摘要: 一、环境配置需要 pillow 和 pytesseract 这两个库,pip install 安装就好了。pipinstallpillow-ihttp://pypi.douban.com/simple--trusted-hostpypi.douban.compipinstallpytesseract-ihttp://pypi.douban.com/simple... ...
音频解说
目录
(为您整理了一些要点),点击可以直达。一、环境配置
需要 pillow 和 pytesseract 这两个库,pip install 安装就好了。
pipinstallpillow-ihttp://pypi.douban.com/simple--trusted-hostpypi.douban.compipinstallpytesseract-ihttp://pypi.douban.com/simple--trusted-hostpypi.douban.com
安装好Tesseract-OCR.exe
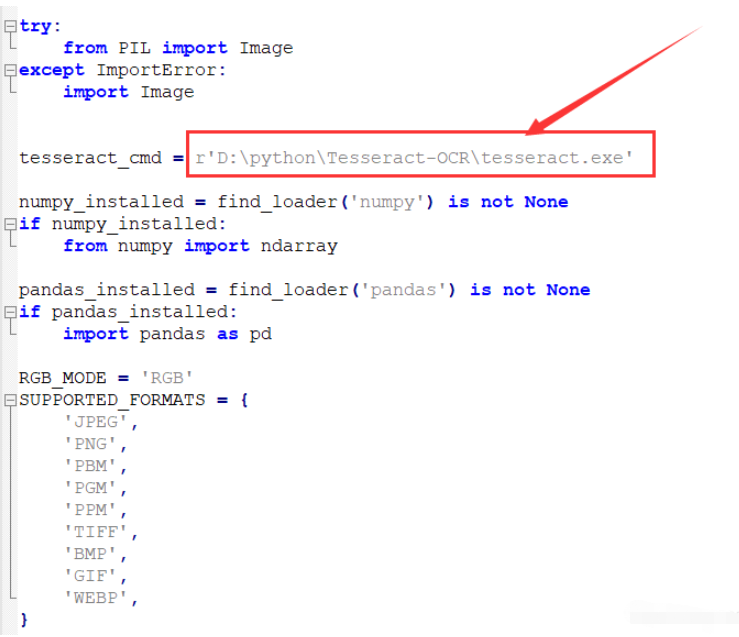
pytesseract 库的配置:搜索找到pytesseract.py,打开该.py文件,找到 tesseract_cmd,改变它的值为刚才安装 tesseract.exe 的路径。
二、验证码识别
识别验证码,需要先对图像进行预处理,去除会影响识别准确度的线条或噪点,提高识别准确度。
实例1
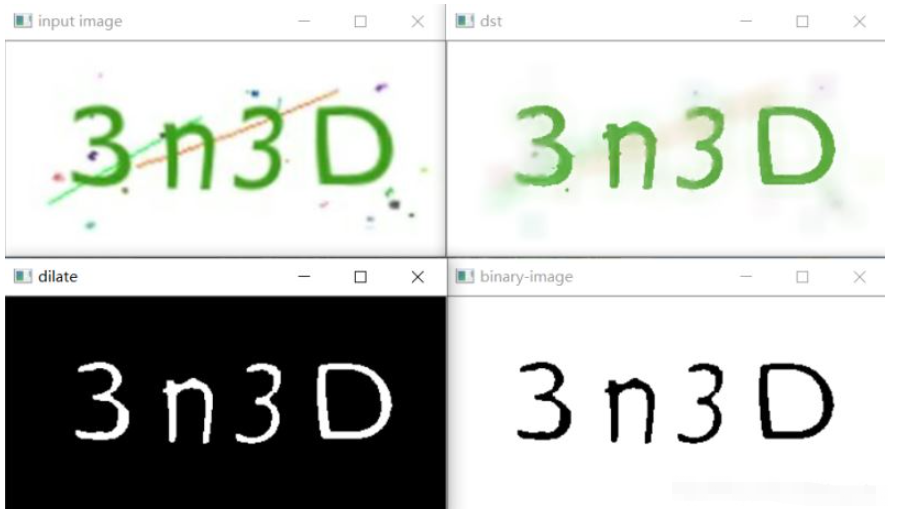
importcv2ascvimportpytesseractfromPILimportImagedefrecognize_text(image):#边缘保留滤波去噪dst=cv.pyrMeanShiftFiltering(image,sp=10,sr=150)#灰度图像gray=cv.cvtColor(dst,cv.COLOR_BGR2GRAY)#二值化ret,binary=cv.threshold(gray,0,255,cv.THRESH_BINARY_INV|cv.THRESH_OTSU)#形态学操作腐蚀膨胀erode=cv.erode(binary,None,iterations=2)dilate=cv.dilate(erode,None,iterations=1)cv.imshow('dilate',dilate)#逻辑运算让背景为白色字体为黑便于识别cv.bitwise_not(dilate,dilate)cv.imshow('binary-image',dilate)#识别test_message=Image.fromarray(dilate)text=pytesseract.image_to_string(test_message)print(f'识别结果:{text}')src=cv.imread(r'./test/044.png')cv.imshow('inputimage',src)recognize_text(src)cv.waitKey(0)cv.destroyAllWindows()运行效果如下:
识别结果:3n3D
Processfinishedwithexitcode0
实例2
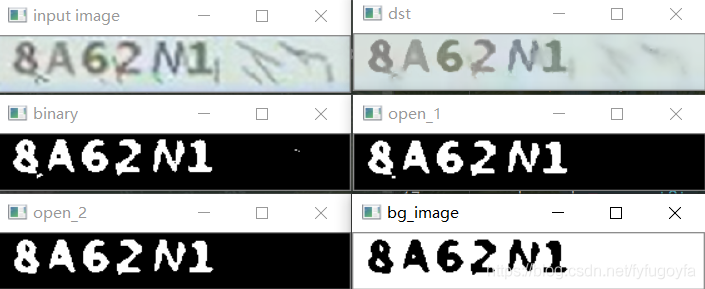
importcv2ascvimportpytesseractfromPILimportImagedefrecognize_text(image):#边缘保留滤波去噪blur=cv.pyrMeanShiftFiltering(image,sp=8,sr=60)cv.imshow('dst',blur)#灰度图像gray=cv.cvtColor(blur,cv.COLOR_BGR2GRAY)#二值化ret,binary=cv.threshold(gray,0,255,cv.THRESH_BINARY_INV|cv.THRESH_OTSU)print(f'二值化自适应阈值:{ret}')cv.imshow('binary',binary)#形态学操作获取结构元素开操作kernel=cv.getStructuringElement(cv.MORPH_RECT,(3,2))bin1=cv.morphologyEx(binary,cv.MORPH_OPEN,kernel)cv.imshow('bin1',bin1)kernel=cv.getStructuringElement(cv.MORPH_OPEN,(2,3))bin2=cv.morphologyEx(bin1,cv.MORPH_OPEN,kernel)cv.imshow('bin2',bin2)#逻辑运算让背景为白色字体为黑便于识别cv.bitwise_not(bin2,bin2)cv.imshow('binary-image',bin2)#识别test_message=Image.fromarray(bin2)text=pytesseract.image_to_string(test_message)print(f'识别结果:{text}')src=cv.imread(r'./test/045.png')cv.imshow('inputimage',src)recognize_text(src)cv.waitKey(0)cv.destroyAllWindows()运行效果如下:
二值化自适应阈值:181.0
识别结果:8A62N1
Processfinishedwithexitcode0
实例3
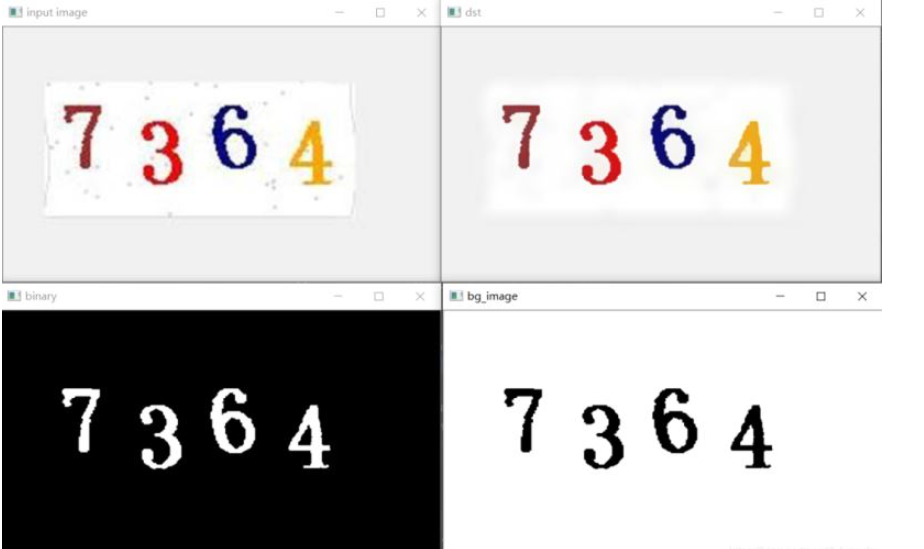
importcv2ascvimportpytesseractfromPILimportImagedefrecognize_text(image):#边缘保留滤波去噪blur=cv.pyrMeanShiftFiltering(image,sp=8,sr=60)cv.imshow('dst',blur)#灰度图像gray=cv.cvtColor(blur,cv.COLOR_BGR2GRAY)#二值化设置阈值自适应阈值的话黄色的4会提取不出来ret,binary=cv.threshold(gray,185,255,cv.THRESH_BINARY_INV)print(f'二值化设置的阈值:{ret}')cv.imshow('binary',binary)#逻辑运算让背景为白色字体为黑便于识别cv.bitwise_not(binary,binary)cv.imshow('bg_image',binary)#识别test_message=Image.fromarray(binary)text=pytesseract.image_to_string(test_message)print(f'识别结果:{text}')src=cv.imread(r'./test/045.jpg')cv.imshow('inputimage',src)recognize_text(src)cv.waitKey(0)cv.destroyAllWindows()运行效果如下:
二值化设置的阈值:185.0
识别结果:7364
Processfinishedwithexitcode0
</div> <div class="zixun-tj-product adv-bottom"></div> </div> </div> <div class="prve-next-news">本文:
Python+Pillow+Pytesseract怎么实现验证码识别的详细内容,希望对您有所帮助,信息来源于网络。