spring IOC容器的Bean管理XML自动装配怎么实现
导读:本文共2399字符,通常情况下阅读需要8分钟。同时您也可以点击右侧朗读,来听本文内容。按键盘←(左) →(右) 方向键可以翻页。
摘要: 什么是自动装配?在之前的内容中,每给属性注入值都要一个个的用 property 标签来完成,比如:<beanid="book"class="com.pingguo.spring5.collectiontype.Book"scope="prototype"><propertyname=... ...
音频解说
目录
(为您整理了一些要点),点击可以直达。什么是自动装配?
在之前的内容中,每给属性注入值都要一个个的用 property 标签来完成,比如:
<beanid="book"class="com.pingguo.spring5.collectiontype.Book"scope="prototype"><propertyname="list"ref="bookList"></property></bean>
这就是手动装配。
而自动装配中,spring 会根据指定装配规则(属性名称或者属性类型) 来自动的将匹配的属性值进行注入。
自动装配过程
1. 创建 2 个类
分别是部门类 Department 和员工类 Employee 。
packagecom.pingguo.spring5.autowire;publicclassDepartment{@OverridepublicStringtoString(){return"Department{}";}}员工类有个 部门的属性,表示员工所属的一个部门。其他方法是为了后续方便演示输出。
packagecom.pingguo.spring5.autowire;publicclassEmployee{privateDepartmentdepartment;publicvoidsetDepartment(Departmentdepartment){this.department=department;}@OverridepublicStringtoString(){return"Employee{"+"department="+department+'}';}publicvoidtest(){System.out.println(department);}}2. 配置文件
<?xmlversion="1.0"encoding="UTF-8"?><beansxmlns="http://www.springframework.org/schema/beans"xmlns:xsi="http://www.w3.org/2001/XMLSchema-instance"xsi:schemaLocation="http://www.springframework.org/schema/beanshttp://www.springframework.org/schema/beans/spring-beans.xsd"><beanid="employee"class="com.pingguo.spring5.autowire.Employee"><propertyname="department"ref="department"></property></bean><beanid="department"class="com.pingguo.spring5.autowire.Department"></bean></beans>
3. 测试方法
@Testpublicvoidtest5(){ApplicationContextcontext=newClassPathXmlApplicationContext("bean5.xml");Employeeemployee=context.getBean("employee",Employee.class);System.out.println(employee);}运行结果:
Employee{department=Department{}}Processfinishedwithexitcode0ok,到这里,其实就是手动装配的过程。
实现自动装配,在配置文件里,通过 bean 标签里的属性 autowire 来配置:
autowire="byName":根据属性名称自动注入。
autowire="byType":根据属性类型自动注入。
1)byName 演示
注入值的bean的 id 值和类属性名称一致,比如:
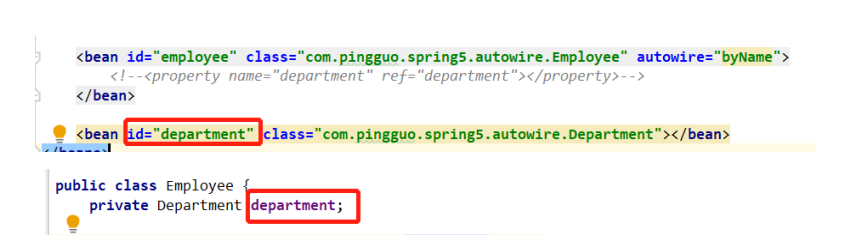
修改配置文件,加上 autowire="byName",然后注释掉 property。
<beanid="employee"class="com.pingguo.spring5.autowire.Employee"autowire="byName"><!--<propertyname="department"ref="department"></property>--></bean><beanid="department"class="com.pingguo.spring5.autowire.Department"></bean>
执行测试函数:
Employee{department=Department{}}Processfinishedwithexitcode0跟使用 property 手动装配结果一致。
2)byType 演示
要注入值的 bean 的类型与 属性里的一致,比如:

现在继续修改配置文件,加上 autowire="byType",然后注释掉 property。
<beanid="employee"class="com.pingguo.spring5.autowire.Employee"autowire="byType"><!--<propertyname="department"ref="department"></property>--></bean><beanid="department"class="com.pingguo.spring5.autowire.Department"></bean>
再次执行测试:
Employee{department=Department{}}Processfinishedwithexitcode0跟使用 property 手动装配结果一致。
</div> <div class="zixun-tj-product adv-bottom"></div> </div> </div> <div class="prve-next-news">本文:
spring IOC容器的Bean管理XML自动装配怎么实现的详细内容,希望对您有所帮助,信息来源于网络。