Python如何实现自动驾驶训练模型
导读:本文共5025.5字符,通常情况下阅读需要17分钟。同时您也可以点击右侧朗读,来听本文内容。按键盘←(左) →(右) 方向键可以翻页。
摘要: 一、安装环境gym是用于开发和比较强化学习算法的工具包,在python中安装gym库和其中子场景都较为简便。安装gym:pipinstallgym安装自动驾驶模块,这里使用Edouard Leurent发布在github上的包highway-env:pipinstall--usergit+https://github.com/eleurent/highway-e... ...
目录
(为您整理了一些要点),点击可以直达。一、安装环境
gym是用于开发和比较强化学习算法的工具包,在python中安装gym库和其中子场景都较为简便。
安装gym:
pipinstallgym
安装自动驾驶模块,这里使用Edouard Leurent发布在github上的包highway-env:
pipinstall--usergit+https://github.com/eleurent/highway-env
其中包含6个场景:
高速公路——“highway-v0”
汇入——“merge-v0”
环岛——“roundabout-v0”
泊车——“parking-v0”
十字路口——“intersection-v0”
赛车道——“racetrack-v0”
二、配置环境
安装好后即可在代码中进行实验(以高速公路场景为例):
importgymimporthighway_env%matplotlibinlineenv=gym.make('highway-v0')env.reset()for_inrange(3):action=env.action_type.actions_indexes["IDLE"]obs,reward,done,info=env.step(action)env.render()运行后会在模拟器中生成如下场景:
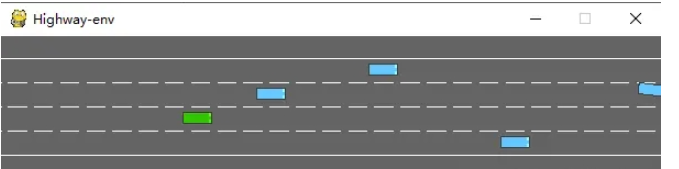
绿色为ego vehicle env类有很多参数可以配置,具体可以参考原文档。
三、训练模型
1、数据处理
(1)state
highway-env包中没有定义传感器,车辆所有的state (observations) 都从底层代码读取,节省了许多前期的工作量。根据文档介绍,state (ovservations) 有三种输出方式:Kinematics,Grayscale Image和Occupancy grid。
Kinematics
输出V*F的矩阵,V代表需要观测的车辆数量(包括ego vehicle本身),F代表需要统计的特征数量。例:

数据生成时会默认归一化,取值范围:[100, 100, 20, 20],也可以设置ego vehicle以外的车辆属性是地图的绝对坐标还是对ego vehicle的相对坐标。
在定义环境时需要对特征的参数进行设定:
config=\{"observation":{"type":"Kinematics",#选取5辆车进行观察(包括egovehicle)"vehicles_count":5,#共7个特征"features":["presence","x","y","vx","vy","cos_h","sin_h"],"features_range":{"x":[-100,100],"y":[-100,100],"vx":[-20,20],"vy":[-20,20]},"absolute":False,"order":"sorted"},"simulation_frequency":8,#[Hz]"policy_frequency":2,#[Hz]}Grayscale Image
生成一张W*H的灰度图像,W代表图像宽度,H代表图像高度
Occupancy grid
生成一个WHF的三维矩阵,用W*H的表格表示ego vehicle周围的车辆情况,每个格子包含F个特征。
(2) action
highway-env包中的action分为连续和离散两种。连续型action可以直接定义throttle和steering angle的值,离散型包含5个meta actions:
ACTIONS_ALL={0:'LANE_LEFT',1:'IDLE',2:'LANE_RIGHT',3:'FASTER',4:'SLOWER'}(3) reward
highway-env包中除了泊车场景外都采用同一个reward function:
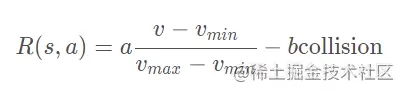
这个function只能在其源码中更改,在外层只能调整权重。(泊车场景的reward function原文档里有,懒得打公式了……)
2、搭建模型
DQN网络的结构和搭建过程已经在我另一篇文章中讨论过,所以这里不再详细解释。我采用第一种state表示方式——Kinematics进行示范。
由于state数据量较小(5辆车*7个特征),可以不考虑使用CNN,直接把二维数据的size[5,7]转成[1,35]即可,模型的输入就是35,输出是离散action数量,共5个。
importtorchimporttorch.nnasnnfromtorch.autogradimportVariableimporttorch.nn.functionalasFimporttorch.optimasoptimimporttorchvision.transformsasTfromtorchimportFloatTensor,LongTensor,ByteTensorfromcollectionsimportnamedtupleimportrandomTensor=FloatTensorEPSILON=0#epsilonusedforepsilongreedyapproachGAMMA=0.9TARGET_NETWORK_REPLACE_FREQ=40#HowfrequentlytargetnetowrkupdatesMEMORY_CAPACITY=100BATCH_SIZE=80LR=0.01#learningrateclassDQNNet(nn.Module):def__init__(self):super(DQNNet,self).__init__()self.linear1=nn.Linear(35,35)self.linear2=nn.Linear(35,5)defforward(self,s):s=torch.FloatTensor(s)s=s.view(s.size(0),1,35)s=self.linear1(s)s=self.linear2(s)returnsclassDQN(object):def__init__(self):self.net,self.target_net=DQNNet(),DQNNet()self.learn_step_counter=0self.memory=[]self.position=0self.capacity=MEMORY_CAPACITYself.optimizer=torch.optim.Adam(self.net.parameters(),lr=LR)self.loss_func=nn.MSELoss()defchoose_action(self,s,e):x=np.expand_dims(s,axis=0)ifnp.random.uniform()<1-e:actions_value=self.net.forward(x)action=torch.max(actions_value,-1)[1].data.numpy()action=action.max()else:action=np.random.randint(0,5)returnactiondefpush_memory(self,s,a,r,s_):iflen(self.memory)<self.capacity:self.memory.append(None)self.memory[self.position]=Transition(torch.unsqueeze(torch.FloatTensor(s),0),torch.unsqueeze(torch.FloatTensor(s_),0),\torch.from_numpy(np.array([a])),torch.from_numpy(np.array([r],dtype='float32')))#self.position=(self.position+1)%self.capacitydefget_sample(self,batch_size):sample=random.sample(self.memory,batch_size)returnsampledeflearn(self):ifself.learn_step_counter%TARGET_NETWORK_REPLACE_FREQ==0:self.target_net.load_state_dict(self.net.state_dict())self.learn_step_counter+=1transitions=self.get_sample(BATCH_SIZE)batch=Transition(*zip(*transitions))b_s=Variable(torch.cat(batch.state))b_s_=Variable(torch.cat(batch.next_state))b_a=Variable(torch.cat(batch.action))b_r=Variable(torch.cat(batch.reward))q_eval=self.net.forward(b_s).squeeze(1).gather(1,b_a.unsqueeze(1).to(torch.int64))q_next=self.target_net.forward(b_s_).detach()#q_target=b_r+GAMMA*q_next.squeeze(1).max(1)[0].view(BATCH_SIZE,1).t()loss=self.loss_func(q_eval,q_target.t())self.optimizer.zero_grad()#resetthegradienttozeroloss.backward()self.optimizer.step()#executebackpropagationforonestepreturnlossTransition=namedtuple('Transition',('state','next_state','action','reward'))3、运行结果
各个部分都完成之后就可以组合在一起训练模型了,流程和用CARLA差不多,就不细说了。
初始化环境(DQN的类加进去就行了):
importgymimporthighway_envfrommatplotlibimportpyplotaspltimportnumpyasnpimporttimeconfig=\{"observation":{"type":"Kinematics","vehicles_count":5,"features":["presence","x","y","vx","vy","cos_h","sin_h"],"features_range":{"x":[-100,100],"y":[-100,100],"vx":[-20,20],"vy":[-20,20]},"absolute":False,"order":"sorted"},"simulation_frequency":8,#[Hz]"policy_frequency":2,#[Hz]}env=gym.make("highway-v0")env.configure(config)训练模型:
dqn=DQN()count=0reward=[]avg_reward=0all_reward=[]time_=[]all_time=[]collision_his=[]all_collision=[]whileTrue:done=Falsestart_time=time.time()s=env.reset()whilenotdone:e=np.exp(-count/300)#随机选择action的概率,随着训练次数增多逐渐降低a=dqn.choose_action(s,e)s_,r,done,info=env.step(a)env.render()dqn.push_memory(s,a,r,s_)if((dqn.position!=0)&(dqn.position%99==0)):loss_=dqn.learn()count+=1print('trainedtimes:',count)if(count%40==0):avg_reward=np.mean(reward)avg_time=np.mean(time_)collision_rate=np.mean(collision_his)all_reward.append(avg_reward)all_time.append(avg_time)all_collision.append(collision_rate)plt.plot(all_reward)plt.show()plt.plot(all_time)plt.show()plt.plot(all_collision)plt.show()reward=[]time_=[]collision_his=[]s=s_reward.append(r)end_time=time.time()episode_time=end_time-start_timetime_.append(episode_time)is_collision=1ifinfo['crashed']==Trueelse0collision_his.append(is_collision)我在代码中添加了一些画图的函数,在运行过程中就可以掌握一些关键的指标,每训练40次统计一次平均值。
平均碰撞发生率:

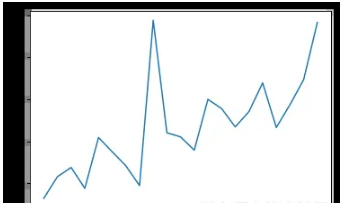
epoch平均时长(s):
平均reward:
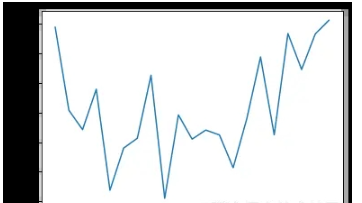
可以看出平均碰撞发生率会随训练次数增多逐渐降低,每个epoch持续的时间会逐渐延长(如果发生碰撞epoch会立刻结束)
</div> <div class="zixun-tj-product adv-bottom"></div> </div> </div> <div class="prve-next-news">Python如何实现自动驾驶训练模型的详细内容,希望对您有所帮助,信息来源于网络。