Python opencv怎么实现高动态范围成像
导读:本文共4051.5字符,通常情况下阅读需要14分钟。同时您也可以点击右侧朗读,来听本文内容。按键盘←(左) →(右) 方向键可以翻页。
摘要: 高动态范围成像一、引言如今,大多数数字图像和成像设备每通道使用 8 位整数表示灰度,因此将设备的动态范围限制在两个数量级(实际上是 256 级),而人眼可以适应变化十个数量级的照明条件。当我们拍摄真实世界场景的照片时,明亮区域可能曝光过度,而黑暗区域可能曝光不足,因此我们无法使用单次曝光捕捉所有细节。 HDR 成像适用于每通道使用超过 8 位(通常为 32 位浮... ...
目录
(为您整理了一些要点),点击可以直达。高动态范围成像
一、引言
如今,大多数数字图像和成像设备每通道使用 8 位整数表示灰度,因此将设备的动态范围限制在两个数量级(实际上是 256 级),而人眼可以适应变化十个数量级的照明条件。当我们拍摄真实世界场景的照片时,明亮区域可能曝光过度,而黑暗区域可能曝光不足,因此我们无法使用单次曝光捕捉所有细节。 HDR 成像适用于每通道使用超过 8 位(通常为 32 位浮点值)的图像,允许更宽的动态范围。获取 HDR 图像的方法有很多种,但最常见的一种是使用以不同曝光值拍摄的场景照片。要结合这些曝光,了解相机的响应函数以及估计它的算法很有用。混合 HDR 图像后,必须将其转换回 8 位才能在普通显示器上查看。这个过程称为色调映射。当场景或相机的对象在镜头之间移动时,会出现额外的复杂性,因为应该配准和对齐具有不同曝光的图像。在本教程中,我们将展示如何从曝光序列中生成和显示 HDR 图像。在我们的例子中,图像已经对齐并且没有移动对象。我们还展示了一种称为曝光融合的替代方法,它可以产生低动态范围的图像。
二、曝光序列
三、代码演示
from__future__importprint_functionfrom__future__importdivisionimportcv2ascvimportnumpyasnpimportargparseimportos
defcv_show(name,img):cv.imshow(name,img)cv.waitKey(0)cv.destroyAllWindows()
defcompare(imgs):#foriinrange(len(imgs)):#imgs[i][:,-3:-1,:]=[255,255,255]res=np.hstack(imgs)cv_show('Compare',res)defloadExposureSeq(path):images=[]times=[]withopen(os.path.join(path,'list.txt'))asf:content=f.readlines()forlineincontent:tokens=line.split()images.append(cv.imread(os.path.join(path,tokens[0])))#便于之后的逆CRF操作times.append(1/float(tokens[1]))returnimages,np.asarray(times,dtype=np.float32)
#jupyter难以手动输入参数,故使用绝对路径#parser=argparse.ArgumentParser(description='CodeforHighDynamicRangeImagingtutorial.')#parser.add_argument('--input',type=str,help='Pathtothedirectorythatcontainsimagesandexposuretimes.')#args=parser.parse_args()#ifnotargs.input:#parser.print_help()#exit(0)#images,times=loadExposureSeq(args.input)images,times=loadExposureSeq('exposures/')calibrate=cv.createCalibrateDebevec()response=calibrate.process(images,times)merge_debevec=cv.createMergeDebevec()hdr=merge_debevec.process(images,times,response)tonemap=cv.createTonemap(2.2)ldr=tonemap.process(hdr)merge_mertens=cv.createMergeMertens()fusion=merge_mertens.process(images)cv.imwrite('fusion.png',fusion*255)cv.imwrite('ldr.png',ldr*255)cv.imwrite('hdr.hdr',hdr)True
四、解释
1. 加载图像和曝光时间
images,times=loadExposureSeq('exposures/')#查看数据集中曝光图像个数len(images)
16
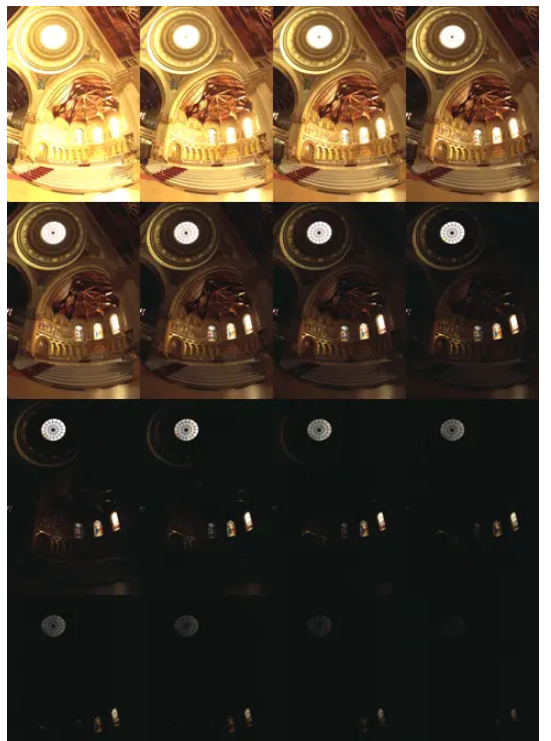
首先我们从用户自定义文件夹中(此处我采用了教程提供的数据集并将其放置到了同目录下便于载入)载入输入图像以及其曝光时间。文件夹中需要包含图像和list.txt文本文件,其中包含了文件名称和反曝光时间
提供的图像数据集的列表如下:
memorial00.png 0.03125
memorial01.png 0.0625
...
memorial15.png 1024
2. 估计相机响应
calibrate=cv.createCalibrateDebevec()response=calibrate.process(images,times)
用法如下:
cv.createCalibrateDebevec( [, samples[, lambda_[, random]]] ) -> retval
参数含义:
samples :number of pixel locations to use
lambda :smoothness term weight. Greater values produce smoother results, but can alter the response.
random :if true sample pixel locations are chosen at random, otherwise they form a rectangular grid.
很多 HDR 构建算法都需要了解相机响应函数(CRF)。 我们使用一种校准算法来估计所有 256 个像素值的逆 CRF
3. 形成HDR图像
merge_debevec=cv.createMergeDebevec()#利用逆CRF形成HDR图像hdr=merge_debevec.process(images,times,response)
用法如下:
cv.createMergeMertens( [, contrast_weight[, saturation_weight[, exposure_weight]]] ) -> retval
参数含义:
contrast_weight :contrast measure weight. See MergeMertens.
saturation_weight: saturation measure weight
exposure_weight :well-exposedness measure weight
我们使用 Debevec 的加权方案,使用上一项中计算的响应来构建 HDR 图像。
4. 对 HDR 图像进行色调映射
tonemap=cv.createTonemap(2.2)ldr=tonemap.process(hdr)cv_show('Result',ldr)用法如下: cv.createTonemap( [, gamma] ) -> retval
参数含义:
gamma :positive value for gamma correction. Gamma value of 1.0 implies no correction, gamma equal to 2.2f is suitable for most displays. Generally gamma > 1 brightens the image and gamma < 1 darkens it.
由于我们想在普通 LDR 显示器上看到我们的结果,我们必须将 HDR 图像映射到 8 位范围,保留大部分细节。 这是色调映射方法的主要目标。 我们使用带有双边滤波的色调映射器,并将 2.2 设置为 gamma 校正的值。
5. 实现曝光融合
merge_mertens=cv.createMergeMertens()fusion=merge_mertens.process(images)
如果我们不需要 HDR 图像,还有另一种方法可以合并我们的曝光。 这个过程称为曝光融合,并产生不需要伽马校正的 LDR 图像。 它也不使用照片的曝光值。
compare([ldr,fusion])
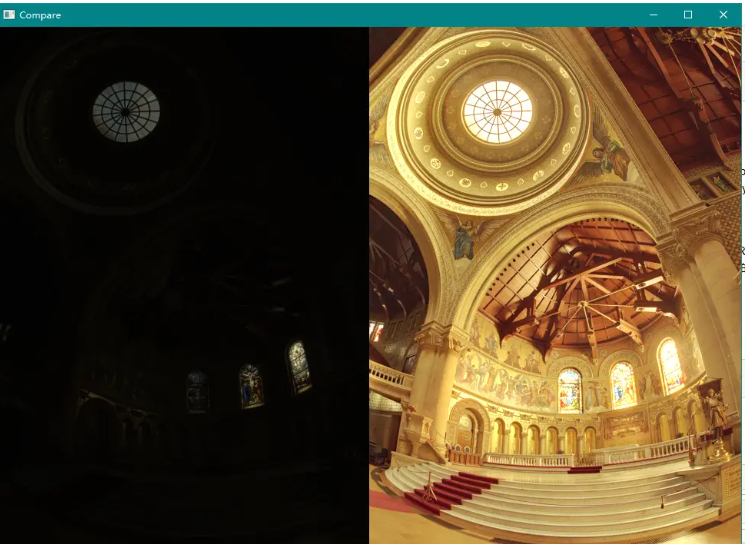
左边是对HDR图像直接进行色调映射的结果,只会保留大部分细节,右边图像是使用所有输入图像序列进行图像曝光融合的结果
请注意,HDR 图像不能以一种常见的图像格式存储,因此我们将其保存为 Radiance 图像 (.hdr)。 此外,所有 HDR 成像函数都返回 [0, 1] 范围内的结果,因此我们应该将结果乘以 255。您可以尝试其他色调映射算法:cv::TonemapDrago、cv::TonemapMantiuk 和 cv::TonemapReinhard 您还可以调整 您自己的照片的 HDR 校准和色调映射方法参数。
#修改gamma使整幅图像变亮tonemap=cv.createTonemap(10)ldr=tonemap.process(hdr)cv_show('Result',ldr)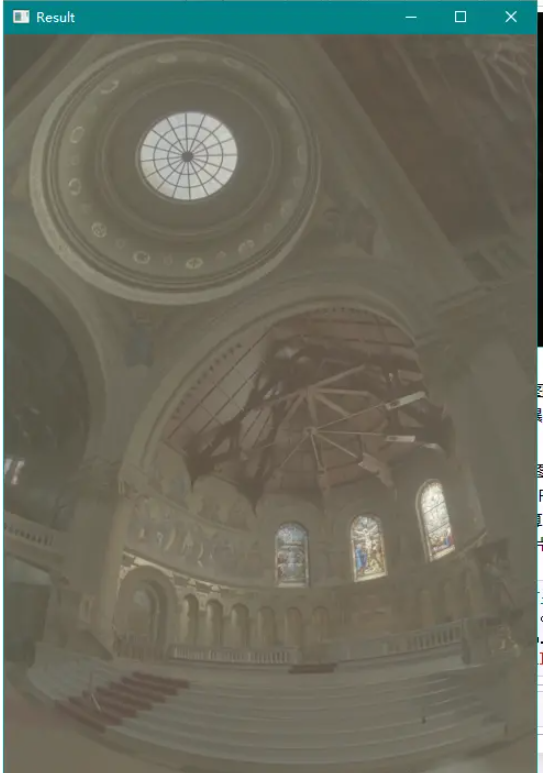
</div> <div class="zixun-tj-product adv-bottom"></div> </div> </div> <div class="prve-next-news">Python opencv怎么实现高动态范围成像的详细内容,希望对您有所帮助,信息来源于网络。