怎么在wxPython中修改文本框颜色
导读:本文共2102字符,通常情况下阅读需要7分钟。同时您也可以点击右侧朗读,来听本文内容。按键盘←(左) →(右) 方向键可以翻页。
摘要: 具体思路如下:1、 去除现有wxpython 的wx.TextCtrl控件的边框,再使用wx.StaticText给wx.TextCtrl做一个边框。(要相信,界面上看到的东西,只是开发人想让你看到的)2、 这个边框需要使用两个wx.StaticText控件,为啥要用两个?a) 模拟边框是需要色差的,由于色差存在,所以看得像一个边框。b) 先使用一个wx.Sta... ...
音频解说
目录
(为您整理了一些要点),点击可以直达。具体思路如下:
1、 去除现有wxpython 的wx.TextCtrl控件的边框,再使用wx.StaticText给wx.TextCtrl做一个边框。(要相信,界面上看到的东西,只是开发人想让你看到的)
2、 这个边框需要使用两个wx.StaticText控件,为啥要用两个?
a) 模拟边框是需要色差的,由于色差存在,所以看得像一个边框。
b) 先使用一个wx.StaticText控件,设置一个黑色背景色,再在这个wx.StaticText控件上添加一个白色背景,并且长宽小于父亲2px的wx.StaticText控,这个界面上就能1px的黑色线条。这就是我们需要的边框,并且这个边框可以边框颜色和大小。(只需要改父亲控件的背景设,和子wx.StaticText的大小就行)
c) 再同理,来把无边框的wx.TextCtrl放入这个边框中,设置位置,就得到了自定义的可以改变边框颜色和文本垂直居中的文本框
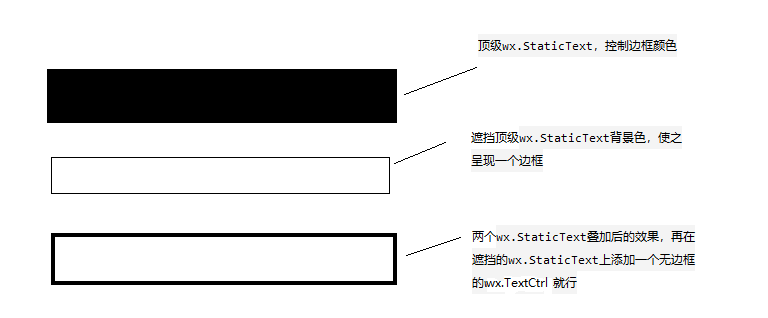
3. 合成示意图
自定义控件代码:
importwxclassMyText:"""自定义文本框"""def__init__(self,parent,pos,size=(80,36),readOnly=False):self.defaultFontSize=10#默认字体大小self.TextCtrlColor='white'#文本框的背景色self.defaultBorderColoe='#EAEAEA'#默认边框颜色self.textCtrl,self.border,self.bg=self.__CreateTextCtrl(parent,pos,size,self.defaultBorderColoe,readOnly)def__CreateTextCtrl(self,parent,pos,size,borderColor,readOnly=True,borderSize=1):"""创建文本框"""border=wx.StaticText(parent,-1,'',size=size,pos=pos)#创建边框border.SetBackgroundColour(borderColor)#设置边框要展现的颜色bg=wx.StaticText(border,-1,'',size=((size[0]-borderSize*2),(size[1]-borderSize*2)),pos=(borderSize,borderSize))ifreadOnly:#设置文本框是否只读,还有去自带的边框style=wx.TE_READONLY|wx.NO_BORDERelse:style=wx.NO_BORDERtextCtrl=wx.TextCtrl(bg,-1,size=((size[0]-10),self.defaultFontSize*2),pos=(5,(size[1]-2*self.defaultFontSize-borderSize*2)/2),style=style)font=wx.Font(self.defaultFontSize,wx.DEFAULT,wx.NORMAL,wx.NORMAL,False,'微软雅黑')textCtrl.SetFont(font)ifreadOnly:bg.SetBackgroundColour('rgb(240,240,240)')self.TextCtrlColor='rgb(240,240,240)'else:bg.SetBackgroundColour(textCtrl.GetBackgroundColour())self.TextCtrlColor=textCtrl.GetBackgroundColour()bg.Bind(wx.EVT_LEFT_UP,self.__ClickEvent)returntextCtrl,border,bgdef__ClickEvent(self,evt):"""点击时焦点设置在文本框上"""self.textCtrl.SetFocus()defSetValue(self,value):ifnotvalue:value=''self.textCtrl.SetValue(value)defGetValue(self):returnself.textCtrl.GetValue()defSetBorderColor(self,color):self.border.SetBackgroundColour(color)self.border.Refresh()defSetFontColor(self,color):self.textCtrl.SetForegroundColour(color)self.textCtrl.SetBackgroundColour(self.TextCtrlColor)defSetFont(self,font):self.textCtrl.SetFont(font)defSetBackgroundColour(self,color):self.bg.SetBackgroundColour(color)self.textCtrl.SetBackgroundColour(color)self.textCtrl.Refresh()测试代码:
#coding:utf-8importwxfromwxpythonimportMywxpythonapp=wx.App()frame=wx.Frame(None,title="GuiTestEditor",pos=(1000,200),size=(500,400))panel=wx.Panel(frame)path_text=wx.TextCtrl(panel,size=(260,36))my_text=Mywxpython.MyText(panel,pos=(10,50),size=(260,36))my_text1=Mywxpython.MyText(panel,pos=(10,100),size=(260,36),readOnly=True)my_text.SetBorderColor('red')frame.Show()app.MainLoop()
</div> <div class="zixun-tj-product adv-bottom"></div> </div> </div> <div class="prve-next-news">本文:
怎么在wxPython中修改文本框颜色的详细内容,希望对您有所帮助,信息来源于网络。