怎么使用vue+three.js实现炫酷的3D登陆页面
导读:本文共5669.5字符,通常情况下阅读需要19分钟。同时您也可以点击右侧朗读,来听本文内容。按键盘←(左) →(右) 方向键可以翻页。
摘要:这篇文章主要介绍“怎么使用vue+three.js实现炫酷的3D登陆页面”的相关知识,小编通过实际案例向大家展示操作过程,操作方法简单快捷,实用性强,希望这篇“怎么使用vue+three.js实现炫酷的3D登陆页面”文章能帮助大家解决问题。关于场景你可以为场景添加背景颜色,或创建一个盒模型(球体、立方体),给盒模型的内部贴上图片,再把相机放在这个盒模型内部以达到模拟场景的效果。盒模型的方式多用于3... ...
目录
(为您整理了一些要点),点击可以直达。这篇文章主要介绍“怎么使用vue+three.js实现炫酷的3D登陆页面”的相关知识,小编通过实际案例向大家展示操作过程,操作方法简单快捷,实用性强,希望这篇“怎么使用vue+three.js实现炫酷的3D登陆页面”文章能帮助大家解决问题。
关于场景
你可以为场景添加背景颜色,或创建一个盒模型(球体、立方体),给盒模型的内部贴上图片,再把相机放在这个盒模型内部以达到模拟场景的效果。盒模型的方式多用于360度全景,比如房屋vr展示
【登陆页面】创建场景的例子:
constscene=newTHREE.Scene()//在场景中添加雾的效果,Fog参数分别代表‘雾的颜色'、‘开始雾化的视线距离'、刚好雾化至看不见的视线距离'scene.fog=newTHREE.Fog(0x000000,0,10000)//盒模型的深度constdepth=1400//在场景中添加一个圆球盒模型//1.创建一个立方体constgeometry=newTHREE.BoxGeometry(1000,800,depth)//2.加载纹理consttexture=newTHREE.TextureLoader().load('bg.png')//3.创建网格材质(原料)constmaterial=newTHREE.MeshBasicMaterial({map:texture,side:THREE.BackSide})//4.生成网格constmesh=newTHREE.Mesh(geometry,material)//5.把网格放入场景中scene.add(mesh)关于光源
为场景设置光源的颜色、强度,同时还可以设置光源的类型(环境光、点光源、平行光等)、光源所在的位置
【登陆页面】创建光源的例子:
//1.创建环境光constambientLight=newTHREE.AmbientLight(0xffffff,1)//2.创建点光源,位于场景右下角constlight_rightBottom=newTHREE.PointLight(0x0655fd,5,0)light_rightBottom.position.set(0,100,-200)//3.把光源放入场景中scene.add(light_rightBottom)scene.add(ambientLight)
关于相机(重要)
很重要的一步,相机就是你的眼睛。这里还会着重说明一下使用透视相机时可能会遇到的问题,我们最常用到的相机就是正交相机和透视相机了。
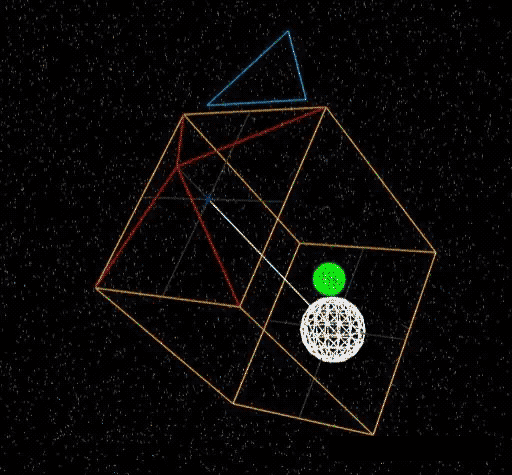
正交相机:无论物体距离相机距离远或者近,在最终渲染的图片中物体的大小都保持不变。用于渲染2D场景或者UI元素是非常有用的。如图:
图注解:
图中红色三角锥体是视野的大小
红色锥体连着的第一个面是摄像机能看到的最近位置
从该面通过白色辅助线延伸过去的面是摄像机能看到的最远的位置
透视相机:被用来模拟人眼所看到的景象。它是3D场景的渲染中使用得最普遍的投影模式。如图:
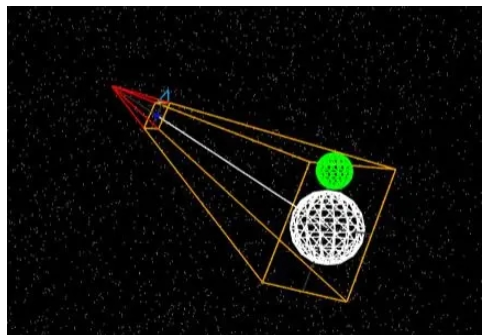
我们在使用透视相机时,可能会遇到这种情况:边缘处的物体会产生一定程度上的形变,原因是:透视相机是鱼眼效果,如果视域越大,边缘变形越大。为了避免边缘变形,可以将fov角度设置小一些,距离拉远一些
关于透视相机的几个参数
new THREE.PerspectiveCamera(fov, width / height, near, far)
fov(field of view) — 摄像机视锥体垂直视野角度
aspect(width / height) — 摄像机视锥体长宽比
near — 摄像机视锥体近端面
far — 摄像机视锥体远端面
/***为了避免边缘变形,这里将fov角度设置小一些,距离拉远一些*固定视域角度,求需要多少距离才能满足完整的视野画面*15度等于(Math.PI/12)*/constcontainer=document.getElementById('login-three-container')constwidth=container.clientWidthconstheight=container.clientHeightconstfov=15constdistance=width/2/Math.tan(Math.PI/12)constzAxisNumber=Math.floor(distance-depth/2)constcamera=newTHREE.PerspectiveCamera(fov,width/height,1,30000)camera.position.set(0,0,zAxisNumber)constcameraTarget=newTHREE.Vector3(0,0,0)camera.lookAt(cameraTarget)关于渲染器
用WebGL渲染出你精心制作的场景。它会创建一个canvas进行渲染
【登陆页面】创建渲染器的例子:
//获取容器domconstcontainer=document.getElementById('login-three-container')//创建webgl渲染器实例constrenderer=newTHREE.WebGLRenderer({antialias:true,alpha:true})//设置渲染器画布的大小renderer.setSize(width,height)//把画布实例(canvas)放入容器中container.appendChild(renderer.domElement)//渲染器渲染场景renderer.render(scene,camera)需要注意,这样创建出来的场景并没有动效,原因是这次渲染的仅仅只是这一帧的画面。为了让场景中的物体能动起来,我们需要使用requestAnimationFrame,所以我们可以写一个loop函数
//动画刷新constloopAnimate=()=>{requestAnimationFrame(loopAnimate)scene.rotateY(0.001)renderer.render(scene,camera)}loopAnimate()完善效果
创建一个左上角的地球
//加载纹理consttexture=THREE.TextureLoader().load('earth_bg.png')//创建网格材质constmaterial=newTHREE.MeshPhongMaterial({map:texture,blendDstAlpha:1})//创建几何球体constsphereGeometry=newTHREE.SphereGeometry(50,64,32)//生成网格constsphere=newTHREE.Mesh(sphereGeometry,material)//为了单独操作球体的运动效果,我们把球体放到一个组中constSphere_Group=newTHREE.Group()constSphere_Group.add(sphere)//设置该组(球体)在空间坐标中的位置constSphere_Group.position.x=-400constSphere_Group.position.y=200constSphere_Group.position.z=-200//加入场景scene.add(Sphere_Group)//使球能够自转,需要在loopAnimate中加上Sphere_Group.rotateY(0.001)使地球自转
//渲染星球的自转constrenderSphereRotate=()=>{if(sphere){Sphere_Group.rotateY(0.001)}}//使球能够自转,需要在loopAnimate中加上constloopAnimate=()=>{requestAnimationFrame(loopAnimate)renderSphereRotate()renderer.render(scene,camera)}创建星星
//初始化星星constinitSceneStar=(initZposition:number):any=>{constgeometry=newTHREE.BufferGeometry()constvertices:number[]=[]constpointsGeometry:any[]=[]consttextureLoader=newTHREE.TextureLoader()constsprite1=textureLoader.load('starflake1.png')constsprite2=textureLoader.load('starflake2.png')parameters=[[[0.6,100,0.75],sprite1,50],[[0,0,1],sprite2,20]]//初始化500个节点for(leti=0;i<500;i++){/***constx:number=Math.random()*2*width-width*等价*THREE.MathUtils.randFloatSpread(width)*_.random使用的是lodash库中的生成随机数*/constx:number=THREE.MathUtils.randFloatSpread(width)consty:number=_.random(0,height/2)constz:number=_.random(-depth/2,zAxisNumber)vertices.push(x,y,z)}geometry.setAttribute('position',newTHREE.Float32BufferAttribute(vertices,3))//创建2种不同的材质的节点(500*2)for(leti=0;i<parameters.length;i++){constcolor=parameters[i][0]constsprite=parameters[i][1]constsize=parameters[i][2]materials[i]=newTHREE.PointsMaterial({size,map:sprite,blending:THREE.AdditiveBlending,depthTest:true,transparent:true})materials[i].color.setHSL(color[0],color[1],color[2])constparticles=newTHREE.Points(geometry,materials[i])particles.rotation.x=Math.random()*0.2-0.15particles.rotation.z=Math.random()*0.2-0.15particles.rotation.y=Math.random()*0.2-0.15particles.position.setZ(initZposition)pointsGeometry.push(particles)scene.add(particles)}returnpointsGeometry}constparticles_init_position=-zAxisNumber-depth/2letzprogress=particles_init_positionletzprogress_second=particles_init_position*2constparticles_first=initSceneStar(particles_init_position)constparticles_second=initSceneStar(zprogress_second)使星星运动
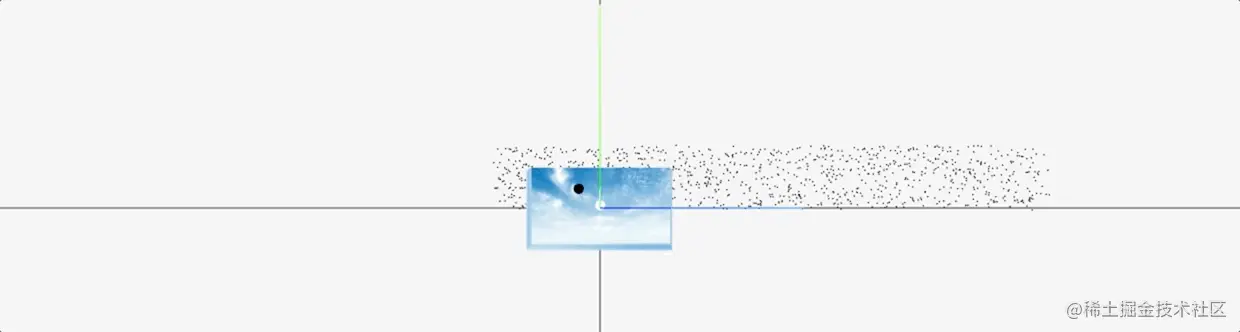
//渲染星星的运动constrenderStarMove=()=>{consttime=Date.now()*0.00005zprogress+=1zprogress_second+=1if(zprogress>=zAxisNumber+depth/2){zprogress=particles_init_position}else{particles_first.forEach((item)=>{item.position.setZ(zprogress)})}if(zprogress_second>=zAxisNumber+depth/2){zprogress_second=particles_init_position}else{particles_second.forEach((item)=>{item.position.setZ(zprogress_second)})}for(leti=0;i<materials.length;i++){constcolor=parameters[i][0]consth=((360*(color[0]+time))%360)/360materials[i].color.setHSL(color[0],color[1],parseFloat(h.toFixed(2)))}}星星的运动效果,实际就是沿着z轴从远处不断朝着相机位置移动,直到移出相机的位置时回到起点,不断重复这个操作。我们使用上帝视角,从x轴的左侧看去,效果如下:
创建云以及运动轨迹
//创建曲线路径constroute=[newTHREE.Vector3(-width/10,0,-depth/2),newTHREE.Vector3(-width/4,height/8,0),newTHREE.Vector3(-width/4,0,zAxisNumber)]constcurve=newTHREE.CatmullRomCurve3(route,false)consttubeGeometry=newTHREE.TubeGeometry(curve,100,2,50,false)consttubeMaterial=newTHREE.MeshBasicMaterial({opacity:0,transparent:true})consttube=newTHREE.Mesh(tubeGeometry,tubeMaterial)//把创建好的路径加入场景中scene.add(tube)//创建平面几何constclondGeometry=newTHREE.PlaneGeometry(500,200)consttextureLoader=newTHREE.TextureLoader()constcloudTexture=textureLoader.load('cloud.png')constclondMaterial=newTHREE.MeshBasicMaterial({map:cloudTexture,blending:THREE.AdditiveBlending,depthTest:false,transparent:true})constcloud=newTHREE.Mesh(clondGeometry,clondMaterial)//将云加入场景中scene.add(cloud)现在有了云和曲线路径,我们需要将二者结合,让云按着路径进行运动
使云运动
letcloudProgress=0letscaleSpeed=0.0006letmaxScale=1letstartScale=0//初始化云的运动函数constcloudMove=()=>{if(startScale<maxScale){startScale+=scaleSpeedcloud.scale.setScalar(startScale)}if(cloudProgress>1){cloudProgress=0startScale=0}else{cloudProgress+=speedif(cloudParameter.curve){constpoint=curve.getPoint(cloudProgress)if(point&&point.x){cloud.position.set(point.x,point.y,point.z)}}}}完成three.js有关效果
最后,把cloudMove函数放入loopAnimate函数中即可实现云的运动。
关于“怎么使用vue+three.js实现炫酷的3D登陆页面”的内容就介绍到这里了,感谢大家的阅读。如果想了解更多行业相关的知识,可以关注亿速云行业资讯频道,小编每天都会为大家更新不同的知识点。
怎么使用vue+three.js实现炫酷的3D登陆页面的详细内容,希望对您有所帮助,信息来源于网络。