Vue怎么实现图片裁剪功能
导读:本文共7654.5字符,通常情况下阅读需要26分钟。同时您也可以点击右侧朗读,来听本文内容。按键盘←(左) →(右) 方向键可以翻页。
摘要:',type:'error'})}}).finally(()=>{_this.loading=false})})/if(flag){this.$message.warning('请选择图片')}/}},createNewFileName(){//constnow=Date.now()//constfileName=now+... ...
目录
(为您整理了一些要点),点击可以直达。',
type:'error'
})
}
}).finally(()=>{
_this.loading=false
})
})
/if(flag){
this.$message.warning('请选择图片')
}/
}
},
createNewFileName(){
//constnow=Date.now()
//constfileName=now+'-'+Math.ceil(Math.random()*100)
//returnfileName+'.jpg'
constfileName=regularFileName()
returnfileName+'.jpg'
}
}
}
</script>
<stylescopedlang="scss">
.cropper-content{
display:flex;
display:-webkit-flex;
justify-content:flex-end;
.cropper-box{
flex:1;
width:100%;
.cropper{
width:auto;
height:300px;
}
}
.show-preview{
flex:1;
-webkit-flex:1;
display:flex;
display:-webkit-flex;
justify-content:center;
.preview{
overflow:hidden;
border:1pxsolid#67c23a;
background:#cccccc;
}
}
}
.footer-btn{
margin-top:30px;
display:flex;
display:-webkit-flex;
justify-content:flex-end;
.scope-btn{
display:flex;
display:-webkit-flex;
justify-content:space-between;
padding-right:10px;
}
.upload-btn{
flex:1;
-webkit-flex:1;
display:flex;
display:-webkit-flex;
justify-content:center;
}
.btn{
outline:none;
display:inline-block;
line-height:1;
white-space:nowrap;
cursor:pointer;
-webkit-appearance:none;
text-align:center;
-webkit-box-sizing:border-box;
box-sizing:border-box;
outline:0;
-webkit-transition:0.1s;
transition:0.1s;
font-weight:500;
padding:8px15px;
font-size:12px;
border-radius:3px;
color:#fff;
background-color:#409eff;
border-color:#409eff;
margin-right:10px;
}
}
</style>
需要更改成自己的上传接口:
import{uploadFile}from'@/api/smrz/setting'后台接口参数如下,要求表单方式上传
/*
上传附件

@paramfile文件流(注意带文件后缀,统一使用.jpg结尾)
@paramfileName文件名称(唯一性)
@parambusType业务类型(具体值参考ApiConstants类中FILE_开头常量说明)
@authorwangkun
@createTime2022/7/1917:18
*/
@PostMapping(value="/file/upload",consumes="multipart/form-data")
publicRpcResultuploadFile(@RequestParam(value="rpc")MultipartFilefile,@RequestParam(value="fileName")StringfileName,@RequestParam(value="busType")StringbusType){
在uploadImg函数这里,使用FormData对象包装请求参数
注意append方法,要给文件对象指定文件名,必须要入参第三个参数
否则默认名称blob
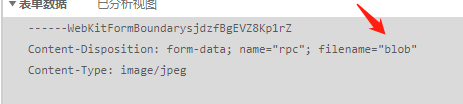
按实际接口对应调整参数即可
constformData=newFormData()_this.randomFileName=this.createNewFileName()
//给blob对象的filename属性赋值文件名
formData.append('rpc',data,_this.randomFileName)
//给参数赋值文件名
formData.append('fileName',_this.randomFileName)
formData.append('busType',_this.busType)uploadFile(formData)
其它自定义参数,通过Props属性传入此组件
props:{
autoCropWidth:{//默认生成截图框宽度
type:Number,
default:410
},
autoCropHeight:{//默认生成截图框高度
type:Number,
default:150
},
busType:{
type:String,
default:'advertPic'
}
},
文件名的生成方法,就是当前时间按单位数值排序
实际使用根据业务实际情况改写
exportfunctionregularFileName(){
constnow=newDate()
constyear=now.getFullYear()
constmonth=digitFix(now.getMonth()+1)
constdayOfMonth=digitFix(now.getDate())
consthour=digitFix(now.getHours())
constminute=digitFix(now.getMinutes())
constsecond=digitFix(now.getSeconds())
constmillSecond=now.getMilliseconds()
return${year}${month}${dayOfMonth}${hour}${minute}${second}${millSecond}
}constfileName=`${regularFileName()}
3、【图片上传表单项】组件编写
<template>
<divclass="cropper-app">
<el-form
ref="ruleForm"
:model="formValidate"
:rules="ruleValidate"
label-width="110px"
class="demo-ruleForm"
>
<el-form-item
:label="label"
prop="mainImage"
>
<divclass="list-img-box">
<div
v-if="formValidate.mainImage!==''"
class="img_div">
<img
:src="formValidate.mainImage"
alt="图片找不到"
>
<ahref="#"rel="externalnofollow">
<divclass="mask">
<h4>
<i
class="el-icon-zoom-in"
@click="clickImg('zoom-in')"
/><i
class="el-icon-delete"
@click="clickImg('delete')"
/>
</h4>
</div>
</a>
</div>
<div
v-else
class="upload-btn"@click="uploadPicture('flagImg')"
>
<i
class="el-icon-plus"/>
<!--<span>封面设置</span>-->
</div>
</div>
<input
v-model="formValidate.mainImage"
type="hidden"
placeholder="请添加封面"
>
</el-form-item>
</el-form>
<!--剪裁组件弹窗-->
<el-dialog
v-if="cropperModel"
title="图片剪切"
:visible.sync="cropperModel"
width="1020px"
center
append-to-body
>
<cropper-image
v-if="cropperModel"
ref="child"
:auto-crop-width="autoCropWidth"
:auto-crop-height="autoCropHeight"
:bus-type="busType"
@uploadImgSuccess="handleUploadSuccess"
/>
</el-dialog>
<!--查看大封面-->
<el-dialog
title=""
:visible.sync="imgVisible"
center
append-to-body
>
<img
v-if="imgVisible"
:src="imgUrl"alt="查看"
>
</el-dialog>
</div>
</template><script>
importCropperImagefrom'@/components/CropperImage'
import{commonsDownloadAPI}from'@/api/smrz/setting'
exportdefault{
name:'Tailoring',
components:{CropperImage},
props:{
label:{
type:String,
default:'上传图片'
},
url:{
type:String
},
autoCropWidth:{//默认生成截图框宽度
type:Number,
default:410
},
autoCropHeight:{//默认生成截图框高度
type:Number,
default:150
},
isSignFlag:{
type:Boolean,
default:false
},
busType:{
type:String,
default:'busType'
}
},data(){
varimageUrl2=(rule,value,callback)=>{
if(!this.isSignFlag){
returncallback()
}
if(!value){
returncallback(newError('请输上传图片'))
}
returncallback()
}
return{
formValidate:{
mainImage:''
},
ruleValidate:{
mainImage:[
/{required:true,message:'请上传图片',trigger:'blur'}/
{required:true,validator:imageUrl2,trigger:'blur'}
]
},
//裁切图片参数
cropperModel:false,
cropperName:'',
imgUrl:'',
imgVisible:false,dialogImageUrl:'',
dialogVisible:false
}
},
created(){
this.formValidate.mainImage=this.url
this.imgUrl=this.url
},
methods:{
validateForm(){
this.$refs['ruleForm'].validate((valid)=>{
this.$emit('validVal',valid)
})
},
//封面设置
uploadPicture(name){
this.cropperName=name
this.cropperModel=true
},
//图片上传成功后
asynchandleUploadSuccess(data){
//this.formValidate.mainImage=data.url//图片回显
const{data:res2,code}=awaitcommonsDownloadAPI({
fileName:data.fileName,
busType:'advertPic'
})constimgBase64=
code!==200
?'-1':data:image/jpeg;base64,${res2.data}
this.formValidate.mainImage=imgBase64/switch(data.name){
case'flagImg':
this.formValidate.mainImage=data.url
console.log('最终输出'+data.name)
console.log('最终输出2'+this.formValidate)
break
}/
this.cropperModel=false
this.$emit('uploadSuccess',data)
},
clickImg(val){
if(val==='delete'){
this.formValidate.mainImage=''
this.$emit('deleteImage')
}elseif(val==='zoom-in'){
//
this.imgUrl=this.formValidate.mainImage
this.imgVisible=true
}
}}
}
</script>
<stylescoped>
.upload-list-cover{
position:absolute;
top:0;
bottom:0;
left:0;
right:0;
display:flex;
flex-wrap:wrap;
justify-content:space-between;
padding:040px;
align-items:center;
background:rgba(0,0,0,0.6);
opacity:0;
transition:opacity1s;
}
.cover_icon{
font-size:30px;
}
.upload-btn{
display:-webkit-box;
display:-ms-flexbox;
display:flex;
-ms-flex-wrap:wrap;
flex-wrap:wrap;
-webkit-box-pack:center;
-ms-flex-pack:center;
justify-content:center;
-webkit-box-align:center;
-ms-flex-align:center;
align-items:center;
border:1pxsolid#cccccc;
border-radius:5px;
overflow:hidden;
box-shadow:001px#cccccc;
}
.upload-btn:hover{
border:1pxsolid#69b7ed;
}
.upload-btni{
margin:5px;
}.img_divimg{
width:200px!important;
height:100px!important;
/margin:20px400px0400px;
position:relative;
width:531px;
height:354px;/
}
.mask{
position:absolute;
top:0;
left:0;
width:200px;
height:100px;
background:rgba(101,101,101,0.6);
color:#ffffff;
opacity:0;
}
.maskh4{
text-align:center;
line-height:60px;
}.img_diva:hover.mask{
opacity:0.8;
}
</style>
表单项组件需要引入
1、裁剪组件
2、图片下载接口
importCropperImagefrom'@/components/CropperImage'
import{commonsDownloadAPI}from'@/api/smrz/setting'
3、表单项设置了自定义校验
varimageUrl2=(rule,value,callback)=>{
if(!this.isSignFlag){
returncallback()
}
if(!value){
returncallback(newError('请输上传图片'))
}
returncallback()
}
就是检查src有没有地址或者base64资源,校验触发的效果:
4、图片上传后的回调处理:
上传成功后,回到表单页需要立即回显之前上传的图片
所以需要调用图片下载接口来获取刚刚上传的资源,
在这个回调方法中实现,因为下载接口提供的资源不是图片地址,而是返回Base64编码
这里我写的是base64编码资源的回显处理
实际使用根据业务实际情况改写
//图片上传成功后
asynchandleUploadSuccess(data){
//this.formValidate.mainImage=data.url//图片回显
const{data:res2,code}=awaitcommonsDownloadAPI({
fileName:data.fileName,
busType:'advertPic'
})constimgBase64=
code!==200
?'-1':data:image/jpeg;base64,${res2.data}
this.formValidate.mainImage=imgBase64/switch(data.name){
case'flagImg':
this.formValidate.mainImage=data.url
console.log('最终输出'+data.name)
console.log('最终输出2'+this.formValidate)
break
}/
this.cropperModel=false
this.$emit('uploadSuccess',data)
},
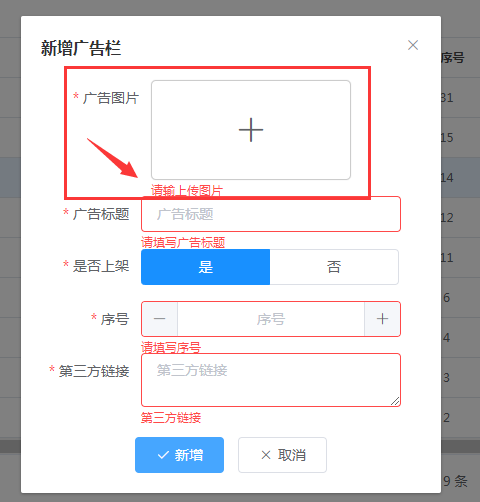
4、业务功能引用
引入表单项
importTailoringfrom'@/components/Tailoring'
声明组件,并注入参数
<divclass="ant-upload-preview">
<tailoring
v-if="true"
ref="child"
label="广告图片"
:is-sign-flag="true"
:url="url"
:bus-type="businessType"
:auto-crop-height="80"
:auto-crop-width="410"
@uploadSuccess="uploadSuccess"
@validVal="validVal"
/>
</div>
- url是一开始加载组件需要回显的图片资源地址
- isSignFlag变量用来辅助自定义校验的,为false时直接放行校验,所以默认写死true
- bus-type是自定义的业务参数
- auto-crop的宽高用来配置裁剪的宽高,预览大小和裁剪大小合并使用这两个参数
上传成功的回调,uploadSuccess,可以在组件自定义需要的参数
这里是以图片名称作为记录主键,所以要传入这个文件名
实际使用根据业务实际情况改写
asyncuploadSuccess(res){
console.log(上传结果res->${JSON.stringify(res)})
constfileName=res.fileName
this.newId=fileName.substring(0,fileName.lastIndexOf('.'))
},
校验值,应该是返回校验后的src值,但我这里没用上,所以不执行任何逻辑
validVal(val){},要触发【裁剪表单项】校验,使用
this.$refs.child.validateForm()这里是亿速云网站,更多相关内容可以进入相关频道进行查询,关注我们,继续学习!
Vue怎么实现图片裁剪功能的详细内容,希望对您有所帮助,信息来源于网络。