QML中动态与静态模型怎么应用
导读:本文共7007字符,通常情况下阅读需要23分钟。同时您也可以点击右侧朗读,来听本文内容。按键盘←(左) →(右) 方向键可以翻页。
摘要:前言对于开发用户界面,最重要的就是保持数据与UI分离。数据通常被称为为model,可视化处理称作view。在QML中,model与view都通过delegate连接起来。功能划分如下,model提供数据,对于每个数据项,可能有很多个值。显示在view(视图)中的每项数据,都是通过delegate(代理)来实现可视化的。view(视图)的任务是排列这些delegate(代理),每个delegate(... ...
目录
(为您整理了一些要点),点击可以直达。前言
对于开发用户界面,最重要的就是保持数据与UI分离。数据通常被称为为model,可视化处理称作view。在QML中,model与view都通过delegate连接起来。功能划分如下,model提供数据,对于每个数据项,可能有很多个值。显示在view(视图)中的每项数据,都是通过delegate(代理)来实现可视化的。view(视图)的任务是排列这些delegate(代理),每个delegate(代理)将model item(模型项)的值呈现给用户。
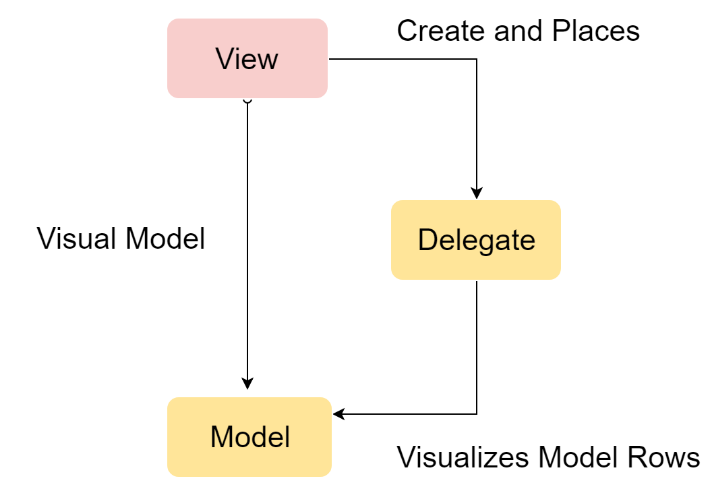
一个模型可以是一个整数,提供给代理使用的索引值(index).如果JavaScript数组被作为一个模型,模型数据变量(modelData)代表了数组的数据的当前索引。对于更加复杂的情况,每个数据项需要提供多个值,可以使用ListModel与ListElement。
对于静态模型,一个Repeater可以被用作视图。它可以非常方便的使用行(Row),列(Column),栅格(Grid),或者流(Flow)来创建用户界面。对于动态或者更大的数据模型,使用ListView或者GridView更加合适。它们会在需要时动态的创建代理,减少在场景下一次显示的元素的数量。
在视图中的代理可以与数据模型中的属性静态绑定或者动态绑定。使用onAdd与onRemove信号,可以动态的播放他们的添加和移除的特效。
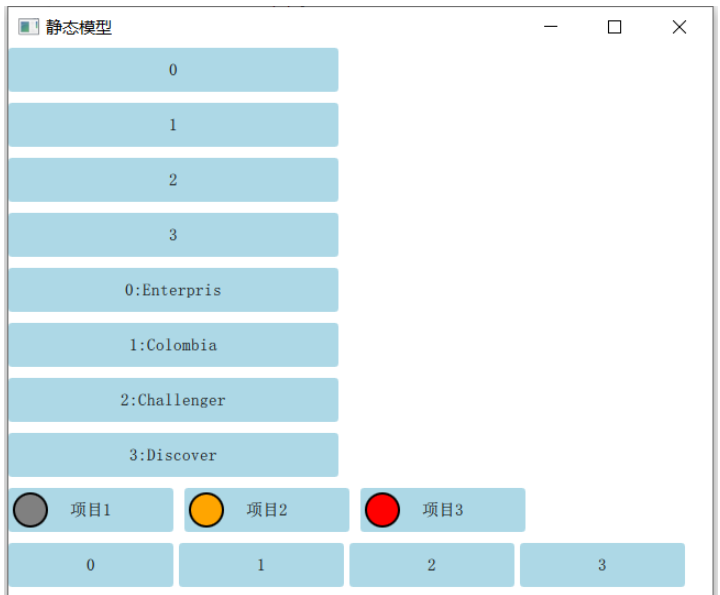
静态模型
通过Repeater来作视图,用来创建一些静态的显示界面。
importQtQuick2.12
importQtQuick.Window2.12
Window{
visible:true
width:640
height:480
title:qsTr("静态模型")
//静态显示单一的数据模型
Column{
id:column1
spacing:10
Repeater{
model:4
Rectangle{
width:300
height:40
radius:3
color:"lightBlue"
Text{
anchors.centerIn:parent
text:index
}
}
}
}
//静态显示列表数据模型
Column{
id:column2
anchors.top:column1.bottom
anchors.topMargin:10
spacing:10
Repeater{
model:["Enterpris","Colombia","Challenger","Discover"]
Rectangle{
width:300
height:40
radius:3
color:"lightBlue"
Text{
anchors.centerIn:parent
text:index+":"+modelData
}
}
}
}
//使用多元素的ListModel
Row{
id:listModelItem
anchors.top:column2.bottom
anchors.topMargin:10
spacing:10
Repeater{
model:ListModel{
ListElement{name:"项目1";surfaceColor:"gray";}
ListElement{name:"项目2";surfaceColor:"orange";}
ListElement{name:"项目3";surfaceColor:"red";}
}
Rectangle{
width:150
height:40
radius:3
color:"lightBlue"
Text{
anchors.left:circleItem.right
anchors.leftMargin:10
anchors.centerIn:parent
text:name
}
Rectangle{
id:circleItem
anchors.left:parent.left
anchors.verticalCenter:parent.verticalCenter
anchors.leftMargin:4
width:32
height:32
radius:16
border.color:"black"
border.width:2
color:surfaceColor
}
}
}
}
Row{
spacing:5
anchors.top:listModelItem.bottom
anchors.topMargin:10
Repeater{
model:4
delegate:Rectangle{
width:150
height:40
radius:3
color:"lightBlue"
Text{
anchors.centerIn:parent
text:index
}
}
}
}
}
显示效果如下图所示:
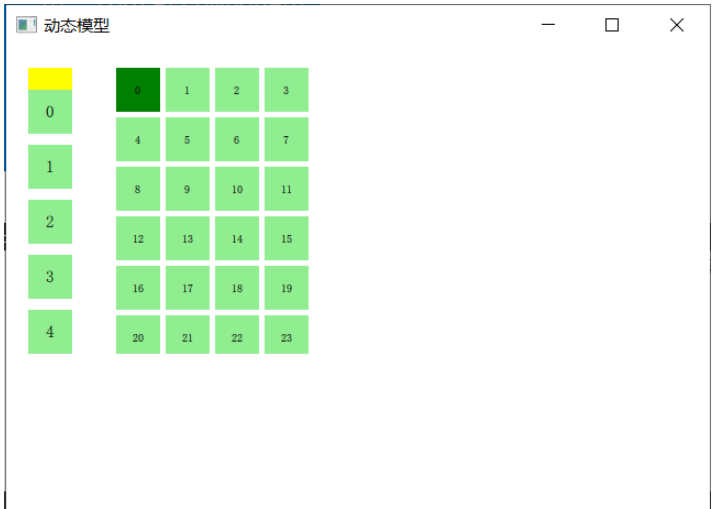
动态模型
Repeator元素适合有限的静态元素,但是真正使用的时候,模型通常更加复杂和庞大。QtQuick提供了ListView和GridView元素,这两个都是基于Flickable区域的元素,因此用户可以放入更大的数据。
importQtQuick2.12
importQtQuick.Window2.12
Window{
visible:true
width:640
height:480
title:qsTr("动态模型")
Rectangle{
id:rowView
width:80
height:300
color:"white"
ListView{
anchors.fill:parent
anchors.margins:20
//是否对边界进行裁剪
clip:true
model:5
delegate:numberDelegate
//列表显示是水平还是垂直
orientation:ListView.Vertical
//focus:true
spacing:10
//页眉和页脚
header:headerComponent
footer:footerComponent
}
Component{
id:numberDelegate
//必须使用Item做为基本元素
Rectangle{
width:40
height:40
color:"lightGreen"
Text{
anchors.centerIn:parent
font.pixelSize:15
text:index
}
}
}
Component{
id:headerComponent
Rectangle{
width:40
height:20
color:"yellow"
}
}
Component{
id:footerComponent
Rectangle{
width:40
height:20
color:"yellow"
}
}
}
Rectangle{
id:gridView
width:240
height:300
color:"white"
anchors.left:rowView.right
GridView{
anchors.fill:parent
anchors.margins:20
//是否对边界进行裁剪
clip:true
model:100
delegate:gridDelegate
cellHeight:45
cellWidth:45
focus:true
}
Component{
id:gridDelegate
//必须使用Item做为基本元素
Rectangle{
width:40
height:40
color:GridView.isCurrentItem?"Green":"lightGreen"
Text{
anchors.centerIn:parent
font.pixelSize:10
text:index
}
}
}
}
}
显示效果如下图所示:
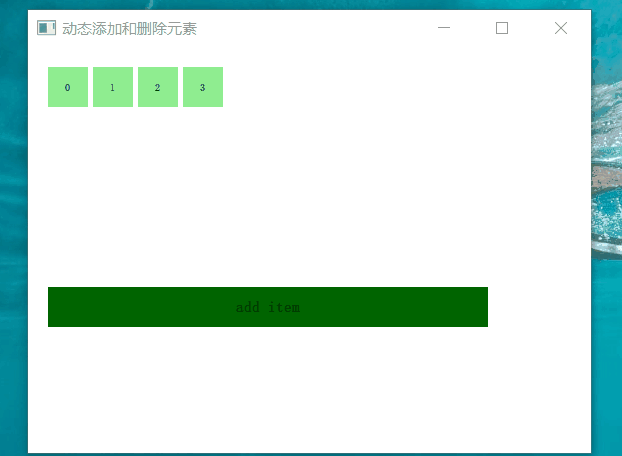
有时候我们需要根据需要动态的向数据模型中添加或者删除元素,这时候我们需要了解元素添加和移除的接口。为了方便使用,QML为每个视图绑定了两个信号,onAdd和onRemove.使用动画连接它们,可以方便的创建识别哪些内容被添加或删除的动画。
importQtQuick2.12
importQtQuick.Window2.12
Window{
visible:true
width:640
height:480
title:qsTr("动态添加和删除元素")
Rectangle{
width:480
height:300
color:"white"
ListModel{
id:theModel
ListElement{number:0}
ListElement{number:1}
ListElement{number:2}
ListElement{number:3}
ListElement{number:4}
ListElement{number:5}
ListElement{number:6}
ListElement{number:7}
ListElement{number:8}
}
Rectangle{
anchors.left:parent.left
anchors.right:parent.right
anchors.bottom:parent.bottom
anchors.margins:20
height:40
color:"darkGreen"
Text{
anchors.centerIn:parent
text:"additem"
}
MouseArea{
anchors.fill:parent
onClicked:{
theModel.append({"number":++parent.count})
}
}
propertyintcount:9
}
GridView{
anchors.fill:parent
anchors.margins:20
anchors.bottomMargin:80
clip:true
model:theModel
cellWidth:45
cellHeight:45
delegate:numberDelegate
}
Component{
id:numberDelegate
Rectangle{
id:wrapper
width:40
height:40
color:"lightGreen"
Text{
anchors.centerIn:parent
font.pixelSize:10
text:number
}
MouseArea{
anchors.fill:parent
onClicked:{
if(!wrapper.GridView.delayRemove)
{
theModel.remove(index)
}
}
}
//模型元素移除时候的动画
GridView.onRemove:SequentialAnimation{
PropertyAction{target:wrapper;property:"GridView.delayRemove";value:true}
NumberAnimation{target:wrapper;property:"scale";to:0;duration:250;easing.type:Easing.InOutQuad}
PropertyAction{target:wrapper;property:"GridView.delayRemove";value:false}
}
//模型元素添加的时候的动画
GridView.onAdd:SequentialAnimation{
NumberAnimation{target:wrapper;property:"scale";from:0;to:1;duration:250;easing.type:Easing.InOutQuad}
}
}
}
}
}
显示效果如下图所示:
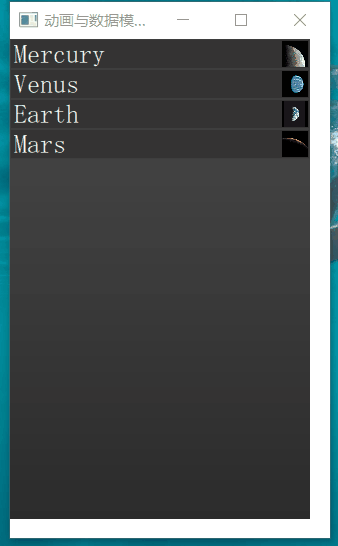
在使用链表时通常会使用当前项激活时展开的机制。这个操作可以被用于动态的将当前项目填充到整个屏幕来添加一个新的用户界面,或者为链表中的当前项提供更多的信息。
importQtQuick2.12
importQtQuick.Window2.12
Window{
visible:true
width:640
height:480
title:qsTr("动画与数据模型组合使用")
Item{
width:300
height:480
Rectangle{
anchors.fill:parent
gradient:Gradient{
GradientStop{position:0.0;color:"#4a4a4a"}
GradientStop{position:1.0;color:"#2b2b2b"}
}
}
//视图
ListView{
id:listView
anchors.fill:parent
delegate:detailsDelegate
model:planets
}
//数据模型
ListModel{
id:planets
ListElement{name:"Mercury";imageSource:"images/mercury.jpeg";facts:"MercuryisthesmallestplanetintheSolarSystem.Itistheclosestplanettothesun.ItmakesonetriparoundtheSunonceevery87.969days."}
ListElement{name:"Venus";imageSource:"images/venus.jpeg";facts:"VenusisthesecondplanetfromtheSun.Itisaterrestrialplanetbecauseithasasolid,rockysurface.TheotherterrestrialplanetsareMercury,EarthandMars.AstronomershaveknownVenusforthousandsofyears."}
ListElement{name:"Earth";imageSource:"images/earth.jpeg";facts:"TheEarthisthethirdplanetfromtheSun.ItisoneofthefourterrestrialplanetsinourSolarSystem.Thismeansmostofitsmassissolid.TheotherthreeareMercury,VenusandMars.TheEarthisalsocalledtheBluePlanet,'PlanetEarth',and'Terra'."}
ListElement{name:"Mars";imageSource:"images/mars.jpeg";facts:"MarsisthefourthplanetfromtheSunintheSolarSystem.Marsisdry,rockyandcold.ItishometothelargestvolcanointheSolarSystem.MarsisnamedafterthemythologicalRomangodofwarbecauseitisaredplanet,whichsignifiesthecolourofblood."}
}
//控件代理
Component{
id:detailsDelegate
Item{
id:wrapper
width:listView.width
height:30
Rectangle{
anchors.left:parent.left
anchors.right:parent.right
anchors.top:parent.top
height:30
color:"#333"
border.color:Qt.lighter(color,1.2)
Text{
anchors.left:parent.left
anchors.verticalCenter:parent.verticalCenter
anchors.leftMargin:4
font.pixelSize:parent.height-4
color:'#fff'
text:name
}
}
Rectangle{
id:image
width:26
height:26
anchors.right:parent.right
anchors.top:parent.top
anchors.rightMargin:2
anchors.topMargin:2
color:"black"
Image{
anchors.fill:parent
fillMode:Image.PreserveAspectFit
source:imageSource
}
}
MouseArea{
anchors.fill:parent
onClicked:parent.state="expanded"
}
Item{
id:factsView
anchors.top:image.bottom
anchors.left:parent.left
anchors.right:parent.right
anchors.bottom:parent.bottom
opacity:0
Rectangle{
anchors.fill:parent
gradient:Gradient{
GradientStop{position:0.0;color:"#fed958"}
GradientStop{position:1.0;color:"#fecc2f"}
}
border.color:'#000000'
border.width:2
Text{
anchors.fill:parent
anchors.margins:5
clip:true
wrapMode:Text.WordWrap
color:'#1f1f21'
font.pixelSize:12
text:facts
}
}
}
Rectangle{
anchors.right:parent.right
anchors.top:parent.top
anchors.rightMargin:2
anchors.topMargin:2
width:26
height:26
color:"#157efb"
border.color:Qt.lighter(color,1.1)
opacity:0
MouseArea{
anchors.fill:parent
onClicked:wrapper.state=""
}
}
//通过状态切换来更改界面控件的状态
states:[
State{
name:"expanded"
PropertyChanges{target:wrapper;height:listView.height}
PropertyChanges{target:image;width:listView.width;height:listView.width;anchors.rightMargin:0;anchors.topMargin:30}
PropertyChanges{target:factsView;opacity:1}
PropertyChanges{target:closeButton;opacity:1}
PropertyChanges{target:wrapper.ListView.view;contentY:wrapper.y;interactive:false}
}
]
transitions:[
Transition{
NumberAnimation{
duration:200;
properties:"height,width,anchors.rightMargin,anchors.topMargin,opacity,contentY"
}
}
]
}
}
}
}
显示效果如下图所示:
QML中动态与静态模型怎么应用的详细内容,希望对您有所帮助,信息来源于网络。