Android ViewBinding如何使用
导读:本文共14400字符,通常情况下阅读需要48分钟。同时您也可以点击右侧朗读,来听本文内容。按键盘←(左) →(右) 方向键可以翻页。
摘要:希望大家仔细阅读,能够学有所成!一、kotlin-android-extensions在使用ViewBinding之前,我们一直使用的是kotlin-android-extensions,使用kotlin-android-extensions可以节约很多写findViewById的时间。不过这个kotlin-android-extensions插件已经废弃了,简单说一下kotlin-android... ...
目录
(为您整理了一些要点),点击可以直达。希望大家仔细阅读,能够学有所成!
一、kotlin-android-extensions
在使用ViewBinding之前,我们一直使用的是kotlin-android-extensions,使用kotlin-android-extensions可以节约很多写findViewById的时间。不过这个kotlin-android-extensions插件已经废弃了,简单说一下kotlin-android-extensions存在的问题:
1.通过反编译kotlin-android-extensions的代码,发现会创建一个HashMap,用来存放所有的id和对应的View的缓存,如果缓存中没有View,那么就通过findViewById去创建并存入缓存,否则就直接获取。所以会存在内存问题。
privateHashMap_$findViewCache;
publicView$findCachedViewById(intvar1){
if(this.$findViewCache==null){
this.$findViewCache=newHashMap();
}
Viewvar2=(View)this.$findViewCache.get(var1);
if(var2==null){
Viewvar10000=this.getView();
if(var10000==null){
returnnull;
}
var2=var10000.findViewById(var1);
this.$findViewCache.put(var1,var2);
}
returnvar2;
}
publicvoid$clearFindViewByIdCache(){
if(this.$findViewCache!=null){
this.$findViewCache.clear();
}
}
//$FF:syntheticmethod
publicvoidonDestroyView(){
super.onDestroyView();
this.$_clearFindViewByIdCache();
}
2.由于kotlin-android-extensions是通过view的id名直接引用的,如果多个布局间的同名id,就需要手动对import进行重命名处理,如果引用错误的布局文件,就会出现crash。所以存在资源重名的问题。
3.只有Kotlin才可以使用。
所以ViewBinding优势有:java,kotlin都可以使用,可以有效避免NullPointerException。
二、ViewBinding使用
1.gradle配置
buildFeatures {
viewBinding true
}
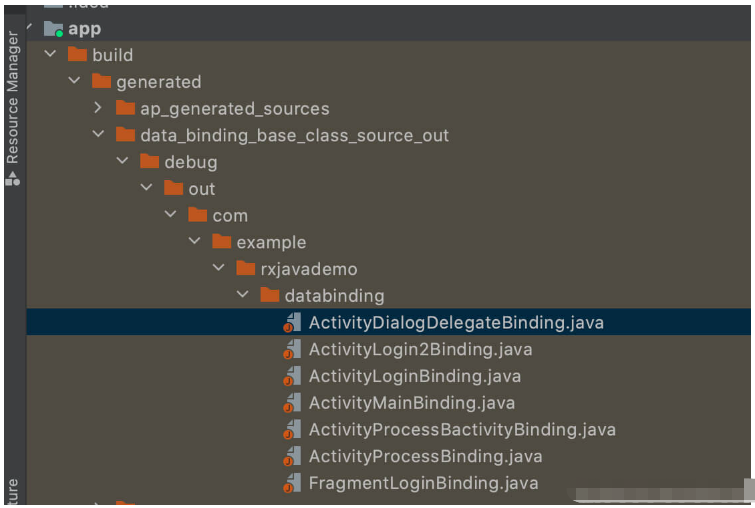
开启ViewBinding之后,在编译时,AGP会自动帮我们给每个xml布局创建一个Binding类,位于build/generated/data_binding_base_class_source_out/目录下。
publicfinalclassFragmentLoginBindingimplementsViewBinding{
@NonNull
privatefinalConstraintLayoutrootView;
@NonNull
publicfinalConstraintLayoutcontainer;
@NonNull
publicfinalProgressBarloading;
@NonNull
publicfinalButtonlogin;
@NonNull
publicfinalEditTextpassword;
@NonNull
publicfinalEditTextusername;
privateFragmentLoginBinding(@NonNullConstraintLayoutrootView,
@NonNullConstraintLayoutcontainer,@NonNullProgressBarloading,@NonNullButtonlogin,
@NonNullEditTextpassword,@NonNullEditTextusername){
this.rootView=rootView;
this.container=container;
this.loading=loading;
this.login=login;
this.password=password;
this.username=username;
}
@Override
@NonNull
publicConstraintLayoutgetRoot(){
returnrootView;
}
@NonNull
publicstaticFragmentLoginBindinginflate(@NonNullLayoutInflaterinflater){
returninflate(inflater,null,false);
}
@NonNull
publicstaticFragmentLoginBindinginflate(@NonNullLayoutInflaterinflater,
@NullableViewGroupparent,booleanattachToParent){
Viewroot=inflater.inflate(R.layout.fragment_login,parent,false);
if(attachToParent){
parent.addView(root);
}
returnbind(root);
}
@NonNull
publicstaticFragmentLoginBindingbind(@NonNullViewrootView){
//Thebodyofthismethodisgeneratedinawayyouwouldnototherwisewrite.
//Thisisdonetooptimizethecompiledbytecodeforsizeandperformance.
intid;
missingId:{
ConstraintLayoutcontainer=(ConstraintLayout)rootView;
id=R.id.loading;
ProgressBarloading=rootView.findViewById(id);
if(loading==null){
breakmissingId;
}
id=R.id.login;
Buttonlogin=rootView.findViewById(id);
if(login==null){
breakmissingId;
}
id=R.id.password;
EditTextpassword=rootView.findViewById(id);
if(password==null){
breakmissingId;
}
id=R.id.username;
EditTextusername=rootView.findViewById(id);
if(username==null){
breakmissingId;
}
returnnewFragmentLoginBinding((ConstraintLayout)rootView,container,loading,login,
password,username);
}
StringmissingId=rootView.getResources().getResourceName(id);
thrownewNullPointerException("MissingrequiredviewwithID:".concat(missingId));
}
}
注意:
1.因为这些类编译时就生成了,就不会占用运行时内存。
2.未使用的Binding文件会在混淆时被删除,所以对包大小影响很小。
3.编译器生成Binding文件是增量更新的。
那么如何不生成Binding类呢?tools:viewBindingIgnore="true"
<androidx.constraintlayout.widget.ConstraintLayoutxmlns:android="http://schemas.android.com/apk/res/android"
xmlns:app="http://schemas.android.com/apk/res-auto"
xmlns:tools="http://schemas.android.com/tools"
android:layout_width="match_parent"
android:layout_height="match_parent"
tools:viewBindingIgnore="true"
tools:context=".MainActivity">
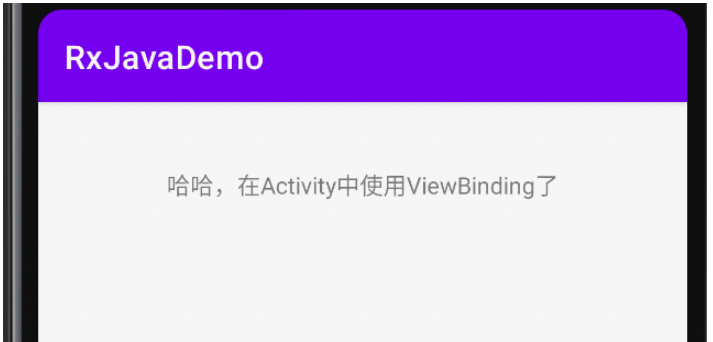
2.在Activity 使用
classTestViewBindingActivity:AppCompatActivity(){
privatelateinitvarbindding:ActivityTestViewBindingBinding
overridefunonCreate(savedInstanceState:Bundle?){
super.onCreate(savedInstanceState)
bindding=ActivityTestViewBindingBinding.inflate(layoutInflater)
setContentView(bindding.root)
changeText()
}
privatefunchangeText(){
bindding.titleTv.text="哈哈,在Activity中使用ViewBinding了"
}
}
<?xmlversion="1.0"encoding="utf-8"?>
<androidx.constraintlayout.widget.ConstraintLayoutxmlns:android="http://schemas.android.com/apk/res/android"
xmlns:app="http://schemas.android.com/apk/res-auto"
xmlns:tools="http://schemas.android.com/tools"
android:layout_width="match_parent"
android:layout_height="match_parent"
tools:context=".testviewbinding.TestViewBindingActivity">
<TextView
android:id="@+id/titleTv"
android:layout_width="match_parent"
android:layout_height="100dp"
android:gravity="center"
android:text="在Activity中使用ViewBinding"
app:layout_constraintStart_toStartOf="parent"
app:layout_constraintTop_toTopOf="parent"/>
</androidx.constraintlayout.widget.ConstraintLayout>
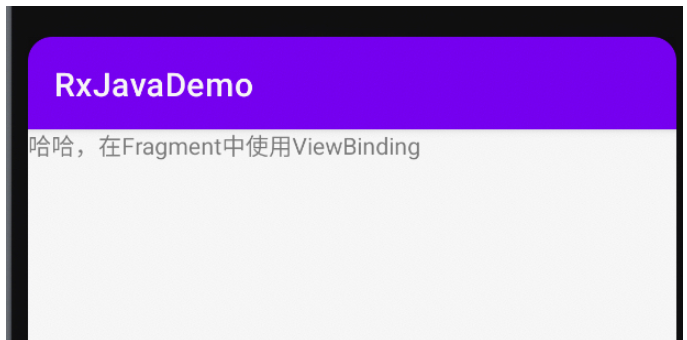
3.在Fragment使用
classTextViewBindingFragment:Fragment(){
privatevarparam1:String?=null
privatevarparam2:String?=null
privatevar_binding:FragmentTextViewBindingBinding?=null
privatevalbindingget()=_binding!!
overridefunonCreate(savedInstanceState:Bundle?){
super.onCreate(savedInstanceState)
arguments?.let{
param1=it.getString(ARG_PARAM1)
param2=it.getString(ARG_PARAM2)
}
}
overridefunonCreateView(
inflater:LayoutInflater,container:ViewGroup?,
savedInstanceState:Bundle?
):View?{
_binding=FragmentTextViewBindingBinding.inflate(layoutInflater,container,false)
returnbinding.root
}
overridefunonViewCreated(view:View,savedInstanceState:Bundle?){
super.onViewCreated(view,savedInstanceState)
changeText()
}
privatefunchangeText(){
binding.tvTitle.text="哈哈,在Fragment中使用ViewBinding"
}
overridefunonDestroyView(){
super.onDestroyView()
_binding=null
}
companionobject{
@JvmStatic
funnewInstance(param1:String,param2:String)=
TextViewBindingFragment().apply{
arguments=Bundle().apply{
putString(ARG_PARAM1,param1)
putString(ARG_PARAM2,param2)
}
}
@JvmStatic
funnewInstance()=TextViewBindingFragment()
}
}
classTestViewBindingActivity:AppCompatActivity(){
privatelateinitvarbindding:ActivityTestViewBindingBinding
overridefunonCreate(savedInstanceState:Bundle?){
super.onCreate(savedInstanceState)
bindding=ActivityTestViewBindingBinding.inflate(layoutInflater)
setContentView(bindding.root)
valnewInstance=TextViewBindingFragment.newInstance()
addFragment(
supportFragmentManager,
newInstance,
isAllowStateLoss=true,
frameId=R.id.fragmentFrame
)
}
}<?xmlversion="1.0"encoding="utf-8"?>
<FrameLayoutxmlns:android="http://schemas.android.com/apk/res/android"
xmlns:tools="http://schemas.android.com/tools"
android:layout_width="match_parent"
android:layout_height="match_parent"
tools:context=".testviewbinding.TextViewBindingFragment">
<TextView
android:id="@+id/tvTitle"
android:layout_width="match_parent"
android:layout_height="match_parent"
android:text="在Fragment中"/>
</FrameLayout>
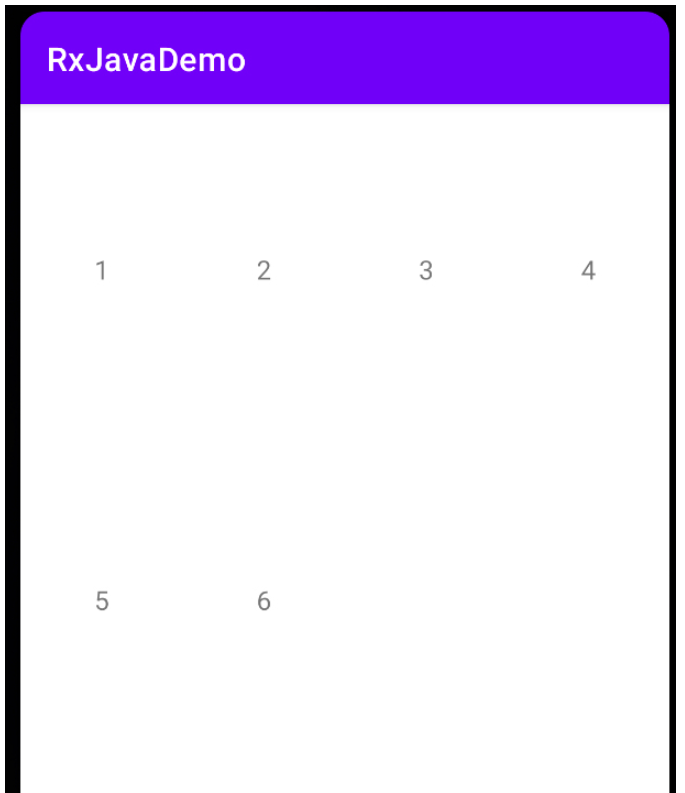
4.在Adapter中使用
classTestAdapterActivity:AppCompatActivity(){
privatelateinitvarbinding:ActivityTestAdapterBinding
overridefunonCreate(savedInstanceState:Bundle?){
super.onCreate(savedInstanceState)
binding=ActivityTestAdapterBinding.inflate(layoutInflater)
setContentView(binding.root)
initView()
}
companionobject{
valITEMS=mutableListOf<String>("1","2","3","4","5","6")
}
privatefuninitView(){
with(binding.contentRcycler){
layoutManager=GridLayoutManager(context,4)
adapter=TestRecyclerViewAdapter(ITEMS)
}
}
}
<?xmlversion="1.0"encoding="utf-8"?>
<androidx.constraintlayout.widget.ConstraintLayoutxmlns:android="http://schemas.android.com/apk/res/android"
xmlns:tools="http://schemas.android.com/tools"
android:layout_width="match_parent"
android:layout_height="match_parent"
tools:context=".testviewbinding.TestAdapterActivity">
<androidx.recyclerview.widget.RecyclerView
android:id="@+id/contentRcycler"
android:layout_width="match_parent"
android:layout_height="match_parent"/>
</androidx.constraintlayout.widget.ConstraintLayout>
classTestRecyclerViewAdapter(privatevalvalues:List<String>):
RecyclerView.Adapter<TestRecyclerViewAdapter.ViewHolder>(){
innerclassViewHolder(binding:RecyclerItemLayoutBinding):
RecyclerView.ViewHolder(binding.root){
valtextTv=binding.contentTv
}
overridefunonCreateViewHolder(parent:ViewGroup,viewType:Int):ViewHolder{
returnViewHolder(
RecyclerItemLayoutBinding.inflate(
LayoutInflater.from(parent.context),
parent,
false
)
)
}
overridefunonBindViewHolder(holder:ViewHolder,position:Int){
valitem=values[position]
holder.textTv.text=item
}
overridefungetItemCount():Int=values.size
}
<?xmlversion="1.0"encoding="utf-8"?>
<androidx.constraintlayout.widget.ConstraintLayoutxmlns:android="http://schemas.android.com/apk/res/android"
xmlns:tools="http://schemas.android.com/tools"
android:layout_width="match_parent"
android:layout_height="200dp">
<TextView
android:id="@+id/contentTv"
android:layout_width="match_parent"
android:layout_height="match_parent"
android:gravity="center"
android:textSize="16dp"
tools:text="99"/>
</androidx.constraintlayout.widget.ConstraintLayout>
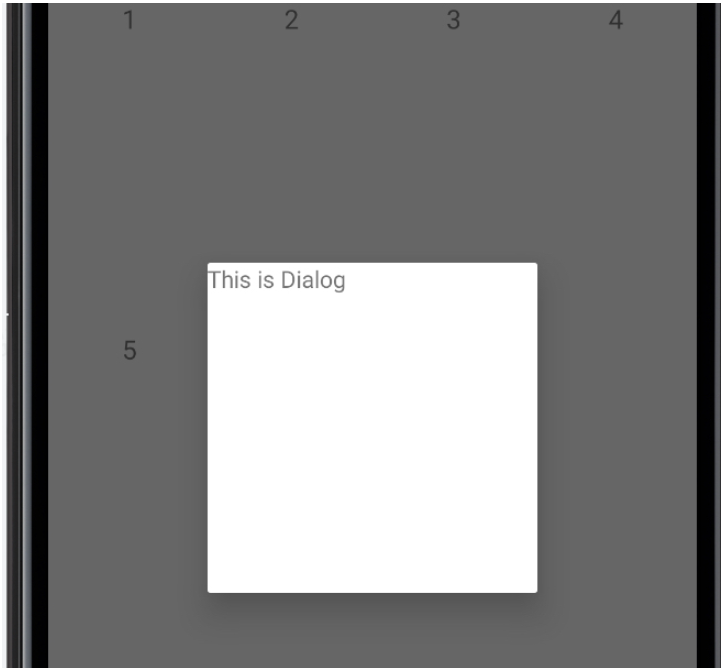
5.在Dialog中使用
classCommonDialog(context:Context):Dialog(context){
overridefunonCreate(savedInstanceState:Bundle?){
super.onCreate(savedInstanceState)
setContentView(DialogLayoutBinding.inflate(layoutInflater).root)
}
}
<?xmlversion="1.0"encoding="utf-8"?>
<androidx.constraintlayout.widget.ConstraintLayoutxmlns:android="http://schemas.android.com/apk/res/android"
xmlns:app="http://schemas.android.com/apk/res-auto"
android:layout_width="match_parent"
android:layout_height="match_parent">
<TextView
android:id="@+id/dialogContent"
android:layout_width="200dp"
android:layout_height="200dp"
android:text="ThisisDialog"
app:layout_constraintBottom_toBottomOf="parent"
app:layout_constraintEnd_toEndOf="parent"
app:layout_constraintStart_toStartOf="parent"
app:layout_constraintTop_toTopOf="parent"/>
</androidx.constraintlayout.widget.ConstraintLayout>
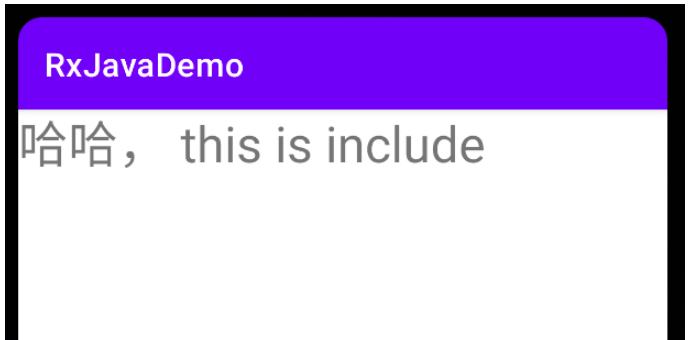
6.Include中使用
classTestIncludeActivity:AppCompatActivity(){
privatelateinitvarbinding:ActivityTestIncludeBinding
overridefunonCreate(savedInstanceState:Bundle?){
super.onCreate(savedInstanceState)
binding=ActivityTestIncludeBinding.inflate(layoutInflater)
setContentView(binding.root)
initView()
}
privatefuninitView(){
binding.itemInclude.itemContentTv.text="哈哈,thisisinclude"
}
}
<?xmlversion="1.0"encoding="utf-8"?>
<androidx.constraintlayout.widget.ConstraintLayoutxmlns:android="http://schemas.android.com/apk/res/android"
xmlns:tools="http://schemas.android.com/tools"
android:layout_width="match_parent"
android:layout_height="match_parent"
tools:context=".testviewbinding.TestIncludeActivity">
<include
android:id="@+id/itemInclude"
layout="@layout/item_layout"/>
</androidx.constraintlayout.widget.ConstraintLayout><?xmlversion="1.0"encoding="utf-8"?>
<androidx.constraintlayout.widget.ConstraintLayoutxmlns:android="http://schemas.android.com/apk/res/android"
xmlns:app="http://schemas.android.com/apk/res-auto"
android:layout_width="match_parent"
android:layout_height="match_parent">
<TextView
android:id="@+id/itemContentTv"
android:layout_width="match_parent"
android:layout_height="200dp"
android:text="Testinclude"
android:textSize="30sp"
app:layout_constraintStart_toStartOf="parent"
app:layout_constraintTop_toTopOf="parent"/>
</androidx.constraintlayout.widget.ConstraintLayout>
三、ViewBinding封装
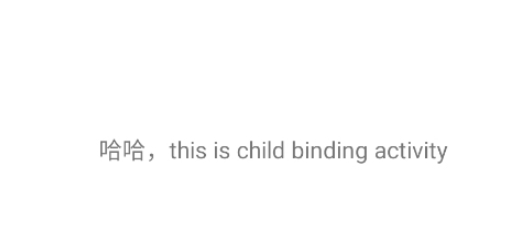
1.在BaseActivity中封装
abstractclassBaseViewBindingActivity<T:ViewBinding>:AppCompatActivity(){
protectedvalbindingbylazy{
getViewBinding()
}
overridefunonCreate(savedInstanceState:Bundle?){
super.onCreate(savedInstanceState)
setContentView(binding.root)
}
protectedabstractfungetViewBinding():T
}
classChildViewBindingMainActivity:
BaseViewBindingActivity<ActivityChildViewBindingMainBinding>(){
overridefunonCreate(savedInstanceState:Bundle?){
super.onCreate(savedInstanceState)
binding.titleTv.text="哈哈,thisischildbindingactivity"
}
overridefungetViewBinding():ActivityChildViewBindingMainBinding{
returnActivityChildViewBindingMainBinding.inflate(layoutInflater)
}
}
<?xmlversion="1.0"encoding="utf-8"?>
<androidx.constraintlayout.widget.ConstraintLayoutxmlns:android="http://schemas.android.com/apk/res/android"
xmlns:app="http://schemas.android.com/apk/res-auto"
xmlns:tools="http://schemas.android.com/tools"
android:layout_width="match_parent"
android:layout_height="match_parent"
tools:context=".encapsulatviewbinding.ChildViewBindingMainActivity">
<TextView
android:id="@+id/titleTv"
android:layout_width="match_parent"
android:layout_height="match_parent"
android:gravity="center"
android:text="36sp"/>
</androidx.constraintlayout.widget.ConstraintLayout>
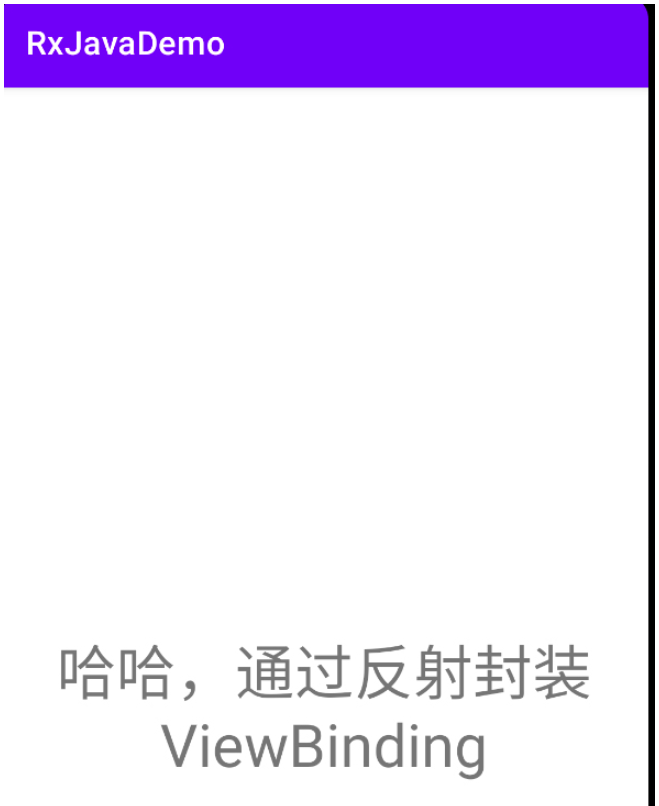
2.通过反射的方式封装
classTestViewBindingMainActivity:AppCompatActivity(){
privatevalbindingbyinflate<ActivityTestViewBindingMainBinding>()
overridefunonCreate(savedInstanceState:Bundle?){
super.onCreate(savedInstanceState)
binding.titleTv.text="哈哈,通过反射封装ViewBinding"
}
}
inlinefun<reifiedT:ViewBinding>inflateByViewBinding(layoutInflater:LayoutInflater)=
T::class.java.getMethod("inflate",LayoutInflater::class.java).invoke(null,layoutInflater)asT
inlinefun<reifiedT:ViewBinding>Activity.inflate()=lazy{
inflateByViewBinding<T>(layoutInflater).apply{
setContentView(root)
}
}
<?xmlversion="1.0"encoding="utf-8"?>
<androidx.constraintlayout.widget.ConstraintLayoutxmlns:android="http://schemas.android.com/apk/res/android"
xmlns:app="http://schemas.android.com/apk/res-auto"
xmlns:tools="http://schemas.android.com/tools"
android:layout_width="match_parent"
android:layout_height="match_parent"
tools:context=".encapsulatviewbinding.TestViewBindingMainActivity">
<TextView
android:id="@+id/titleTv"
android:layout_width="match_parent"
android:layout_height="match_parent"
android:gravity="center"
android:textSize="36sp"/>
</androidx.constraintlayout.widget.ConstraintLayout>
3.反射+基类
1.在Activity 中使用
abstractclassBaseBindingMainActivity2<T:ViewBinding>:AppCompatActivity(){
protectedlateinitvarbinding:T
overridefunonCreate(savedInstanceState:Bundle?){
super.onCreate(savedInstanceState)
valtype=javaClass.genericSuperclass
if(typeisParameterizedType){
valclazz=type.actualTypeArguments[0]asClass<T>
valmethod=clazz.getMethod("inflate",LayoutInflater::class.java)
binding=method.invoke(null,layoutInflater)asT
}
setContentView(binding.root)
}
}
classChildViewBindingMainActivity2:
BaseBindingMainActivity2<ActivityChildViewBindingMain2Binding>(){
overridefunonCreate(savedInstanceState:Bundle?){
super.onCreate(savedInstanceState)
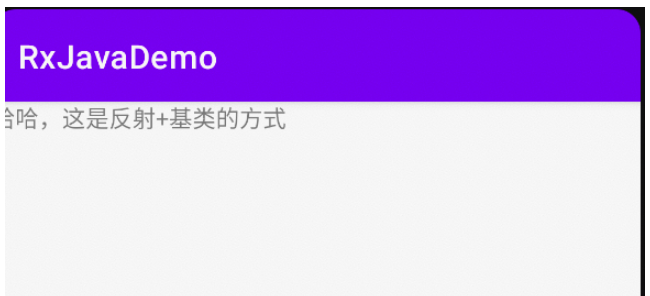
binding.titleTv.text="哈哈,这是反射+基类的方式"
}
}
<?xmlversion="1.0"encoding="utf-8"?>
<androidx.constraintlayout.widget.ConstraintLayoutxmlns:android="http://schemas.android.com/apk/res/android"
xmlns:tools="http://schemas.android.com/tools"
android:layout_width="match_parent"
android:layout_height="match_parent"
tools:context=".encapsulatviewbinding.ChildViewBindingMainActivity2">
<TextView
android:id="@+id/titleTv"
android:layout_width="match_parent"
android:layout_height="match_parent"/>
</androidx.constraintlayout.widget.ConstraintLayout>
2.在Fragment中使用
abstractclassBaseBindingViewFragment<T:ViewBinding>:Fragment(){
privatevar_binding:T?=null
protectedvalbindingget()=_binding!!
overridefunonCreateView(
inflater:LayoutInflater,container:ViewGroup?,
savedInstanceState:Bundle?
):View?{
valtype=javaClass.genericSuperclass
valclazz=(typeasParameterizedType).actualTypeArguments[0]asClass<T>
valmethod=clazz.getMethod(
"inflate",
LayoutInflater::class.java,
ViewGroup::class.java,
Boolean::class.java
)
_binding=method.invoke(null,layoutInflater,container,false)asT
this.viewLifecycleOwner.lifecycle.addObserver(object:LifecycleEventObserver{
overridefunonStateChanged(source:LifecycleOwner,event:Lifecycle.Event){
if(event==Lifecycle.Event.ON_DESTROY){
Log.v(TAG,"onDestroybindingbenull")
_binding=null
}
}
})
returnbinding.root
}
companionobject{
constvalTAG="BaseBindingViewFragment"
}
}
classChildBindingFragment:BaseBindingViewFragment<FragmentChildBindingBinding>(){
overridefunonCreateView(
inflater:LayoutInflater,container:ViewGroup?,
savedInstanceState:Bundle?
):View?{
returnsuper.onCreateView(inflater,container,savedInstanceState)
}
companionobject{
@JvmStatic
funnewInstance()=ChildBindingFragment()
}
}classTestBindingMainActivity3:BaseBindingMainActivity2<ActivityTestBindingMain3Binding>(){
overridefunonCreate(savedInstanceState:Bundle?){
super.onCreate(savedInstanceState)
valnewInstance=ChildBindingFragment.newInstance()
addFragment(
supportFragmentManager,
newInstance,
isAllowStateLoss=true,
frameId=R.id.frame
)
}
}<?xmlversion="1.0"encoding="utf-8"?>
<FrameLayoutxmlns:android="http://schemas.android.com/apk/res/android"
xmlns:tools="http://schemas.android.com/tools"
android:layout_width="match_parent"
android:layout_height="match_parent"
tools:context=".encapsulatviewbinding.ChildBindingFragment">
<TextView
android:layout_width="match_parent"
android:layout_height="match_parent"
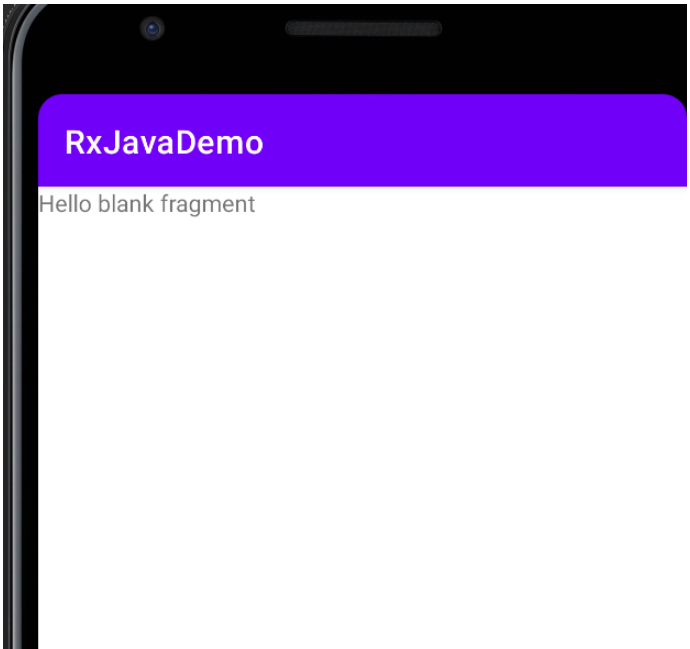
android:text="@string/hello_blank_fragment"/>
</FrameLayout>
4.委托的方式
classTestViewBindingFragment2:Fragment(R.layout.fragment_test_view_binding2){
privatevalbindingbyinflate<FragmentTestViewBinding2Binding>()
overridefunonViewCreated(view:View,savedInstanceState:Bundle?){
super.onViewCreated(view,savedInstanceState)
binding.root
}
companionobject{
@JvmStatic
funnewInstance()=TestViewBindingFragment2()
}
}
inlinefun<reifiedT:ViewBinding>Fragment.inflate()=
FragmentViewBindingDelegate(T::class.java)
classFragmentViewBindingDelegate<T:ViewBinding>(privatevalclazz:Class<T>):
ReadOnlyProperty<Fragment,T>{
privatevarbinding:T?=null
overridefungetValue(thisRef:Fragment,property:KProperty<*>):T{
if(binding==null){
binding=
clazz.getMethod("bind",View::class.java).invoke(null,thisRef.requireView())asT
thisRef.viewLifecycleOwner.lifecycle.addObserver(object:LifecycleEventObserver{
overridefunonStateChanged(source:LifecycleOwner,event:Lifecycle.Event){
if(event==Lifecycle.Event.ON_DESTROY){
binding=null
}
}
})
}
returnbinding!!
}
}
<?xmlversion="1.0"encoding="utf-8"?>
<FrameLayoutxmlns:android="http://schemas.android.com/apk/res/android"
xmlns:tools="http://schemas.android.com/tools"
android:layout_width="match_parent"
android:layout_height="match_parent"
tools:context=".encapsulatviewbinding.TestViewBindingFragment2">
<TextView
android:layout_width="match_parent"
android:layout_height="match_parent"
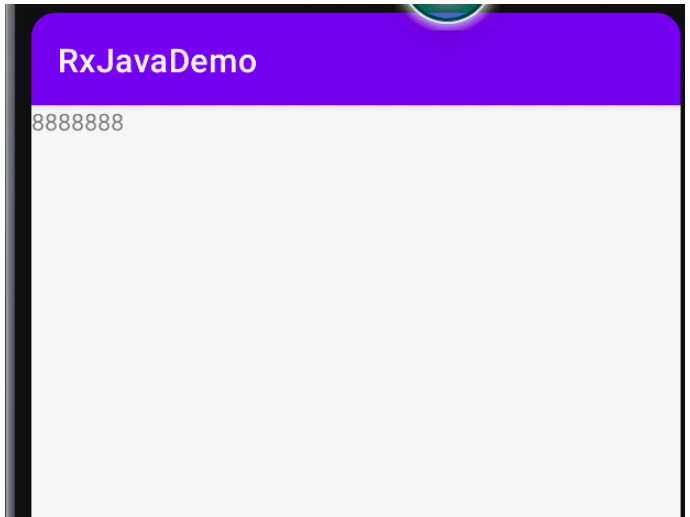
android:text="8888888"/>
</FrameLayout>
Android ViewBinding如何使用的详细内容,希望对您有所帮助,信息来源于网络。