Java 反编译工具对比
导读:本文共19638字符,通常情况下阅读需要65分钟。同时您也可以点击右侧朗读,来听本文内容。按键盘←(左) →(右) 方向键可以翻页。
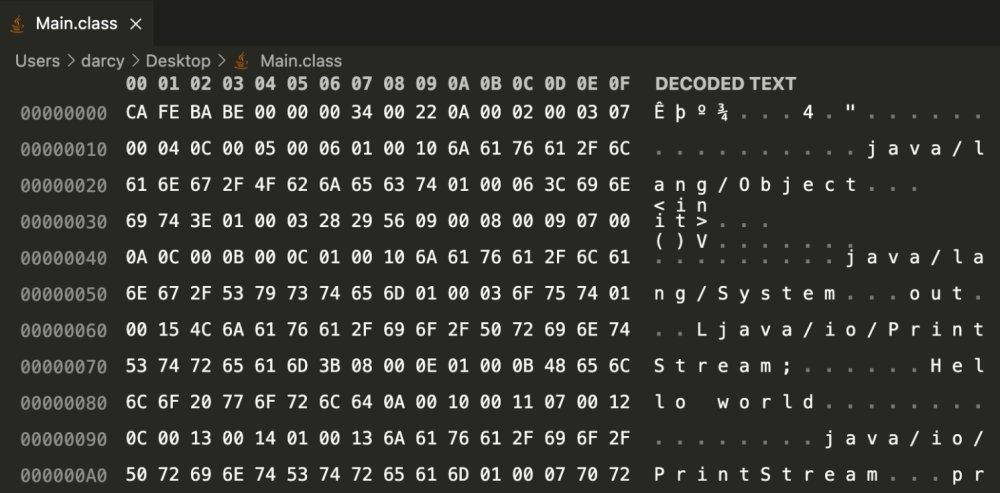
摘要:接下来,请跟着小编一起来学习吧!前言Java 反编译,一听可能觉得高深莫测,其实反编译并不是什么特别高级的操作,Java 对于 Class 字节码文件的生成有着严格的要求,如果你非常熟悉 Java 虚拟机规范,了解 Class 字节码文件中一些字节的作用,那么理解反编译的原理并不是什么问题。 甚至像下面这样的 Class 文件你都能看懂一二。一般在逆向研究和代码分析中,反编译用到的比较多。不过在日... ...
目录
(为您整理了一些要点),点击可以直达。接下来,请跟着小编一起来学习吧!
前言
Java 反编译,一听可能觉得高深莫测,其实反编译并不是什么特别高级的操作,Java 对于 Class 字节码文件的生成有着严格的要求,如果你非常熟悉 Java 虚拟机规范,了解 Class 字节码文件中一些字节的作用,那么理解反编译的原理并不是什么问题。 甚至像下面这样的 Class 文件你都能看懂一二。
一般在逆向研究和代码分析中,反编译用到的比较多。不过在日常开发中,有时候只是简单的看一下所用依赖类的反编译,也是十分重要的。
恰好最近工作中也需要用到 Java 反编译,所以这篇文章介绍目前常见的的几种 Java 反编译工具的使用,在文章的最后也会通过编译速度、语法支持以及代码可读性三个维度,对它们进行测试,分析几款工具的优缺点。
<!-- more -->
Procyon
Github 链接:https://github.com/mstrobel/procyon
Procyon 不仅仅是反编译工具,它其实是专注于 Java 代码的生成和分析的一整套的 Java 元编程工具。 主要包括下面几个部分:
Core Framework
Reflection Framework
Expressions Framework
Compiler Toolset (Experimental)
Java Decompiler (Experimental)
可以看到反编译只是 Procyon 的其中一个模块,Procyon 原来托管于 bitbucket,后来迁移到了 GitHub,根据 GitHub 的提交记录来看,也有将近两年没有更新了。不过也有依赖 Procyon 的其他的开源反编译工具如 decompiler-procyon,更新频率还是很高的,下面也会选择这个工具进行反编译测试。
使用 Procyon
<!--https://mvnrepository.com/artifact/org.jboss.windup.decompiler/decompiler-procyon-->
<dependency>
<groupid>org.jboss.windup.decompiler</groupid>
<artifactid>decompiler-procyon</artifactid>
<version>5.1.4.Final</version>
</dependency>
写一个简单的反编译测试。
packagecom.wdbyte.decompiler;importjava.io.IOException;
importjava.nio.file.Path;
importjava.nio.file.Paths;
importjava.util.Iterator;
importjava.util.List;importorg.jboss.windup.decompiler.api.DecompilationFailure;
importorg.jboss.windup.decompiler.api.DecompilationListener;
importorg.jboss.windup.decompiler.api.DecompilationResult;
importorg.jboss.windup.decompiler.api.Decompiler;
importorg.jboss.windup.decompiler.procyon.ProcyonDecompiler;/*
Procyon反编译测试

@authorhttps://github.com/niumoo
@date2021/05/15
/
publicclassProcyonTest{
publicstaticvoidmain(String[]args)throwsIOException{
Longtime=procyon("decompiler.jar","procyon_output_jar");
System.out.println(String.format("decompilertime:%dms",time));
}
publicstaticLongprocyon(Stringsource,StringtargetPath)throwsIOException{
longstart=System.currentTimeMillis();
PathoutDir=Paths.get(targetPath);
Patharchive=Paths.get(source);
Decompilerdec=newProcyonDecompiler();
DecompilationResultres=dec.decompileArchive(archive,outDir,newDecompilationListener(){
publicvoiddecompilationProcessComplete(){
System.out.println("decompilationProcessComplete");
}
publicvoiddecompilationFailed(List<string>inputPath,Stringmessage){
System.out.println("decompilationFailed");
}
publicvoidfileDecompiled(List<string>inputPath,StringoutputPath){
}
publicbooleanisCancelled(){
returnfalse;
}
});if(!res.getFailures().isEmpty()){
StringBuildersb=newStringBuilder();
sb.append("Faileddecompilationof"+res.getFailures().size()+"classes:");
IteratorfailureIterator=res.getFailures().iterator();
while(failureIterator.hasNext()){
DecompilationFailuredex=(DecompilationFailure)failureIterator.next();
sb.append(System.lineSeparator()+"").append(dex.getMessage());
}
System.out.println(sb.toString());
}
System.out.println("Compilationresults:"+res.getDecompiledFiles().size()+"succeeded,"+res.getFailures().size()+"failed.");
dec.close();
Longend=System.currentTimeMillis();
returnend-start;
}
}
Procyon 在反编译时会实时输出反编译文件数量的进度情况,最后还会统计反编译成功和失败的 Class 文件数量。
....
五月15,202110:58:28下午org.jboss.windup.decompiler.procyon.ProcyonDecompiler$3call
信息:Decompiling650/783
五月15,202110:58:30下午org.jboss.windup.decompiler.procyon.ProcyonDecompiler$3call
信息:Decompiling700/783
五月15,202110:58:37下午org.jboss.windup.decompiler.procyon.ProcyonDecompiler$3call
信息:Decompiling750/783
decompilationProcessComplete
Compilationresults:783succeeded,0failed.
decompilertime:40599ms
Procyon GUI
对于 Procyon 反编译来说,在 GitHub 上也有基于此实现的开源 GUI 界面,感兴趣的可以下载尝试。
Github 地址:https://github.com/deathmarine/Luyten
CFR
GitHub 地址:https://github.com/leibnitz27/cfr
CFR 官方网站:http://www.benf.org/other/cfr/(可能需要FQ)
Maven 仓库: https://mvnrepository.com/artifact/org.benf/cfr
CFR(Class File Reader) 可以支持 Java 9、Java 12、Java 14 以及其他的最新版 Java 代码的反编译工作。而且 CFR 本身的代码是由 Java 6 编写,所以基本可以使用 CFR 在任何版本的 Java 程序中。值得一提的是,使用 CFR 甚至可以将使用其他语言编写的的 JVM 类文件反编译回 Java 文件。
CFR 命令行使用
使用 CFR 反编译时,你可以下载已经发布的 JAR 包,进行命令行反编译,也可以使用 Maven 引入的方式,在代码中使用。下面先说命令行运行的方式。
直接在 GitHub Tags 下载已发布的最新版 JAR. 可以直接运行查看帮助。
#查看帮助
java-jarcfr-0.151.jar--help
如果只是反编译某个 class.
#反编译class文件,结果输出到控制台
java-jarcfr-0.151.jarWindupClasspathTypeLoader.class反编译class文件,结果输出到out文件夹
java-jarcfr-0.151.jarWindupClasspathTypeLoader.class--outputpath./out
反编译某个 JAR.
#反编译jar文件,结果输出到output_jar文件夹
➜Desktopjava-jarcfr-0.151.jardecompiler.jar--outputdir./output_jar
Processingdecompiler.jar(usesilenttosilence)
Processingcom.strobel.assembler.metadata.ArrayTypeLoader
Processingcom.strobel.assembler.metadata.ParameterDefinition
Processingcom.strobel.assembler.metadata.MethodHandle
Processingcom.strobel.assembler.metadata.signatures.FloatSignature
.....
反编译结果会按照 class 的包路径写入到指定文件夹中。 
CFR 代码中使用
添加依赖这里不提。
<!--https://mvnrepository.com/artifact/org.benf/cfr-->
<dependency>
<groupid>org.benf</groupid>
<artifactid>cfr</artifactid>
<version>0.151</version>
</dependency>
实际上我在官方网站和 GitHub 上都没有看到具体的单元测试示例。不过没有关系,既然能在命令行运行,那么直接在 IDEA 中查看反编译后的 Main 方法入口,看下命令行是怎么执行的,就可以写出自己的单元测试了。
packagecom.wdbyte.decompiler;importjava.io.IOException;
importjava.util.ArrayList;
importjava.util.HashMap;
importjava.util.List;importorg.benf.cfr.reader.api.CfrDriver;
importorg.benf.cfr.reader.util.getopt.OptionsImpl;/*
CFRTest
@authorhttps://github.com/niumoo
@date2021/05/15
/
publicclassCFRTest{
publicstaticvoidmain(String[]args)throwsIOException{
Longtime=cfr("decompiler.jar","./cfr_output_jar");
System.out.println(String.format("decompilertime:%dms",time));
//decompilertime:11655ms
}
publicstaticLongcfr(Stringsource,StringtargetPath)throwsIOException{
Longstart=System.currentTimeMillis();
//sourcejar
List<string>files=newArrayList<>();
files.add(source);
//targetdir
HashMap<string,string>outputMap=newHashMap<>();
outputMap.put("outputdir",targetPath);OptionsImploptions=newOptionsImpl(outputMap);
CfrDrivercfrDriver=newCfrDriver.Builder().withBuiltOptions(options).build();
cfrDriver.analyse(files);
Longend=System.currentTimeMillis();
return(end-start);
}
}
JD-Core
GiHub 地址:https://github.com/java-decompiler/jd-core
JD-core 官方网址:https://java-decompiler.github.io/
JD-core 是一个的独立的 Java 库,可以用于 Java 的反编译,支持从 Java 1 至 Java 12 的字节码反编译,包括 Lambda 表达式、方式引用、默认方法等。知名的 JD-GUI 和 Eclipse 无缝集成反编译引擎就是 JD-core。 JD-core 提供了一些反编译的核心功能,也提供了单独的 Class 反编译方法,但是如果你想在自己的代码中去直接反编译整个 JAR 包,还是需要一些改造的,如果是代码中有匿名函数,Lambda 等,虽然可以直接反编译,不过也需要额外考虑。
使用 JD-core
<!--https://mvnrepository.com/artifact/org.jd/jd-core-->
<dependency>
<groupid>org.jd</groupid>
<artifactid>jd-core</artifactid>
<version>1.1.3</version>
</dependency>
为了可以反编译整个 JAR 包,使用的代码我做了一些简单改造,以便于最后一部分的对比测试,但是这个示例中没有考虑内部类,Lambda 等会编译出多个 Class 文件的情况,所以不能直接使用在生产中。
packagecom.wdbyte.decompiler;importjava.io.File;
importjava.io.IOException;
importjava.io.InputStream;
importjava.nio.file.Files;
importjava.nio.file.Path;
importjava.nio.file.Paths;
importjava.util.Enumeration;
importjava.util.HashMap;
importjava.util.jar.JarFile;
importjava.util.zip.ZipEntry;
importjava.util.zip.ZipFile;importorg.apache.commons.io.IOUtils;
importorg.apache.commons.lang3.StringUtils;
importorg.jd.core.v1.ClassFileToJavaSourceDecompiler;
importorg.jd.core.v1.api.loader.Loader;
importorg.jd.core.v1.api.printer.Printer;/*
@authorhttps://github.com/niumoo
@date2021/05/15
/
publicclassJDCoreTest{publicstaticvoidmain(String[]args)throwsException{
JDCoreDecompilerjdCoreDecompiler=newJDCoreDecompiler();
Longtime=jdCoreDecompiler.decompiler("decompiler.jar","jd_output_jar");
System.out.println(String.format("decompilertime:%dms",time));
}
}classJDCoreDecompiler{
privateClassFileToJavaSourceDecompilerdecompiler=newClassFileToJavaSourceDecompiler();
//存放字节码
privateHashMap<string,byte[]>classByteMap=newHashMap<>();/*
注意:没有考虑一个Java类编译出多个Class文件的情况。
@paramsource
@paramtarget
@return
@throwsException
/
publicLongdecompiler(Stringsource,Stringtarget)throwsException{
longstart=System.currentTimeMillis();
//解压
archive(source);
for(StringclassName:classByteMap.keySet()){
Stringpath=StringUtils.substringBeforeLast(className,"/");
Stringname=StringUtils.substringAfterLast(className,"/");
if(StringUtils.contains(name,"$")){
name=StringUtils.substringAfterLast(name,"$");
}
name=StringUtils.replace(name,".class",".java");
decompiler.decompile(loader,printer,className);
Stringcontext=printer.toString();
PathtargetPath=Paths.get(target+"/"+path+"/"+name);
if(!Files.exists(Paths.get(target+"/"+path))){
Files.createDirectories(Paths.get(target+"/"+path));
}
Files.deleteIfExists(targetPath);
Files.createFile(targetPath);
Files.write(targetPath,context.getBytes());
}
returnSystem.currentTimeMillis()-start;
}
privatevoidarchive(Stringpath)throwsIOException{
try(ZipFilearchive=newJarFile(newFile(path))){
Enumeration<!--?extendsZipEntry-->entries=archive.entries();
while(entries.hasMoreElements()){
ZipEntryentry=entries.nextElement();
if(!entry.isDirectory()){
Stringname=entry.getName();
if(name.endsWith(".class")){
byte[]bytes=null;
try(InputStreamstream=archive.getInputStream(entry)){
bytes=IOUtils.toByteArray(stream);
}
classByteMap.put(name,bytes);
}
}
}
}
}privateLoaderloader=newLoader(){
@Override
publicbyte[]load(StringinternalName){
returnclassByteMap.get(internalName);
}
@Override
publicbooleancanLoad(StringinternalName){
returnclassByteMap.containsKey(internalName);
}
};privatePrinterprinter=newPrinter(){
protectedstaticfinalStringTAB="";
protectedstaticfinalStringNEWLINE="\n";
protectedintindentationCount=0;
protectedStringBuildersb=newStringBuilder();
@OverridepublicStringtoString(){
StringtoString=sb.toString();
sb=newStringBuilder();
returntoString;
}
@Overridepublicvoidstart(intmaxLineNumber,intmajorVersion,intminorVersion){}
@Overridepublicvoidend(){}
@OverridepublicvoidprintText(Stringtext){sb.append(text);}
@OverridepublicvoidprintNumericConstant(Stringconstant){sb.append(constant);}
@OverridepublicvoidprintStringConstant(Stringconstant,StringownerInternalName){sb.append(constant);}
@OverridepublicvoidprintKeyword(Stringkeyword){sb.append(keyword);}
@OverridepublicvoidprintDeclaration(inttype,StringinternalTypeName,Stringname,Stringdescriptor){sb.append(name);}
@OverridepublicvoidprintReference(inttype,StringinternalTypeName,Stringname,Stringdescriptor,StringownerInternalName){sb.append(name);}
@Overridepublicvoidindent(){this.indentationCount++;}
@Overridepublicvoidunindent(){this.indentationCount--;}
@OverridepublicvoidstartLine(intlineNumber){for(inti=0;i<indentationcount;i++)sb.append(tab);}@overridepublicvoidendline(){sb.append(newline);extraline(intcount)while(count-->0)sb.append(NEWLINE);}
@OverridepublicvoidstartMarker(inttype){}
@OverridepublicvoidendMarker(inttype){}
};
}
JD-GUI
GitHub 地址:https://github.com/java-decompiler/jd-gui
JD-core 也提供了官方的 GUI 界面,需要的也可以直接下载尝试。 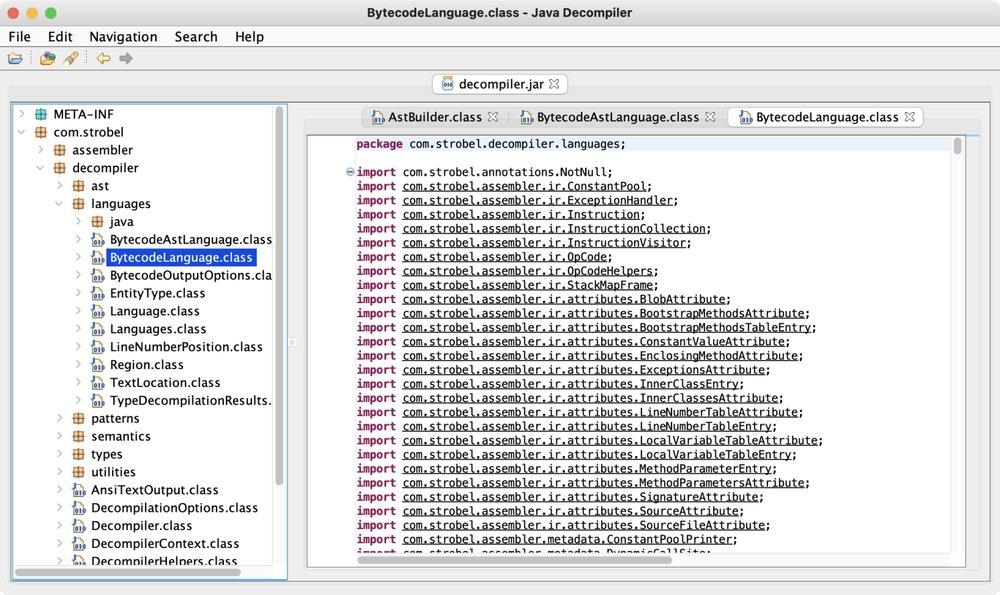
Jadx
GitHub 地址:https://github.com/skylot/jadx
Jadx 是一款可以反编译 JAR、APK、DEX、AAR、AAB、ZIP 文件的反编译工具,并且也配有 Jadx-gui 用于界面操作。 Jadx 使用 Grade 进行依赖管理,可以自行克隆仓库打包运行。
gitclonehttps://github.com/skylot/jadx.git
cdjadx
./gradlewdist查看帮助
./build/jadx/bin/jadx--help
jadx-dextojavadecompiler,version:dev
usage:jadx[options]<inputfiles>(.apk,.dex,.jar,.class,.smali,.zip,.aar,.arsc,.aab)
options:
-d,--output-dir-outputdirectory
-ds,--output-dir-src-outputdirectoryforsources
-dr,--output-dir-res-outputdirectoryforresources
-r,--no-res-donotdecoderesources
-s,--no-src-donotdecompilesourcecode
--single-class-decompileasingleclass
--output-format-canbe'java'or'json',default:java
-e,--export-gradle-saveasandroidgradleproject
-j,--threads-count-processingthreadscount,default:6
--show-bad-code-showinconsistentcode(incorrectlydecompiled)
--no-imports-disableuseofimports,alwayswriteentirepackagename
--no-debug-info-disabledebuginfo
--add-debug-lines-addcommentswithdebuglinenumbersifavailable
--no-inline-anonymous-disableanonymousclassesinline
--no-replace-consts-don'treplaceconstantvaluewithmatchingconstantfield
--escape-unicode-escapenonlatincharactersinstrings(with\u)
--respect-bytecode-access-modifiers-don'tchangeoriginalaccessmodifiers
--deobf-activatedeobfuscation
--deobf-min-minlengthofname,renamedifshorter,default:3
--deobf-max-maxlengthofname,renamediflonger,default:64
--deobf-cfg-file-deobfuscationmapfile,default:samedirandnameasinputfilewith'.jobf'extension
--deobf-rewrite-cfg-forcetosavedeobfuscationmap
--deobf-use-sourcename-usesourcefilenameasclassnamealias
--deobf-parse-kotlin-metadata-parsekotlinmetadatatoclassandpackagenames
--rename-flags-whattorename,comma-separated,'case'forsystemcasesensitivity,'valid'forjavaidentifiers,'printable'characters,'none'or'all'(default)
--fs-case-sensitive-treatfilesystemascasesensitive,falsebydefault
--cfg-savemethodscontrolflowgraphtodotfile
--raw-cfg-savemethodscontrolflowgraph(userawinstructions)
-f,--fallback-makesimpledump(usinggotoinsteadof'if','for',etc)
-v,--verbose-verboseoutput(set--log-leveltoDEBUG)
-q,--quiet-turnoffoutput(set--log-leveltoQUIET)
--log-level-setloglevel,values:QUIET,PROGRESS,ERROR,WARN,INFO,DEBUG,default:PROGRESS
--version-printjadxversion
-h,--help-printthishelp
Example:
jadx-doutclasses.dex
根据 HELP 信息,如果想要反编译 decompiler.jar 到 out 文件夹。
./build/jadx/bin/jadx-d./out~/Desktop/decompiler.jar
INFO-loading...
INFO-processing...
INFO-doneress:1143of1217(93%)
Fernflower
GitHub 地址:https://github.com/fesh0r/fernflower
Fernflower 和 Jadx 一样使用 Grade 进行依赖管理,可以自行克隆仓库打包运行。
➜fernflower-master./gradlewbuildBUILDSUCCESSFULin32s
4actionabletasks:4executed➜fernflower-masterjava-jarbuild/libs/fernflower.jar
Usage:java-jarfernflower.jar[-<option>=<value>]*[<source>]+<destination>
Example:java-jarfernflower.jar-dgs=truec:\my\source\c:\my.jard:\decompiled\➜fernflower-mastermkdirout
➜fernflower-masterjava-jarbuild/libs/fernflower.jar~/Desktop/decompiler.jar./out
INFO:Decompilingclasscom/strobel/assembler/metadata/ArrayTypeLoader
INFO:...done
INFO:Decompilingclasscom/strobel/assembler/metadata/ParameterDefinition
INFO:...done
INFO:Decompilingclasscom/strobel/assembler/metadata/MethodHandle
...➜fernflower-masterllout
total1288
-rw-r--r--1darcystaff595K51617:47decompiler.jar
➜fernflower-master
Fernflower 在反编译 JAR 包时,默认反编译的结果也是一个 JAR 包。Jad
反编译速度
到这里已经介绍了五款 Java 反编译工具了,那么在日常开发中我们应该使用哪一个呢?又或者在代码分析时我们又该选择哪一个呢?我想这两种情况的不同,使用时的关注点也是不同的。如果是日常使用,读读代码,我想应该是对可读性要求更高些,如果是大量的代码分析工作,那么可能反编译的速度和语法的支持上要求更高些。 为了能有一个简单的参考数据,我使用 JMH 微基准测试工具分别对这五款反编译工具进行了简单的测试,下面是一些测试结果。
测试环境
反编译 JAR 1:procyon-compilertools-0.5.33.jar (1.5 MB)
反编译 JAR 2: python2java4common-1.0.0-20180706.084921-1.jar (42 MB)
JAR 2 这个包是比较大的,是拿很多代码仓库合并到一起的,同时还有很多 Python 转 Java 生成的代码,理论上代码的复杂度会更高。
语法支持和可读性
如果反编译后的代码需要自己看的话,那么可读性更好的代码更占优势,下面我写了一些代码,主要是 Java 8 及以下的代码语法和一些嵌套的流程控制,看看反编译后的效果如何。
packagecom.wdbyte.decompiler;importjava.util.ArrayList;
importjava.util.List;
importjava.util.stream.IntStream;importorg.benf.cfr.reader.util.functors.UnaryFunction;
/*
@authorhttps://www.wdbyte.com
@date2021/05/16
/
publicclassHardCode<a,b>{
publicHardCode(Aa,Bb){}publicstaticvoidtest(int...args){}
publicstaticvoidmain(String...args){
test(1,2,3,4,5,6);
}intbyteAnd0(){
intb=1;
intx=0;
do{
b=(byte)((b^x));
}while(b++<10);
returnb;
}privatevoida(Integeri){
a(i);
b(i);
c(i);
}privatevoidb(inti){
a(i);
b(i);
c(i);
}privatevoidc(doubled){
c(d);
d(d);
}privatevoidd(Doubled){
c(d);
d(d);
}privatevoide(Shorts){
b(s);
c(s);
e(s);
f(s);
}privatevoidf(shorts){
b(s);
c(s);
e(s);
f(s);
}voidtest1(Stringpath){
try{
intx=3;
}catch(NullPointerExceptiont){
System.out.println("FileNotfound");
if(path==null){return;}
throwt;
}finally{
System.out.println("Fred");
if(path==null){thrownewIllegalStateException();}
}
}privatefinalList<integer>stuff=newArrayList<>();{
stuff.add(1);
stuff.add(2);
}publicstaticintplus(booleant,inta,intb){
intc=t?a:b;
returnc;
}//Lambda
IntegerlambdaInvoker(intarg,UnaryFunction<integer,integer>fn){
returnfn.invoke(arg);
}//Lambda
publicinttestLambda(){
returnlambdaInvoker(3,x->x+1);
//return1;
}//Lambda
publicIntegertestLambda(List<integer>stuff,inty,booleanb){
returnstuff.stream().filter(b?x->x>y:x->x<3).findFirst().orElse(null);
}//stream
publicstatic<yextendsinteger>voidtestStream(List<y>list){
IntStreams=list.stream()
.filter(x->{
System.out.println(x);
returnx.intValue()/2==0;
})
.map(x->(Integer)x+2)
.mapToInt(x->x);
s.toArray();
}//switch
publicvoidtestSwitch2(){
inti=0;
switch(((Long)(i+1L))+""){
case"1":
System.out.println("one");
}
}
//switch
publicvoidtestSwitch3(Stringstring){
switch(string){
case"apples":
System.out.println("apples");
break;
case"pears":
System.out.println("pears");
break;
}
}//switch
publicstaticvoidtestSwitch4(intx){
while(true){
if(x<5){
switch("test"){
case"okay":
continue;
default:
continue;
}
}
System.out.println("wowx2!");
}
}
}
此处本来贴出了所有工具的反编译结果,但是碍于文章长度和阅读体验,没有放出来,不过我在个人博客的发布上是有完整代码的,个人网站排版比较自由,可以使用 Tab 选项卡的方式展示。如果需要查看可以访问 https://www.wdbyte.com 进行查看。
Procyon
看到 Procyon 的反编译结果,还是比较吃惊的,在正常反编译的情况下,反编译后的代码基本上都是原汁原味。唯一一处反编译后和源码语法上有变化的地方,是一个集合的初始化操作略有不同。
//源码
publicHardCode(Aa,Bb){}
privatefinalList<integer>stuff=newArrayList<>();{
stuff.add(1);
stuff.add(2);
}
//Procyon反编译
privatefinalList<integer>stuff;publicHardCode(finalAa,finalBb){
(this.stuff=newArrayList<integer>()).add(1);
this.stuff.add(2);
}
而其他部分代码, 比如装箱拆箱,Switch 语法,Lambda 表达式,流式操作以及流程控制等,几乎完全一致,阅读没有障碍。
装箱拆箱操作反编译后完全一致,没有多余的类型转换代码。
//源码
privatevoida(Integeri){
a(i);
b(i);
c(i);
}privatevoidb(inti){
a(i);
b(i);
c(i);
}privatevoidc(doubled){
c(d);
d(d);
}privatevoidd(Doubled){
c(d);
d(d);
}privatevoide(Shorts){
b(s);
c(s);
e(s);
f(s);
}privatevoidf(shorts){
b(s);
c(s);
e(s);
f(s);
}
//Procyon反编译
privatevoida(finalIntegeri){
this.a(i);
this.b(i);
this.c(i);
}privatevoidb(finalinti){
this.a(i);
this.b(i);
this.c(i);
}privatevoidc(finaldoubled){
this.c(d);
this.d(d);
}privatevoidd(finalDoubled){
this.c(d);
this.d(d);
}privatevoide(finalShorts){
this.b(s);
this.c(s);
this.e(s);
this.f(s);
}privatevoidf(finalshorts){
this.b(s);
this.c(s);
this.e(s);
this.f(s);
}
Switch 部分也是一致,流程控制部分也没有变化。
//源码switch
publicvoidtestSwitch2(){
inti=0;
switch(((Long)(i+1L))+""){
case"1":
System.out.println("one");
}
}
publicvoidtestSwitch3(Stringstring){
switch(string){
case"apples":
System.out.println("apples");
break;
case"pears":
System.out.println("pears");
break;
}
}
publicstaticvoidtestSwitch4(intx){
while(true){
if(x<5){
switch("test"){
case"okay":
continue;
default:
continue;
}
}
System.out.println("wowx2!");
}
}
//Procyon反编译
publicvoidtestSwitch2(){
finalinti=0;
finalStringstring=(Object)(i+1L)+"";
switch(string){
case"1":{
System.out.println("one");
break;
}
}
}
publicvoidtestSwitch3(finalStringstring){
switch(string){
case"apples":{
System.out.println("apples");
break;
}
case"pears":{
System.out.println("pears");
break;
}
}
}
publicstaticvoidtestSwitch4(finalintx){
while(true){
if(x<5){
finalStrings="test";
switch(s){
case"okay":{
continue;
}
default:{
continue;
}
}
}
else{
System.out.println("wowx2!");
}
}
}
Lambda 表达式和流式操作完全一致。
//源码
//Lambda
publicIntegertestLambda(List<integer>stuff,inty,booleanb){
returnstuff.stream().filter(b?x->x>y:x->x<3).findFirst().orElse(null);
}//stream
publicstatic<yextendsinteger>voidtestStream(List<y>list){
IntStreams=list.stream()
.filter(x->{
System.out.println(x);
returnx.intValue()/2==0;
})
.map(x->(Integer)x+2)
.mapToInt(x->x);
s.toArray();
}
//Procyon反编译
publicIntegertestLambda(finalList<integer>stuff,finalinty,finalbooleanb){
returnstuff.stream().filter(b?(x->x>y):(x->x<3)).findFirst().orElse(null);
}publicstatic<yextendsinteger>voidtestStream(finalList<y>list){
finalIntStreams=list.stream().filter(x->{
System.out.println(x);
returnx/2==0;
}).map(x->x+2).mapToInt(x->x);
s.toArray();
}
流程控制,反编译后发现丢失了无意义的代码部分,阅读来说并无障碍。
//源码
voidtest1(Stringpath){
try{
intx=3;
}catch(NullPointerExceptiont){
System.out.println("FileNotfound");
if(path==null){return;}
throwt;
}finally{
System.out.println("Fred");
if(path==null){thrownewIllegalStateException();}
}
}
//Procyon反编译
voidtest1(finalStringpath){
try{}
catch(NullPointerExceptiont){
System.out.println("FileNotfound");
if(path==null){
return;
}
throwt;
}
finally{
System.out.println("Fred");
if(path==null){
thrownewIllegalStateException();
}
}
}
鉴于代码篇幅,下面几种的反编译结果的对比只会列出不同之处,相同之处会直接跳过。
CFR
CFR 的反编译结果多出了类型转换部分,个人来看没有 Procyon 那么原汁原味,不过也算是十分优秀,测试案例中唯一不满意的地方是对 while continue 的处理。
//CFR反编译结果
//装箱拆箱
privatevoide(Shorts){
this.b(s.shortValue());//装箱拆箱多出了类型转换部分。
this.c(s.shortValue());//装箱拆箱多出了类型转换部分。
this.e(s);
this.f(s);
}
//流程控制
voidtest1(Stringpath){
try{
intn=3;//流程控制反编译结果十分满意,原汁原味,甚至此处的无意思代码都保留了。
}
catch(NullPointerExceptiont){
System.out.println("FileNotfound");
if(path==null){
return;
}
throwt;
}
finally{
System.out.println("Fred");
if(path==null){
thrownewIllegalStateException();
}
}
}
//Lambda和Stream操作完全一致,不提。
//switch处,反编译后功能一致,但是流程控制有所更改。
publicstaticvoidtestSwitch4(intx){
block6:while(true){//源码中只有while(true),反编译后多了block6
if(x<5){
switch("test"){
case"okay":{
continueblock6;//多了block6
}
}
continue;
}
System.out.println("wowx2!");
}
}
JD-Core
JD-Core 和 CFR 一样,对于装箱拆箱操作,反编译后不再一致,多了类型转换部分,而且自动优化了数据类型。个人感觉,如果是反编译后自己阅读,通篇的数据类型的转换优化影响还是挺大的。
//JD-Core反编译
privatevoidd(Doubled){
c(d.doubleValue());//新增了数据类型转换
d(d);
}privatevoide(Shorts){
b(s.shortValue());//新增了数据类型转换
c(s.shortValue());//新增了数据类型转换
e(s);
f(s.shortValue());//新增了数据类型转换
}privatevoidf(shorts){
b(s);
c(s);
e(Short.valueOf(s));//新增了数据类型转换
f(s);
}
//Stream操作中,也自动优化了数据类型转换,阅读起来比较累。
publicstatic<yextendsinteger>voidtestStream(List<y>list){
IntStreams=list.stream().filter(x->{
System.out.println(x);
return(x.intValue()/2==0);
}).map(x->Integer.valueOf(x.intValue()+2)).mapToInt(x->x.intValue());
s.toArray();
}
Jadx
首先 Jadx 在反编译测试代码时,报出了错误,反编译的结果里也有提示不能反编 Lambda 和 Stream 操作,反编译结果中变量名称杂乱无章,流程控制几乎阵亡,如果你想反编译后生物肉眼阅读,Jadx 肯定不是一个好选择。
//Jadx反编译
privatevoide(Shorts){
b(s.shortValue());//新增了数据类型转换
c((double)s.shortValue());//新增了数据类型转换
e(s);
f(s.shortValue());//新增了数据类型转换
}privatevoidf(shorts){
b(s);
c((double)s);//新增了数据类型转换
e(Short.valueOf(s));//新增了数据类型转换
f(s);
}
publicinttestLambda(){//testLambda反编译失败
/
r2=this;
r0=3
r1=move-result
java.lang.Integerr0=r2.lambdaInvoker(r0,r1)
intr0=r0.intValue()
returnr0
/
thrownewUnsupportedOperationException("Methodnotdecompiled:com.wdbyte.decompiler.HardCode.testLambda():int");
}
//Stream反编译失败
publicstatic<yextendsjava.lang.integer>voidtestStream(java.util.List<y>r3){
/
java.util.stream.Streamr1=r3.stream()
r2=move-result
java.util.stream.Streamr1=r1.filter(r2)
r2=move-result
java.util.stream.Streamr1=r1.map(r2)
r2=move-result
java.util.stream.IntStreamr0=r1.mapToInt(r2)
r0.toArray()
return
/
thrownewUnsupportedOperationException("Methodnotdecompiled:com.wdbyte.decompiler.HardCode.testStream(java.util.List):void");
}
publicvoidtestSwitch3(Stringstring){//switch操作无法正常阅读,和源码出入较大。
charc=65535;
switch(string.hashCode()){
case-1411061671:
if(string.equals("apples")){
c=0;
break;
}
break;
case106540109:
if(string.equals("pears")){
c=1;
break;
}
break;
}
switch(c){
case0:
System.out.println("apples");
return;
case1:
System.out.println("pears");
return;
default:
return;
}
}
Fernflower
Fernflower 的反编译结果总体上还是不错的,不过也有不足,它对变量名称的指定,以及 Switch 字符串时的反编译结果不够理想。
//反编译后变量命名不利于阅读,有很多var变量
intbyteAnd0(){
intb=1;
bytex=0;bytevar10000;
do{
intb=(byte)(b^x);
var10000=b;
b=b+1;
}while(var10000<10);returnb;
}
//switch反编译结果使用了hashCode
publicstaticvoidtestSwitch4(intx){
while(true){
if(x<5){
Stringvar1="test";
bytevar2=-1;
switch(var1.hashCode()){
case3412756:
if(var1.equals("okay")){
var2=0;
}
default:
switch(var2){
case0:
}
}
}else{
System.out.println("wowx2!");
}
}
}
总结
五种反编译工具比较下来,结合反编译速度和代码可读性测试,看起来 CFR 工具胜出,Procyon 紧随其后。CFR 在速度上不落下风,在反编译的代码可读性上,是最好的,主要体现在反编译后的变量命名、装箱拆箱、类型转换,流程控制上,以及对 Lambda 表达式、Stream 流式操作和 Switch 的语法支持上,都非常优秀。根据 CFR 官方介绍,已经支持到 Java 14 语法,而且截止写这篇测试文章时,CFR 最新提交代码时间实在 11 小时之前,更新速度很快。
文章中部分代码已经上传 GitHub :github.com/niumoo/lab-notes/tree/master/java-decompiler
若想继续学习更多相关知识,请继续关注网站,小编会继续努力为大家带来更多实用的文章!Java 反编译工具对比的详细内容,希望对您有所帮助,信息来源于网络。